Desserts · Part 1 of 3: Ingredients
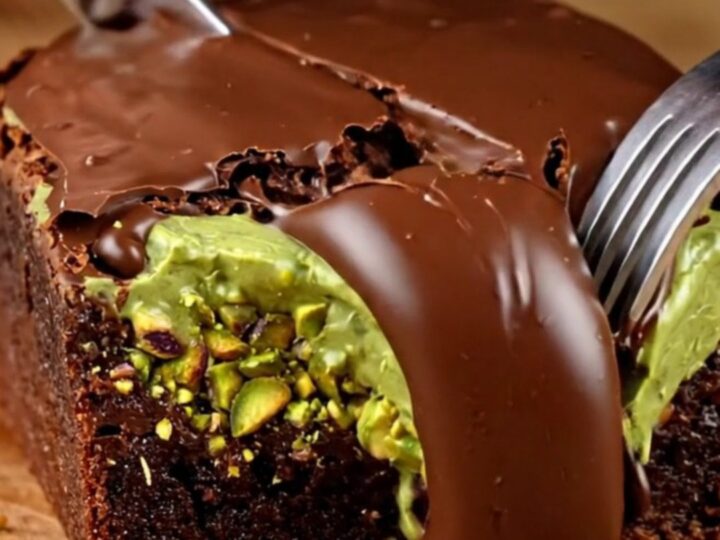
Fudgy Dubai Chocolate Brownies with Crispy Pistachio Kataifi
- Prep
- Cook
- Total
- Serves
- 9
Transform your standard brownie into a luxurious, multi-textured masterpiece. By combining the deep, fudgy richness of a classic chocolate brownie with the unmistakable, buttery crunch of toasted kataifi and smooth pistachio cream, you create a dessert that is truly unmatched.
This recipe brings a sophisticated, viral-inspired twist to your home kitchen, ensuring every bite provides a satisfying snap and a melt-in-your-mouth finish that will delight anyone who loves the combination of chocolate and nuts.
This dessert relies on the interplay of textures to elevate simple ingredients into something extraordinary. The base is a dense, fudgy brownie that provides a soft, chocolatey foundation. Above it, a generous layer of toasted kataifi threads mixed with creamy pistachio paste introduces a dramatic, crispy contrast.
Finally, a thin, glossy layer of dark chocolate provides a clean, snappy finish. This combination is designed for those who appreciate the balance between soft and crunchy elements, providing a professional-level culinary experience with accessible techniques.
Ingredients
Brownie Base
- 1 batch brownie batter containing eggs, prepared from your favorite recipe
Pistachio Crunch
- 2 cups kataifi threads, toasted until golden
- 1 cup Sicilian pistachio cream
- 1 tbsp coconut oil, melted
Topping
- 6 oz dark chocolate, melted
Why this recipe works
The method of layering works because it respects the structural integrity of each component. By baking the brownie first and allowing it to cool, you create a stable base that can support the weight of the pistachio-kataifi topping.
The kataifi is toasted beforehand to ensure it retains its crispiness even when combined with the pistachio cream, which acts as a flavorful binder. This ensures that the crunch remains consistent throughout the entire eating experience, rather than becoming soft or soggy over time.
The final step of adding a melted chocolate shell acts as a protective barrier and a textural highlight. When this chocolate layer is chilled, it forms a firm, glossy surface that provides an audible snap when cut or bitten into.
This contrast is the defining feature of the dish, separating it from standard brownies. The cooling time is critical, as it allows the fats in the chocolate and the pistachio cream to set, resulting in a clean slice and a professional presentation.
Notes and substitutions
For the brownie base, use your preferred recipe, ensuring it is a dense, fudgy version rather than a cake-like one. The quality of the pistachio cream significantly impacts the final result, so choose a high-quality product with a high pistachio content. Kataifi threads are available in many specialty grocers or international markets; if you cannot find them, ensure they are fresh and handle them gently to keep the threads intact before toasting.
The equipment required is minimal, focusing on a standard square baking pan and basic mixing utensils. The most important tool is the spatula, which is used to create an even, level surface for the topping layers. When toasting the kataifi, watch it closely, as it can go from golden to burnt in seconds. Using a good quality dark chocolate with at least 60% cocoa solids ensures the snap is crisp and the flavor is balanced without being overly sweet.
- pistachio cream: almond butter mixed with a touch of honey and ground pistachios
- dark chocolate: semi-sweet chocolate chips
Equipment
- 8x8 inch square baking pan
- mixing bowl
- spatula
- whisk
- parchment paper
Up next · Part 2 of 3
3 steps · 25 min of cooking · what to look for at each stage
Step-by-step instructions (Part 2)