Dinner · Part 2 of 3: Instructions
French Onion Pork Tenderloin — One Pan, Glossy Onion Sauce Step-by-step instructions
- Prep
- Cook
- Total
- Serves
- 4
Before you start
Get everything in place before the skillet heats. Trim the silver skin off the tenderloins and blot them dry — moisture is the enemy of a crust. Measure the salt, pepper, brown sugar, and thyme, mince the garlic, and slice the onions into even quarter-inch pieces.
Whisk the cornstarch and cold water in a small bowl and set the slurry near the stove. Preheat the oven to 375°F (190°C) with a rack in the center, and set out the baking dish, tongs, and thermometer.
Ingredients at a glance (11)
- 2 lb pork tenderloin, trimmed and patted dry
- 1 1/2 tsp kosher salt, divided
- 1/2 tsp coarsely ground black pepper
- 2 tbsp olive oil, divided
- 3 large yellow onions, halved and thinly sliced
- 3 garlic cloves, minced
- 2 tsp chopped fresh thyme leaves
- 1 tbsp light brown sugar, packed
- 1 1/2 cups beef broth
- 1 tbsp cornstarch
- 2 tbsp cold water
Instructions
Sear and prep
- Season the porkTrim any silver skin from the tenderloins, then blot the surface with paper towels until completely dry. Rub all over with 1 tsp of the kosher salt and the black pepper, and leave the meat on the counter while the onions start — no more than 30 minutes out of the refrigerator.Look for The surface looks dry and slightly tacky, with no moisture pooling on the cutting board.Tip A dry surface is what makes the sear brown instead of steam; pat the meat again right before it hits the pan.
- Slice the onionsHalve the onions pole to pole and slice them about 1/4 inch thick, following the grain so the layers hold their shape during the long cook. Discard the dry outer skins and tough cores, and keep the slices in a loose pile so they cook evenly.Look for Every slice is an even quarter-inch, with layers still attached at the root end for a nicer texture.Tip Slicing with the grain, not across it, keeps the onions from dissolving into paste while they caramelize.
- Sear the tenderloinsHeat 1 tbsp olive oil in a large oven-safe skillet over medium-high until it shimmers. Lay the tenderloins in without crowding and sear, turning with tongs, until deeply browned on every side, about 2 to 3 minutes per side. Transfer the pork to a plate, leaving the fat and browned bits behind.Look for The crust is mahogany brown, the pan smells toasty, and the fond sticks to the bottom in dark patches.Tip Do not wipe the pan — those browned bits are the backbone of the French onion flavor.
By the end of this phase, the tenderloins carry a deep mahogany crust on every side and rest on a plate, still firm and raw inside — that is correct. The skillet holds a layer of browned fond and a little fat, and the kitchen smells toasty and savory. The onions are sliced into even quarter-inch pieces, ready to go in.
Build the onion sauce
- Start the onions slowReduce the heat to medium and add the remaining 1 tbsp olive oil. Pile in the sliced onions with the last 1/2 tsp salt and stir to coat. Cook, stirring every few minutes, until the onions soften, release their liquid, and begin to collapse, about 10 minutes.Look for The onions look translucent and collapsed, with a faint sweet smell and liquid at the bottom of the pan.Tip Scrape up the seared fond as you stir; it dissolves into the onions and deepens the color from the start.
- Caramelize deeplyLower the heat to medium-low and keep cooking the onions, stirring often, until deep amber brown and reduced to a third of their volume, 20 to 25 minutes more. Add a splash of water if the pan looks dry or the edges darken too fast.Look for The onions are jammy, glossy, and uniformly deep amber, with no blackened or crunchy bits.Tip Patience here is the whole recipe — real color takes time, and the sauce cannot taste like French onion without it.
- Add aromatics and brothStir in the garlic, thyme, and brown sugar and cook 1 minute until fragrant. Pour in the beef broth, bring to a simmer, and scrape the bottom of the pan until every browned bit lifts into the liquid. Let the sauce bubble gently for 2 minutes.Look for The broth is dark, glossy, and lightly thickened from the onions, with a sweet-savory smell filling the kitchen.Tip The brown sugar is not for sweetness alone — it rounds the broth the way onion soup gets its depth.
The onions should now be a deep, even amber — darker than golden, lighter than brown — and reduced to a jammy mass about a third of their original volume.
The garlic and thyme have bloomed, the brown sugar has dissolved, and the broth has lifted every browned bit into a dark, glossy liquid that simmers with a sweet-savory aroma. Taste the sauce: it should be lightly seasoned, since it reduces slightly under the pork.
Bake, rest, and glaze
- Assemble the baking dishSpread half the caramelized onions across a white ceramic baking dish. Nestle the seared tenderloins on top and spoon the remaining onions over the meat, leaving the thin sauce in the pan for the finish. The pork should sit snugly but not submerged.Look for Each tenderloin is blanketed in a thick layer of onions, with the sauce pooled around but not covering it.Tip Keeping the sauce separate now lets it reduce and thicken later without washing the sear off the meat.
- Bake to temperatureBake at 375°F (190°C) until an instant-read thermometer inserted into the thickest part of the pork reads 145°F (63°C), about 18 to 22 minutes. Transfer the pork to a carving board and let it rest at least 3 minutes before slicing so the juices redistribute.Look for The juices run clear with the faintest blush, and the thermometer reads 145°F (63°C) at the center.Safe temperature 145°F (63°C) internal temperature (steaks, chops and roasts)Tip Check early — a tenderloin is slender, and 2 extra minutes is the difference between juicy and dry.
- Thicken the sauceWhile the pork rests, whisk the cornstarch and cold water in a small bowl until smooth. Bring the reserved sauce to a simmer, whisk in the slurry, and boil 1 minute until the sauce coats the back of a spoon. Taste and adjust the seasoning.Look for The sauce is glossy and thick enough to cling to the spoon, with no starchy raw taste.Tip Whisk the slurry again just before adding it — cornstarch settles fast in the bowl.
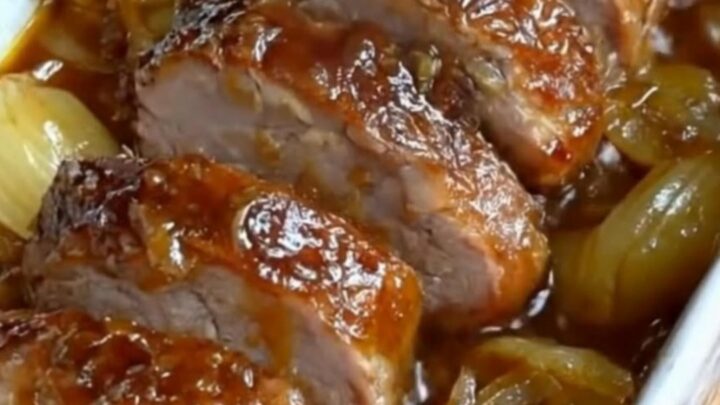
- Slice and coatSlice the rested tenderloin into thick medallions and arrange them on a warm plate or return them briefly to the baking dish. Spoon the glossy onion sauce generously over every slice so the meat is fully coated, and serve immediately while it steams.Look for Each slice glistens with sauce, the onions cling to the surface, and steam rises from the plate.Tip A sharp knife and one clean motion per slice keep the medallions intact and juicy.
The pork reads 145°F (63°C) at its thickest point, has rested at least 3 minutes, and slices into intact medallions with clear, faintly rosy juices. The sauce has thickened to a glossy consistency that coats the back of a spoon, and every slice wears a generous layer of onions and glaze.
The plate steams when it reaches the table. Before serving, taste the sauce one last time — reduction concentrates seasoning, so adjust salt and pepper gently.
Common mistakes
The most common failure is rushing the onions. True caramelization takes 30 to 35 minutes total; cranking the heat browns the edges while the centers stay pale and raw-tasting.
The second trap is overcooking the pork — a tenderloin is slender, so start checking at 15 minutes of baking and pull it at 145°F (63°C), never higher. Skipping the rest comes third: cutting too soon sends the juices onto the board instead of into the meat.
How to tell it’s done
Pork tenderloin is done at an internal temperature of 145°F (63°C), measured in the thickest part with an instant-read thermometer. At that point the juices run clear with the faintest blush and the meat is uniformly pale inside with a touch of pink — moist, tender, and fully cooked. Let the pork rest at least 3 minutes after it leaves the oven so the juices redistribute before slicing.
- Steaks, chops and roasts: 145°F (63°C) in the thickest part, then a 3-minute rest
Up next · Part 3 of 3
4 variations · storage & make-ahead · 5 answers · printable card
Tips, FAQ & printable recipe (Part 3)← Back to the ingredients (Part 1)