Breakfast · Part 2 of 3: Instructions
Fluffy Savory Dill & Feta XXL Pancakes Step-by-step instructions
- Prep
- Cook
- Total
- Serves
- 4
Before you start
Before you start, gather all your ingredients and equipment. Crack the eggs into a large mixing bowl and measure the milk, oil, salt, and baking powder. Sift the flour into a separate bowl or onto a piece of parchment.
Dice the red peppers and chop the dill. Crumble the feta if needed. Have your skillet and spatula ready. This recipe moves quickly once you start cooking, so having everything prepped will make the process smooth.
Ingredients at a glance (10)
- 2 large eggs
- 1 cup whole milk
- 1/4 cup vegetable oil
- 1 tsp salt
- 10 g baking powder
- 1 1/2 cups all-purpose flour
- 1/2 cup crumbled feta cheese
- 1/2 cup diced sweet red peppers
- 1/4 cup chopped fresh dill
- 2 tbsp butter, for the skillet
Instructions
Mixing the Batter
- Whisk the Wet BaseIn a large mixing bowl, crack the eggs and whisk them with the whole milk, vegetable oil, and salt until the mixture is pale, light, and aerated. Whisk vigorously for about 30 seconds to incorporate air, which helps the pancakes rise.Look for The mixture should look frothy and slightly thickened.Safe temperature 160°F (71°C) internal temperature (egg dishes)Tip Whisking well at this stage builds the foundation for fluffy pancakes.
- Sift and Fold Dry IngredientsSift the all-purpose flour and baking powder directly into the wet mixture. Use a spatula to fold gently until just combined. The batter should be thick but still lumpy; do not overmix.Look for No dry streaks remain, but small lumps are fine.Tip Overmixing develops gluten and makes pancakes tough.
- Fold in Feta, Peppers, and DillAdd the crumbled feta, diced sweet red peppers, and chopped fresh dill to the batter. Fold gently with a spatula just until evenly distributed. The feta will create savory pockets as the pancakes cook.Look for The batter is studded with colorful bits of cheese and vegetables.Tip Keep the feta in small chunks so it melts into pockets, not throughout.
At the end of this phase, you should have a thick, lumpy batter studded with feta, peppers, and dill. The batter should be a uniform color with no dry streaks.
It should look airy and slightly frothy from the whisking. The feta should be in small chunks, not completely incorporated.
Cooking the Pancakes
- Heat the Skillet and Ladle BatterPlace a large nonstick skillet over medium heat and add the butter. Let it melt and foam. When the butter is sizzling but not browned, ladle large scoops of batter (about 1/2 cup each) into the skillet, leaving space between them.Look for The butter sizzles gently when the batter hits the pan.Tip If the pan is too hot, the outside burns before the center cooks.
- Cook Until Bubbles FormCook the pancakes for 3 to 4 minutes, until bubbles appear on the surface and the edges look set and golden. The bottom should be deeply browned and crisp.Look for Bubbles pop slowly and the edges look dry.Safe temperature 160°F (71°C) internal temperature (egg dishes)Tip Resist the urge to flip too early; the first side needs time to set.
- Flip and Brown the Second SideCarefully flip each pancake with a spatula. Cook for 2 more minutes, until the second side is bronzed, fragrant, and cooked through to the center. Press gently with the spatula to ensure even browning.Look for The pancake feels firm and springs back when pressed.Safe temperature 160°F (71°C) internal temperature (egg dishes)Tip Use a thin spatula to get under the pancake without breaking it.
The pancakes should be puffed up, golden brown on both sides, and fragrant with butter and dill. The edges should be crisp, and the center should feel set but springy. The kitchen should smell savory and inviting. The pancakes should release easily from the skillet when flipped.
Serving the Pancakes
- Transfer and Rest BrieflyTransfer the cooked pancakes to a serving platter. Let them rest for 1 to 2 minutes so the cheese sets slightly and the steam redistributes.Look for The pancakes are puffed and golden all over.Tip Resting helps the pancakes hold their shape when cut.
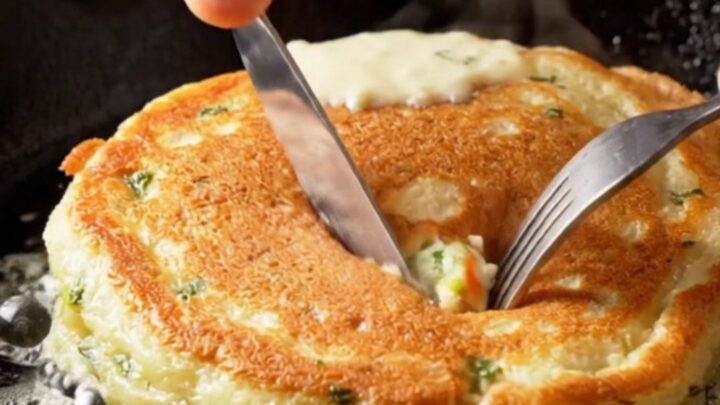
- Break Open and ServeBreak open a warm pancake to reveal the steamy, savory herb and cheese pockets inside. Serve immediately with fresh olives and hot tea, if desired.Look for Steam rises and the interior is moist and fluffy.Tip For the full experience, serve straight from the skillet.
The pancakes are on a platter, steaming and golden. When broken open, the interior should be fluffy and moist, with visible pockets of melted feta and flecks of red pepper and dill. The aroma of dill and butter should be prominent. Serve immediately for the best texture.
Common mistakes
One common mistake is overmixing the batter, which develops gluten and makes the pancakes tough. Another is using a pan that's too hot, causing the outside to burn before the inside cooks.
Also, avoid flipping too early — wait until bubbles form and the edges look set. Finally, don't overcrowd the skillet; cook in batches if necessary to maintain even heat.
How to tell it’s done
The pancakes are done when they are deeply golden brown on both sides and feel firm to the touch. When you press the center with a spatula, it should spring back.
The internal temperature of the pancake should reach at least 160°F (71°C) to ensure the eggs are fully set. If you're unsure, you can cut into one to check that the center is cooked through and no raw batter remains.
- Egg dishes: 160°F (71°C) in the thickest part
Up next · Part 3 of 3
4 variations · storage & make-ahead · 5 answers · printable card
Tips, FAQ & printable recipe (Part 3)← Back to the ingredients (Part 1)