Dinner · Part 2 of 3: Instructions
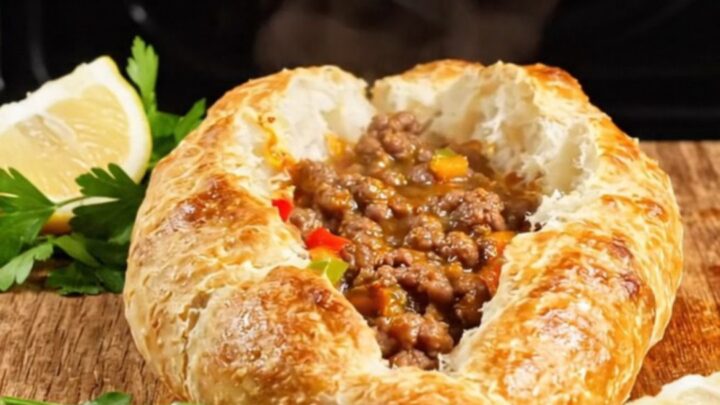
Easy Turkish Flatbread Pide With Juicy Spiced Beef Step-by-step instructions
- Prep
- Cook
- Total
- Serves
- 9
Before you start
Before starting, measure all the ingredients and set them out. Warm the milk and water to about 110°F (43°C), but do not let them get too hot or they will kill the yeast. Grate the onion and chop the peppers, then set them aside. Line a baking sheet with parchment paper or lightly grease it.
Have a clean kitchen towel ready to cover the dough while it rests. Make sure the oven rack is in the middle position. If using active dry yeast, proof it in the warm liquid for a few minutes until foamy. If using instant yeast, you can mix it directly into the flour. Prepare a small bowl of water for brushing the pide before baking.
Ingredients at a glance (12)
- 1 cup warm milk
- 1 cup warm water
- 1/2 cup vegetable oil
- 1 tbsp active dry yeast
- 1 tsp salt
- 4 1/2 cups all-purpose flour
- 500 g ground beef
- 1 finely grated onion
- 1 green pepper, finely chopped
- 1 red kapya pepper, finely chopped
- 1/2 tsp black pepper
- 2 tbsp vegetable oil
Instructions
Dough and Filling
- Make the DoughIn a large bowl, combine the warm milk, warm water, vegetable oil, active dry yeast, and salt. Stir gently and let sit for 5 minutes until the yeast begins to foam. Add the all-purpose flour and mix with a wooden spoon until a shaggy dough forms. Turn out onto a lightly floured surface and knead for 8 to 10 minutes until smooth and elastic. The dough should be soft and pliable, not sticky.Look for The dough is smooth, elastic, and springs back when pressed; it has doubled in volume.Tip If the dough feels too sticky, add flour 1 tablespoon at a time. If too dry, add warm water 1 teaspoon at a time.
- Prepare the FillingWhile the dough rests, make the filling. In a large bowl, combine the ground beef, finely grated onion, chopped green pepper, chopped red kapya pepper, salt, black pepper, and vegetable oil. Use your hands or a fork to mix everything together until well combined. The mixture should be cohesive but not pasty. Divide the filling into 9 equal portions and roll each into a ball. Set the meatballs aside in the refrigerator while the dough finishes rising.Look for The filling is evenly mixed, slightly glossy from the oil, and holds together when shaped.Tip Keep the filling cold; cold meat is easier to wrap and less likely to make the dough soggy.
At the end of this phase, the dough should be smooth, elastic, and doubled in size, while the filling should be well mixed and kept cold. The dough should spring back when gently pressed, and the filling should hold together when shaped into balls.
The kitchen will smell of yeast and fresh bread, and the filling will look vibrant with green and red peppers. Before moving on, make sure the dough is fully risen—if not, give it a few more minutes. The filling should be divided into nine equal portions, ready to wrap.
Shaping and Baking
- Shape the PideOnce the dough has doubled, punch it down and divide it into 9 equal pieces. Roll each piece into a ball. Lightly oil your hands and take one dough ball. Flatten it slightly in your palm, place a meatball in the center, and gently pull the dough up and over the filling, pinching the edges to seal completely. Place the stuffed ball on a baking sheet and repeat with the remaining dough and filling.Look for Each pide is a thin, elongated oval with the dough evenly covering the filling, no tears.Tip Work with one piece at a time and keep the rest covered with a towel to prevent drying.
- Brush and BakePreheat the oven to 425°F (220°C). Brush the top of each pide lightly with water using a pastry brush. This helps create a crisp, blistered crust. Place the baking sheet in the oven and bake for 15 minutes, until the pide are golden brown and puffed. The crust should be crisp and the filling cooked through. Remove from the oven and let rest for 2 minutes before serving.Look for The pide are deeply golden, with blistered spots and a crisp crust; the filling is steaming hot.Safe temperature 160°F (71°C) internal temperature (ground meat)Tip Bake on the middle rack for even browning. If the bottoms need more color, move the sheet to the bottom rack for the last 2 minutes.
The shaped pide should be thin, elongated ovals with the dough evenly covering the filling, with no tears or exposed meat. They should be arranged on the baking sheet with space between each. After brushing with water, they will look glossy. As they bake, the kitchen will fill with the aroma of toasting bread and spiced beef. The pide are ready when the crust is golden and blistered, and the filling is cooked through to 160°F (71°C). The crust should sound hollow when tapped and feel crisp.
Serving
- Serve and EnjoyTransfer the baked pide to a cutting board or serving platter. Let them cool for 2 to 3 minutes, then tear or slice open to reveal the juicy spiced beef filling. Serve warm, either whole or cut into pieces. The pide are best eaten fresh from the oven, when the crust is crackly and the filling is moist and flavorful.Look for The filling is juicy, the crust is crisp, and the aroma of spiced beef fills the kitchen.Tip Serve with a side of plain yogurt or a simple salad, if desired, to balance the richness.
After resting for a few minutes, the pide can be torn open to reveal a juicy, steaming filling. The crust should be crackly and shatter slightly when pulled, while the inside is soft and tender. The meat should be moist and well-seasoned, with visible bits of pepper and onion. Serve the pide warm, either whole or cut into pieces, and enjoy the contrast of textures. The filling should be juicy but not runny, and the bread should hold together without falling apart.
Common mistakes
A common mistake is overworking the dough, which can make it tough; knead just until smooth and elastic. Another issue is not letting the dough rest long enough—if it hasn't doubled, the pide will be dense. When shaping, be careful not to tear the dough; if it resists, let it rest for a few minutes and try again.
Avoid overfilling the pide, as too much meat can cause the dough to split during baking. Brushing with water is essential for a crisp crust; do not skip this step. Finally, do not overcrowd the baking sheet, as the pide need space for air to circulate and brown evenly.
How to tell it’s done
The pide are done when the crust is deeply golden brown and blistered in spots, and the edges look crisp and slightly puffed. The filling should be cooked through, with no pink remaining in the ground beef. To be certain, insert an instant-read thermometer into the center of a pide; it should read at least 160°F (71°C).
The crust should feel firm and crackly when tapped, and the bottom should be golden and crisp. Let the pide rest for 2 to 3 minutes before serving to allow the juices to settle, then tear one open to check that the filling is moist and steaming.
- Ground meat: 160°F (71°C) in the thickest part
Up next · Part 3 of 3
4 variations · storage & make-ahead · 5 answers · printable card
Tips, FAQ & printable recipe (Part 3)← Back to the ingredients (Part 1)