Dinner · Part 2 of 3: Instructions
Slow Cooker Pork Bulgogi: Sweet, Savory, Set-and-Forget Step-by-step instructions
- Prep
- Cook
- Total
- Serves
- 4
Before you start
Before starting, make sure the pork is sliced into thin strips—this helps it cook evenly and become tender. If the pork is not already sliced, place it in the freezer for 15-20 minutes to firm up, then slice against the grain into 1/4-inch strips.
Prepare the onion by peeling and slicing into thin crescents. Grate the Asian pear and mince the garlic and ginger. Have all the sauce ingredients measured and ready. The slow cooker should be clean and ready to use. This recipe is truly set-and-forget, but a little prep goes a long way.
Ingredients at a glance (10)
- 1 1/2 lb pork shoulder, thinly sliced into strips
- 1 medium yellow onion, thinly sliced into crescents
- 1 tsp garlic powder
- 1 tbsp sesame seeds
- 1/2 cup soy sauce
- 1 ripe Asian pear, grated
- 2 tbsp brown sugar
- 3 cloves garlic, minced
- 1 tbsp fresh ginger, grated
- 1 tbsp toasted sesame oil
Instructions
Layer and Sauce
- Layer the Pork and OnionsPlace the sliced pork shoulder strips in the bottom of a 5-6 quart slow cooker, spreading them into an even layer. Scatter the yellow onion crescents over the pork. Sprinkle the garlic powder and sesame seeds evenly over the top.Look for The pork and onions should cover the bottom of the insert in a single, even layer.Tip For easier slicing, freeze the pork for 15 minutes before cutting into thin strips.
- Make the Bulgogi SauceIn a small bowl, whisk together the soy sauce, grated Asian pear, brown sugar, minced garlic, grated ginger, and toasted sesame oil until the sugar dissolves. The sauce will be thin and fragrant.Look for The sauce should be a uniform dark brown with no sugar granules remaining.Tip Grate the pear on the large holes of a box grater; you'll need about 1/2 cup of grated pear.
- Pour the Sauce Over the MeatPour the bulgogi sauce evenly over the pork and onions in the slow cooker. Use a spatula to gently toss the pork and onions so everything is coated with the sauce.Look for All the pork strips should be coated in the dark sauce, with onions distributed throughout.Tip Don't over-stir; you want to keep the pork in a relatively even layer for even cooking.
The pork and onions are layered in the slow cooker, with garlic powder and sesame seeds sprinkled on top. The sauce is mixed and poured over, coating everything evenly.
At this point, the raw pork should be fully coated in the dark sauce, and the onions should be distributed throughout. The slow cooker is ready to be turned on.
Slow Cook
- Cook on LowCover the slow cooker and cook on low for 4 to 5 hours, until the pork is tender and cooked through. The sauce will darken and the onions will soften into the sauce. Let it rest for 3 minutes before slicing.Look for The pork should be opaque and easily pull apart with a fork, and the sauce should be bubbling gently.Safe temperature 145°F (63°C) internal temperature (steaks, chops and roasts)Tip Avoid lifting the lid during cooking to keep the heat steady.
- Check for DonenessAfter 4 hours, check the pork. It should be fork-tender and register at least 145°F (63°C) on an instant-read thermometer. If not, continue cooking in 30-minute increments. Let it rest for 3 minutes before slicing.Look for The pork strips should be opaque with no pink, and the sauce should have thickened slightly.Safe temperature 145°F (63°C) internal temperature (steaks, chops and roasts)Tip Use an instant-read thermometer inserted into the thickest piece of pork to check the temperature.
- Rest the MeatTurn off the slow cooker and let the pork rest in the sauce for at least 3 minutes before serving. This allows the juices to redistribute and the meat to stay moist.Look for The sauce will settle and the pork will look glossy and moist.Safe temperature 145°F (63°C) internal temperature (steaks, chops and roasts)Tip Resting is part of the cooking process; don't skip it.
After 4-5 hours on low, the pork is fork-tender and cooked through, with an internal temperature of at least 145°F (63°C). The sauce has darkened and thickened slightly, and the onions have softened into the sauce. The aroma is rich and savory with a hint of sweetness. The meat should be opaque with no pink.
Rest and Serve
- Serve the BulgogiUsing a slotted spoon, transfer the pork and onions to a serving plate. Spoon some of the thickened sauce over the top. Serve hot, with rice or lettuce wraps if desired.Look for The pork should be glistening with sauce, and the onions tender.Tip Garnish with extra sesame seeds and sliced green onions for a fresh finish, if you like.
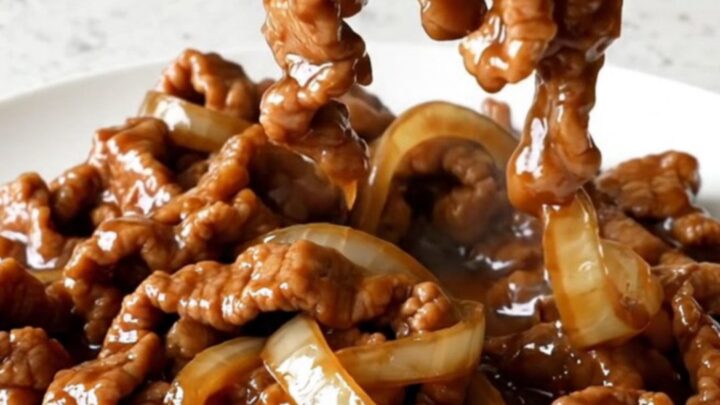
The pork has rested for at least 3 minutes, allowing the juices to redistribute. The meat is glossy and moist, and the sauce is thick enough to coat the back of a spoon. The dish is ready to be served over rice or in lettuce wraps, garnished with extra sesame seeds if desired.
Common mistakes
One common mistake is using a lean cut like pork tenderloin and overcooking it, which results in dry, stringy meat. Stick with pork shoulder for the best texture. Another mistake is lifting the lid too often, which lets out heat and extends cooking time. Trust the slow cooker.
Also, don't skip the pear—it's crucial for both sweetness and tenderizing. If you use a regular pear, make sure it's ripe. Finally, resist the urge to add extra liquid; the pork and onions release moisture as they cook, and the sauce will be the right consistency.
How to tell it’s done
The pork is done when it's fork-tender and easily pulls apart, and the internal temperature reaches at least 145°F (63°C) for whole cuts of meat. Since the pork is sliced thin, it will cook quickly; check after 4 hours.
The sauce should have darkened and thickened slightly, and the onions should be soft and translucent. If the pork isn't tender yet, continue cooking in 30-minute increments until it is. Let the meat rest for at least 3 minutes before serving to allow the juices to redistribute.
- Steaks, chops and roasts: 145°F (63°C) in the thickest part, then a 3-minute rest
Up next · Part 3 of 3
4 variations · storage & make-ahead · 5 answers · printable card
Tips, FAQ & printable recipe (Part 3)← Back to the ingredients (Part 1)