Desserts · Part 2 of 3: Instructions
Dubai-Style Dark Chocolate Pistachio Kataifi Bars with Halva Step-by-step instructions
- Prep
- Cook
- Total
- Serves
- 12
Before you start
Gather every ingredient and tool before you start, because the kataifi dries out quickly once it is exposed to air. Melt the butter and set it aside to cool slightly. Line the pan with parchment paper, letting it overhang the sides.
Chop the pistachios and almonds, toast the sesame seeds lightly, and break the halva into chunks. Chill the dark chocolate bar for about 10 minutes so it grates cleanly. Set a heatproof bowl over a pan of barely simmering water for melting the chocolate later, and keep a sharp knife nearby for cutting the bars.
Ingredients at a glance (10)
- 8 oz kataifi pastry, shredded
- 4 tbsp unsalted butter, melted
- 1 cup shelled pistachios, whole and chopped
- 1/2 cup sliced almonds, chopped
- 2 tbsp toasted sesame seeds
- 4 oz pistachio halva, in chunks
- 1/2 cup thick caramel sauce
- 12 oz dark chocolate, plus 1 bar for grating, divided
- 1/4 cup crushed green pistachios
- fine sea salt, to taste
Instructions
Build the nut and pastry base
- Spread the kataifi baseSpread the shredded kataifi across the cutting board and toss it with the melted butter and a pinch of salt until evenly coated. Scatter the whole and chopped pistachios, the almonds and the sesame seeds over the pastry.Look for Strands look glossy and evenly golden with nuts spread throughout.Tip Pull the kataifi apart gently so the strands stay loose and crisp.
- Add halva and caramelBreak the halva into chunks and scatter them over the nut mixture. Spoon the caramel sauce over the top and press everything together firmly with your gloved hands until it forms one layered mixture.Look for Mixture holds together when pressed and the caramel looks evenly distributed.Tip Press in layers so the mixture packs tightly and slices cleanly later.
At the end of this phase, the kataifi should look glossy and golden with the butter evenly spread through the strands. The pistachios, almonds and sesame seeds should sit across the mixture without clumping in one spot. Halva chunks and caramel should be distributed through the layers and hold together when pressed with your gloved hands.
Check the mixture by pressing a small handful: it should stay compact and not fall apart. If you see dry patches of pastry or loose nuts on the board, toss them back in with a little more melted butter before you move on to the next step.
Grate, pack and pour
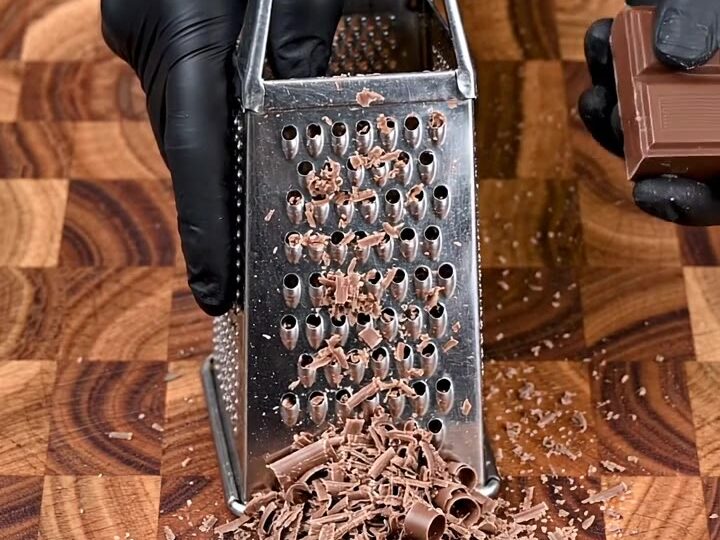
- Grate the chocolateHold the dark chocolate bar over the board and grate it with a box grater, letting fine shavings and curls fall onto the work surface. Set aside about 4 ounces of the grated chocolate for finishing.Look for Fine shavings and curled pieces collect across the board.Tip Chill the chocolate for 10 minutes first so it grates cleanly without melting.
- Pack into the lined panLine the rectangular pan with parchment paper, letting it overhang the sides. Transfer the nut and kataifi mixture into the pan and press it down firmly and evenly to form a compact base.Look for The surface is flat and the base feels firm when pressed.Tip Use the bottom of a measuring cup to press the base into the corners.
- Melt and pour the chocolateMelt the remaining dark chocolate in a heatproof bowl set over barely simmering water, stirring until smooth. Pour the melted chocolate generously over the base and spread it evenly to the edges.Look for Melted chocolate is smooth, glossy and flows easily.Tip Keep the bowl off the water surface and stir often to avoid scorching.
At the end of this phase, the grated chocolate should be spread across the work surface as fine shavings and curled pieces. The nut and pastry mixture should be packed firmly and evenly into the lined pan with no gaps at the corners. The melted chocolate should be smooth, glossy and poured across the top, reaching the edges. Check that the surface looks even and that no pastry is poking through the chocolate. If any spot looks thin, spread a little more melted chocolate over it with a spatula before the next step.
Garnish and set the slab
- Finish and set the slabScatter the reserved grated chocolate, chopped pistachios and halva pieces over the chocolate, then dust with the crushed green pistachios. Refrigerate the pan until the chocolate is firm.Look for Chocolate looks glossy and firm to the touch.Tip Chill on a flat shelf so the slab sets level and smooth.
- Cut into neat barsLift the slab out using the parchment overhang and place it on the cutting board. Cut it with a sharp knife into twelve neat rectangular bars, wiping the blade between cuts for clean edges.Look for Cross-section shows distinct layers of kataifi, nuts and chocolate.Tip Warm the knife briefly under hot water and dry it before each cut.
At the end of this phase, the chocolate surface should be covered with reserved shavings, chopped pistachios, halva pieces and crushed green pistachios, all evenly distributed. The chocolate should look glossy and feel firm to the touch once the pan has chilled. Lift the slab using the parchment overhang and check that it comes out whole and holds its shape. Look at the edges to confirm the layers are still compact. If the chocolate feels soft or tacky, return the pan to the refrigerator for another 20 minutes before cutting.
Common mistakes
The most common mistake is packing the base too loosely. If the kataifi and nuts are not pressed firmly into the pan, the slab will crumble when cut and the bars will lose their clean, layered look. Another frequent problem is melting the chocolate too hot, which can make it seize or turn dull.
Melt it gently over barely simmering water and stir often. Do not rush the setting stage either: cutting the slab before the chocolate is firm will drag the toppings and smear the surface. Finally, avoid letting the kataifi sit exposed to air for long, since dry strands toast unevenly and lose their crunch.
How to tell it’s done
The slab is ready to cut when the chocolate surface looks glossy, feels firm when lightly touched and no longer shows any soft spots or fingerprints. The base should feel compact and hold its shape when the slab is lifted by the parchment.
The kataifi should look golden and crisp at the cut edges, and the halva and nuts should be visible in the cross-section. Because this recipe uses no meat, eggs or other raw protein, there is no internal temperature to check; use visual and tactile signs to judge the set. Allow the slab to chill until the chocolate is completely firm before slicing.
Up next · Part 3 of 3
4 variations · storage & make-ahead · 5 answers · printable card
Tips, FAQ & printable recipe (Part 3)← Back to the ingredients (Part 1)