Desserts · Part 2 of 3: Instructions
Decadent No-Bake Chocolate Biscuit Cake Step-by-step instructions
- Prep
- Cook
- Total
- Serves
- 8
Before you start
Before beginning, ensure all ingredients are measured and ready to use. Chop the dark chocolate finely to facilitate a smooth melt and have your square cake pan lined with parchment paper for easy removal.
Prepare the white chocolate in a small piping bag or a heat-proof plastic bag so it is ready for the final decorative step.
Clear enough space in your refrigerator for the cake pan to sit perfectly level during the chilling process, ensuring the ganache sets without shifting or developing an uneven surface.
Ingredients at a glance (3)
- 8 oz biscuits, crushed
- 10 oz dark chocolate, chopped
- 2 oz white chocolate, for piping
Instructions
Base Preparation
- Prepare the BasePlace the biscuits into a large mixing bowl. Crush them into various sizes to provide a satisfying crunch in every bite of the finished cake.Look for Biscuits should be broken into small, bite-sized fragments.Tip Avoid crushing the biscuits into a fine powder; keep some larger chunks for texture.
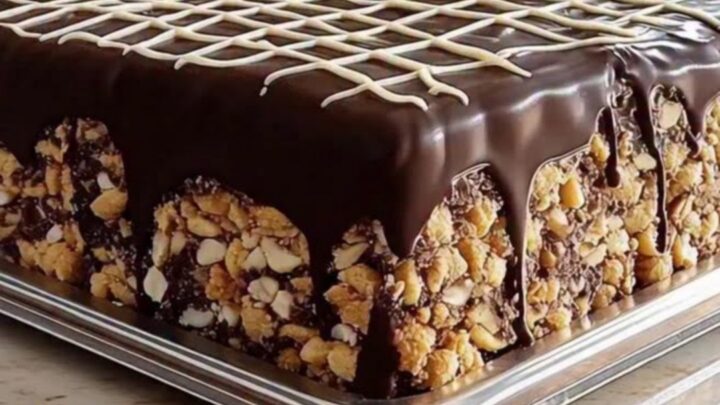
The biscuits should be broken into uneven, chunky pieces. Ensure they are not pulverized, as the distinct texture is vital for the final mouthfeel of the cake. Check that all larger crumbs are gathered in the bowl, ready to be coated with the rich chocolate mixture.
Ganache Emulsification
- Create the GanacheMelt the dark chocolate until smooth, glossy, and fully emulsified. Pour the chocolate over the crushed biscuits in the bowl and fold gently to combine.Look for The mixture should become uniform, shiny, and thick.Tip Ensure the chocolate is melted gently to prevent seizing.
The ganache should be perfectly smooth, dark, and glossy. Check for any unmelted chocolate pieces by stirring slowly with a spatula. The consistency should be thick enough to coat a spoon evenly, indicating the emulsion is successful and ready to be combined with the dry base.
Final Assembly
- Assemble and DecorateTransfer the mixture into a square cake pan, smoothing the top. Once set, pipe a precise white chocolate lattice pattern across the surface.Look for The lattice lines should be precise and evenly spaced.Tip Melt the white chocolate in a small piping bag submerged in warm water for easy application.
The cake should be leveled perfectly in the pan with no air gaps. Once the white chocolate lattice is piped across the top, the cake must be transferred to the refrigerator immediately. Check that the surface is clean and the edges are sharp before the chilling process begins.
Common mistakes
A common mistake is overheating the chocolate, which can cause it to lose its glossy finish. Another error is over-mixing the biscuits into the ganache, which can cause them to disintegrate and lose their signature crunch.
Ensure the ganache is allowed to cool slightly before pouring it over the biscuits, as this helps maintain the structural integrity of the biscuit pieces throughout the assembly process.
How to tell it’s done
The cake is considered done when the ganache has completely firmed up and the entire structure feels solid to the touch. This typically takes at least two hours in the refrigerator.
When sliced with a warm, sharp knife, the cake should hold its shape perfectly, revealing the intricate layers of biscuits and chocolate. The surface should be firm but yield slightly under pressure, and the white chocolate lattice should be set and dry to the touch.
Up next · Part 3 of 3
2 variations · storage & make-ahead · 3 answers · printable card
Tips, FAQ & printable recipe (Part 3)← Back to the ingredients (Part 1)