Desserts · Part 2 of 3: Instructions
Dark Chocolate Honeycomb Bark Bars Step-by-step instructions
- Prep
- Cook
- Total
- Serves
- 8
Before you start
Before starting, ensure the dark chocolate is cold and firm for grating. Line an 8x8-inch metal tray with parchment paper, leaving overhang on two opposite sides.
Prepare the honeycomb sponge candy by breaking it into chunks about 1/2 to 1 inch in size. Set up a double boiler or a heatproof bowl over a pot of simmering water. Have all tools ready, as the melted chocolate needs to be used quickly before it sets.
Ingredients at a glance (3)
- 12 oz 72% dark chocolate, finely chopped
- 2 cups golden honeycomb sponge candy chunks
- parchment paper, for lining, to taste
Instructions
Grate and Melt
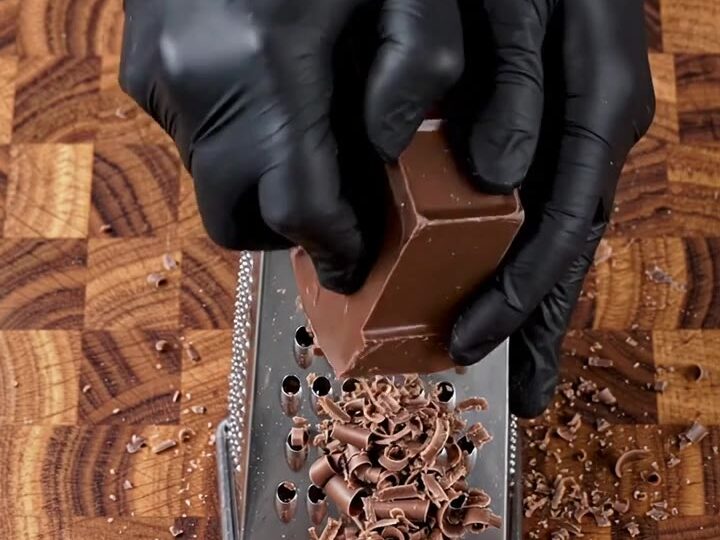
- Grate the chocolateLine an 8x8-inch metal tray with parchment paper, leaving overhang on two sides. Using a box grater, grate the solid block of 72% dark chocolate into a fresh pile of dark chocolate curls. Set the curls aside.Look for The chocolate curls should be light and airy, not melted or clumped.Tip Chill the chocolate block for 10 minutes before grating for cleaner curls.
- Melt the chocolatePlace the grated chocolate in a heatproof bowl set over a pot of barely simmering water. Stir gently until completely melted and glossy. Remove from heat and let cool slightly until it thickens just a bit, about 2 minutes.Look for The melted chocolate should be smooth, glossy, and slightly thickened.Tip Do not let water touch the chocolate; even a drop will cause it to seize.
The chocolate is grated into light, fluffy curls and then melted to a smooth, glossy liquid. The melted chocolate should be fluid enough to pour but slightly thickened, not watery. It should have a rich, deep cocoa aroma. The honeycomb chunks are ready on the side, and the tray is lined with parchment.
Assemble and Press
- Pour the chocolatePour the glossy melted dark chocolate into the prepared parchment-lined metal tray. Use an offset spatula to spread it into an even layer about 1/2 inch thick, reaching all the way to the edges.Look for The chocolate layer should be smooth and level across the tray.Tip Tap the tray gently on the counter to release any air bubbles.
- Press in the honeycombWhile the chocolate is still wet, press the golden honeycomb sponge candy chunks into the surface in a single layer. Press them down gently so they adhere but are not completely submerged.Look for Honeycomb pieces should be evenly distributed and slightly proud of the chocolate.Tip Work quickly before the chocolate sets; if it hardens, warm it briefly.
The melted chocolate is poured into the tray and spread evenly to the edges. The honeycomb chunks are pressed into the surface, creating a textured, golden-studded layer.
The chocolate should still be wet enough to hold the pieces but not so liquid that they sink completely. The tray looks rustic and inviting.
Chill and Slice
- Chill and slicePlace the tray in the refrigerator for 30 minutes, or until the chocolate is completely firm. Once set, lift the slab out using the parchment overhang and place on a cutting board. Slice into thick bars, about 2 inches wide, using a sharp chef's knife.Look for The chocolate is firm and the slab lifts cleanly from the tray.Tip For clean cuts, score the chocolate lightly first, then press down firmly.
- Snap and serveLift one bar and snap it cleanly in half to reveal the layered cross section: crisp dark chocolate on the outside and airy honeycomb within. Serve immediately, or store in an airtight container.Look for The bar snaps with a clean break, showing a distinct layered interior.Tip If the chocolate cracks unevenly, warm the knife slightly before slicing.
After chilling, the chocolate is firm and the slab lifts cleanly from the tray. Slicing yields thick bars with clean edges. When snapped, the bar breaks with a crisp, audible snap, revealing a beautiful cross-section of dark chocolate and airy honeycomb. The bars are ready to serve.
Common mistakes
A common mistake is melting the chocolate over too high heat, which can cause it to seize or become grainy. Always use gentle, indirect heat and stir frequently.
Another issue is pressing the honeycomb too deeply into the chocolate, which can cause it to break and lose its airy texture. Press gently so the pieces stay intact. Also, avoid slicing the bars before the chocolate is fully firm; otherwise, the bars will crumble.
How to tell it’s done
The bars are done when the chocolate has fully set and is firm to the touch. After chilling for 30 minutes, the slab should lift easily from the tray using the parchment overhang.
When sliced, the bars should break cleanly with a sharp snap, revealing a distinct layered cross-section: a smooth dark chocolate exterior and a porous honeycomb interior. If the chocolate bends or feels soft, return it to the refrigerator for additional chilling.
Up next · Part 3 of 3
4 variations · storage & make-ahead · 5 answers · printable card
Tips, FAQ & printable recipe (Part 3)← Back to the ingredients (Part 1)