Dinner · Part 2 of 3: Instructions
Crockpot Turkey Pepper Steak with Peppers and Onions Step-by-step instructions
- Prep
- Cook
- Total
- Serves
- 4
Before you start
Fifteen minutes of prep is all this recipe asks. Set out the slow cooker and give the insert a quick check that it sits level. Pat the turkey tenderloins dry, then slice them into even strips about 1/2 inch thick — even thickness is the single most important detail, because thin pieces finish long before thick ones.
Ingredients at a glance (6)
- 1 1/2 lb turkey tenderloin, cut into strips
- 3 bell peppers, green and red, cut into strips
- 1 yellow onion, cut into strips
- 1 tsp garlic powder
- 1/3 cup soy sauce
- 2/3 cup chicken broth
Instructions
Prep and layer the turkey
- Cut the turkey into stripsPat the turkey tenderloins dry with paper towels, then slice them lengthwise into strips about 1/2 inch thick and 2 inches long. Even strips matter here: pieces of the same size cook at the same rate, so every strip turns out tender instead of some drying out while others stay firm. Trim away any silverskin as you go.Look for Strips should be uniform, roughly finger-sized, with no thick or thin ends.Tip Chill the tenderloins in the freezer for 15 minutes first; firmer meat slices into cleaner, more even strips.
- Slice the peppers and onionCut the green and red bell peppers in half, remove the stems, cores and seeds, and slice them into strips about 1/4 inch wide. Halve the onion pole to pole and slice it the same way, following the natural lines of the onion so the pieces hold their shape during the long cook. Keep the two colors of pepper separate for now if you want to layer them evenly.Look for Strips bend slightly when lifted but do not snap; that thickness survives 4 hours of braising.Tip A sharp knife stops the onion from tearing and releasing as much juice on the board.
- Layer the turkey in the crockArrange the turkey strips in a single layer over the bottom of the slow cooker insert, letting them overlap only slightly. A packed single layer keeps each strip in the sauce instead of steaming unevenly in a clump. Spread them with a spatula or a hand so the bottom of the crock is covered edge to edge.Look for The bottom of the insert should be covered, with just a few small gaps between strips.Tip Keep raw turkey cold until this moment and wash hands, board and knife right after handling it.
By the end of this phase, the bottom of the slow cooker insert is covered with a single, even layer of turkey strips, each about 1/2 inch thick, with the pepper and onion strips sliced and standing by.
Nothing is cooked yet and nothing needs to be: the goal is uniform pieces, because even sizing is what makes every strip finish tender at the same moment.
Build the layers and sauce
- Pile on the peppers and onionsHeap the pepper and onion strips over the turkey, spreading them out so they sit in an even layer rather than one dense mound. They will slump and soften as they cook, releasing juice that feeds the sauce, so a loose, airy pile now means evenly cooked vegetables later. Tuck any stray strips down the sides.Look for The turkey should be barely visible under the vegetables at this point.Tip Mixing green and red peppers gives the best color contrast once everything softens.
- Season with garlic powderSprinkle the garlic powder evenly over the vegetables, reaching toward the edges of the crock rather than dumping it in one spot. Powdered garlic distributes best when scattered dry on top, because the liquid added next will carry it down through every layer as the cooker heats. No salt is needed; the soy sauce brings plenty.Look for A light, even dusting across the whole surface, no bare patches.Tip Scatter from a few inches above the crock to avoid clumps in one place.
- Add soy sauce and brothPour the soy sauce over the vegetables as evenly as possible, then follow with the broth, letting both run down the side of the crock and seep under the turkey strips. The combined liquid only comes partway up the food, and that is right: the turkey and vegetables release their own juices as they cook, building the sauce from within.Look for Liquid should just reach the lower third of the vegetable layer, not cover it.Tip Pour the broth down one side to rinse any garlic powder stuck to the wall back into the sauce.
The crock is assembled and ready to close: peppers and onions heaped in an even layer over the turkey, garlic powder scattered across the top with no bare patches, and the soy sauce and broth poured in so the liquid reaches roughly the lower third of the vegetables — never covering them.
Cook, check and finish
- Cover and cook low and slowPut the lid on and cook on low for about 4 hours, until the turkey strips are tender all the way through. Keep the lid on the whole time: every peek releases heat and adds 20 minutes or more to the cook. On high, the same dish takes closer to 2 hours, but low gives the softest, most evenly braised texture.Look for The kitchen smells savory and the liquid has risen well up the sides of the crock.Tip Start checking at 3 1/2 hours on low; slow cookers vary more than ovens do.
- Check the temperatureLift a few of the thickest strips out and check them with an instant-read thermometer; the turkey is safe and done at 165°F (74°C) in the center. The strips should look soft and braised, never pale or springy, and the peppers should be silky with their edges relaxing into the sauce. Return any checked strips to the crock and let the turkey rest at least 3 minutes before serving.Look for At least 165°F (74°C) in the center of the thickest strip.Safe temperature 165°F (74°C) internal temperature (poultry)Tip Check two or three strips from different spots; slow cookers heat unevenly at the edges.
- Thicken and rest the sauceWith the turkey done, stir everything gently so the sauce coats every strip, then let it sit uncovered on warm for 10 minutes. The sauce reduces slightly and clings to the turkey instead of pooling at the bottom. If it still seems thin, leave the lid off on warm a few more minutes, stirring once or twice.Look for The sauce coats the back of a spoon and clings to the turkey strips.Tip A cornstarch slurry whisked in and heated through on high is the fast fix for a thin sauce.
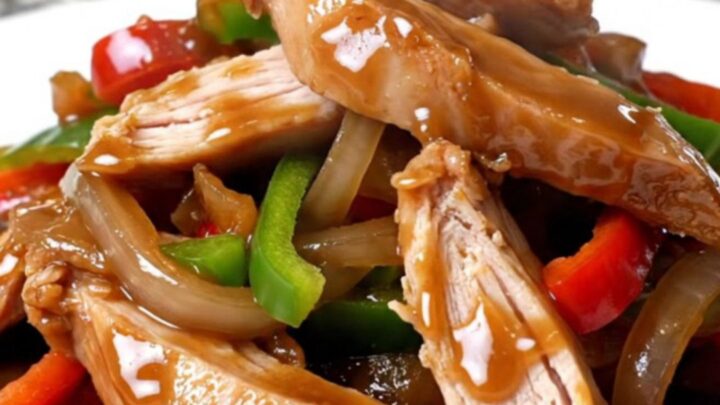
- Plate and serveUse tongs to lift the turkey strips and pepper and onion pieces onto plates, letting excess sauce drip back, then spoon the thick brown sauce over the top. Serve straight from the crock while it steams, or hold it on warm for up to an hour while the rest of dinner comes together. The sauce keeps everything glossy and moist.Look for Strips glisten with sauce and steam rises when the lid comes off.Tip The crock on warm is the best serving dish; the sauce stays fluid to the last plate.
After about 4 hours on low, the kitchen smells savory and the sauce has risen well up the sides. The turkey reads at least 165°F (74°C) at its thickest point, the strips look soft and braised, and the peppers are silky.
Stir gently, let the sauce reduce uncovered on warm for about 10 minutes, and check that it coats a spoon before plating.
Common mistakes
The most common slip is uneven slicing: strips of wildly different thickness finish at different times, and by the time the thick ones are tender, the thin ones have gone stringy. Aim for a consistent 1/2 inch.
Second, lifting the lid. Every peek drops the temperature inside the crock and stretches the cook time by twenty minutes or more, so trust the timer and keep the glass clean for a look without opening.
How to tell it’s done
The turkey is done and safe when an instant-read thermometer reads at least 165°F (74°C) in the center of the thickest strips; check a few from different spots, since edges cook differently from the middle.
Beyond temperature, look for the visual signs: strips with a soft, braised surface, no translucence or springiness, and peppers so silky their edges fold into the sauce.
- Poultry: 165°F (74°C) in the thickest part
- Steaks, chops and roasts: 145°F (63°C) in the thickest part, then a 3-minute rest
Up next · Part 3 of 3
4 variations · storage & make-ahead · 5 answers · printable card
Tips, FAQ & printable recipe (Part 3)← Back to the ingredients (Part 1)