Dinner · Part 2 of 3: Instructions
Slow Cooker Sticky Coconut Chicken Thighs Step-by-step instructions
- Prep
- Cook
- Total
- Serves
- 6
Before you start
Before starting, pat the chicken thighs dry with paper towels and trim any excess fat if needed. Measure out the shredded coconut, brown sugar, and ground ginger into small bowls so they are ready to scatter.
Open the can of coconut milk and whisk it with the soy sauce in a measuring cup or small bowl. Have the slow cooker insert clean and ready to go. No other prep is needed; this recipe is truly dump-and-go.
Ingredients at a glance (6)
- 2 lb boneless skinless chicken thighs
- 1 cup unsweetened shredded coconut
- 1/4 cup packed brown sugar
- 1 tbsp ground ginger
- 1 can full-fat coconut milk (13.5 oz)
- 2 tbsp low-sodium soy sauce
Instructions
Assemble and Season
- Arrange the ChickenPlace the boneless skinless chicken thighs in the slow cooker insert in a single layer, snuggling them together so they fit comfortably. They can overlap slightly, but try to keep them as even as possible for uniform cooking.Look for The thighs should cover the bottom of the insert in one even layer, with no large gaps.Tip If the thighs are very thick, trim any excess fat but do not cut them into smaller pieces, as they will shred naturally.
- Scatter the Coconut and SpicesEvenly scatter the shredded coconut over the chicken, then sprinkle with the brown sugar and ground ginger. Use your fingers or a spoon to distribute the mixture as evenly as possible over the surface of the chicken.Look for The chicken is lightly coated with a speckled layer of coconut, sugar, and ginger.Tip Don't stir at this point; the dry ingredients will form a crust as the chicken cooks.
The chicken thighs are arranged in a single layer in the slow cooker, topped with an even dusting of shredded coconut, brown sugar, and ginger.
The coconut milk and soy sauce have been poured around the chicken, creating a shallow pool of liquid. The top of the chicken still shows the dry seasoning, which will slowly melt into the sauce as it cooks.
Slow Cook
- Pour Over the Coconut Milk and SoyIn a small bowl, whisk together the coconut milk and soy sauce until combined. Pour the mixture evenly over the chicken and dry ingredients. Do not stir; just let the liquid settle around and between the thighs.Look for The liquid comes about halfway up the sides of the chicken, with the coconut and sugar still visible on top.Tip Use full-fat coconut milk for the creamiest, richest sauce. Light coconut milk will make a thinner sauce.
- Cook Low and SlowCover the slow cooker and cook on low for 4 to 5 hours, or until the chicken is fork-tender and shreds easily. The sauce will thicken slightly as the coconut and sugar melt into the liquid.Look for The chicken is very tender, and the sauce is creamy and fragrant with coconut and ginger.Safe temperature 165°F (74°C) internal temperature (poultry)Tip Resist the urge to lift the lid during cooking; each peek lets heat escape and adds time.
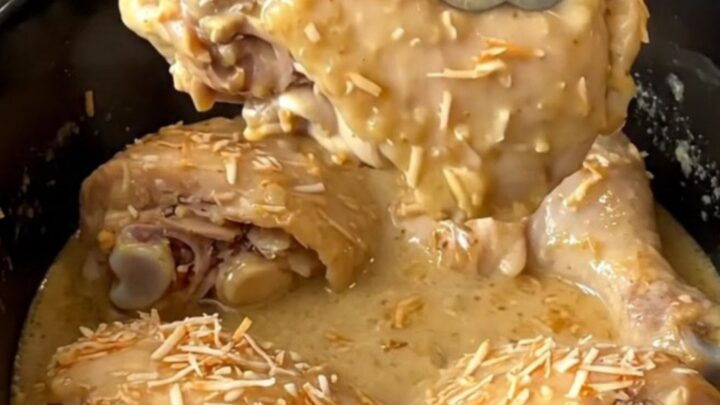
After 4 to 5 hours on low, the chicken is fork-tender and the sauce has turned a warm tan color. The coconut and sugar have melted into the liquid, giving it a creamy, slightly thickened consistency. The smell is sweet and nutty, with a hint of ginger. The chicken should be easily pierced with a fork and beginning to shred at the edges.
Shred and Serve
- Shred and CoatUsing tongs or two forks, gently shred the chicken into large bite-size pieces directly in the slow cooker. Stir the chicken in the sauce so every piece is coated with the creamy coconut mixture.Look for The chicken pulls apart easily and is slicked with a thick, golden-tan sauce.Tip For chunkier pieces, shred lightly; for finer shreds, use two forks and pull more thoroughly.
- Serve WarmSpoon the chicken and sauce into bowls or over rice. Serve immediately, with extra sauce spooned over the top.Look for The sauce is thick enough to cling to the chicken but still pourable.Tip This pairs well with steamed jasmine rice and a squeeze of lime, if desired.
The shredded chicken is coated in a thick, glossy sauce that clings to every piece. The sauce is creamy, lightly sweet, and savory, with visible flecks of coconut. The chicken is tender and moist, with no dry spots. Serve it immediately, spooning extra sauce over the top.
Common mistakes
One common mistake is lifting the lid too often to check on the chicken. Every time the lid is opened, heat escapes and the cooking time increases. Another is using chicken breasts, which can dry out and become stringy. Stick with thighs for the best texture.
Also, avoid stirring the ingredients before cooking; the dry topping needs to form a crust on the chicken, and stirring will just mix it into the liquid. Finally, do not skip the soy sauce—it balances the sweetness and gives the sauce its savory depth.
How to tell it’s done
The chicken is done when it is fork-tender and shreds easily. The internal temperature should read at least 165°F (74°C) on an instant-read thermometer inserted into the thickest part of a thigh.
The sauce should be slightly thickened, creamy, and aromatic, with the coconut and sugar fully dissolved. If the sauce seems too thin, cook uncovered on high for 15 to 20 minutes to reduce it slightly.
- Poultry: 165°F (74°C) in the thickest part
Up next · Part 3 of 3
4 variations · storage & make-ahead · 5 answers · printable card
Tips, FAQ & printable recipe (Part 3)← Back to the ingredients (Part 1)