Desserts · Part 2 of 3: Instructions
Crispy Turkish Kadayıf Baklava with Clotted Cream & Pistachios Step-by-step instructions
- Prep
- Cook
- Total
- Serves
- 12
Before you start
Before starting, make sure the syrup is prepared and cooled completely. Fluff the kadayıf strands and toss with melted clarified butter. Have your baking tray ready, along with the clotted cream and crushed pistachios.
Preheat the oven to 375°F (190°C) before assembling. The filling should be at room temperature for easy spreading. Take your time pressing the layers to ensure an even bake.
Ingredients at a glance (7)
- 400 g fresh shredded kadayıf pastry dough
- 200 g clarified butter (sade yağ), melted
- 200 g Turkish clotted cream (kaymak)
- 1 cup shelled pistachios, finely crushed
- 2 cups granulated sugar
- 1 cup water
- 1 tbsp fresh lemon juice
Instructions
Assembly and Layering
- Prepare the Syrup and PastryIn a small saucepan, combine the sugar and water. Bring to a boil over medium heat, stirring until the sugar dissolves. Remove from heat, stir in the lemon juice, and let the syrup cool completely. Meanwhile, place the shredded kadayıf pastry in a large bowl. Use your hands to fluff and separate the strands gently, breaking up any clumps.Look for The syrup should be cool to the touch; the kadayıf strands are light and separated.Tip Cool the syrup completely—pouring warm syrup over hot pastry makes it soggy.
- Butter the KadayıfPour the melted clarified butter over the fluffed kadayıf. Use your hands to toss and rub the butter through the strands until every piece is evenly coated and glistening. Make sure there are no dry spots.Look for Every strand should look glossy and feel moist but not dripping.Tip Work quickly so the butter doesn't solidify; if it does, warm it slightly.
- Press the Bottom LayerTransfer half of the buttered kadayıf into a round copper baking tray. Press it down firmly and evenly using the bottom of a heavy pot, creating a compact base layer about 1/2-inch thick.Look for The bottom layer is firm and level, with no gaps.Tip Pressing firmly ensures the pastry holds together when sliced.
- Add the Cream and Pistachio FillingSpread the Turkish clotted cream evenly over the pressed kadayıf layer. Sprinkle the crushed pistachios over the cream, covering it completely.Look for The cream layer is smooth and the pistachios are evenly distributed.Tip Use a spatula to spread the cream gently without disturbing the pastry base.
- Top with Remaining KadayıfSpread the remaining buttered kadayıf over the filling, covering it completely. Press down gently with your hands or the bottom of the pot to compact the top layer slightly.Look for The top layer is even and covers the cream entirely.Tip Don't press too hard—you want some airiness for crispness.
The kadayıf strands should be evenly coated with butter and the layers firmly pressed. The bottom layer should be compact, the cream layer smooth, and the top layer covering everything neatly. The tray should look neat and ready for the oven.
Baking and Syrup Soak
- Bake Until Golden and CrispPreheat the oven to 375°F (190°C). Place the tray in the oven and bake for 35 minutes, or until the top is deeply golden brown and the edges are crisp. The pastry should sound crackly when lightly tapped.Look for The top is deep amber, and the pastry feels firm and crisp.Tip Rotate the tray halfway through for even browning.
- Soak with Cooled SyrupRemove the hot baklava from the oven. Immediately pour the cooled syrup evenly over the hot pastry, making sure to cover the entire surface. Listen for the sizzle as the syrup is absorbed.Look for The syrup sizzles and is absorbed quickly, leaving a glossy sheen.Tip Pour slowly and evenly so every piece gets syrup.
- Rest and AbsorbLet the baklava rest at room temperature for at least 30 minutes, allowing the syrup to fully absorb and the pastry to set. Do not cover it while it rests.Look for The surface looks glossy, and the pastry is tender yet crisp.Tip Resting prevents sogginess and makes slicing cleaner.
The pastry should be deeply golden, crisp, and crackly to the touch. When the syrup is poured over, it should sizzle immediately and be absorbed quickly, leaving a glossy, amber surface. The aroma of butter, nuts, and lemon should fill the kitchen.
Resting and Serving
- Slice and ServeUsing a sharp knife, cut the baklava into squares or diamonds. Serve at room temperature, with extra crushed pistachios on top if desired.Look for Clean cuts reveal layers of pastry and creamy filling.Tip Use a serrated knife and wipe it between cuts for neat pieces.
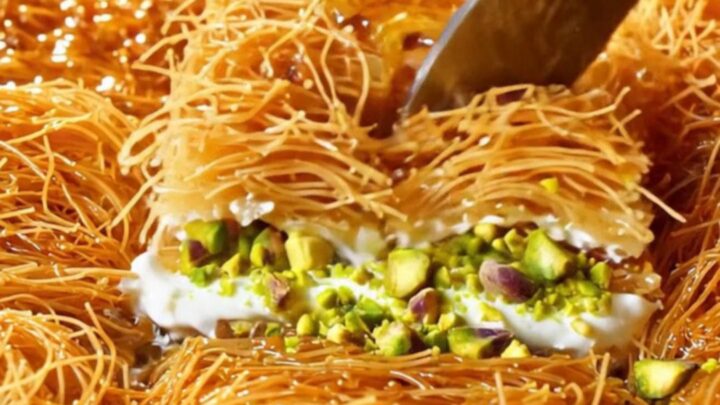
After resting, the baklava should look set and shiny. When cut, the layers should hold together, with the cream and pistachios visible in the center.
The texture should be crisp on top, tender in the middle, and the syrup should have soaked through evenly.
Common mistakes
One common mistake is using a wet or damp kadayıf, which can make the pastry tough. Another is over-packing the layers, which prevents crispness. Be sure to press firmly but not too hard.
Also, don't skip cooling the syrup—pouring warm syrup over hot pastry can make it soggy. Finally, resist the urge to cut the baklava while it's hot; letting it rest allows the layers to set and makes slicing cleaner.
How to tell it’s done
The baklava is done when the top is deeply golden brown and the edges look crisp and slightly darker. When you tap the surface, it should sound hollow and crackly. The internal temperature isn't a factor here, but visual cues are key.
The pastry should be firm to the touch, not soft or doughy. After the syrup is poured, the baklava will absorb it and become glossy—this is the final sign of readiness.
Up next · Part 3 of 3
4 variations · storage & make-ahead · 5 answers · printable card
Tips, FAQ & printable recipe (Part 3)← Back to the ingredients (Part 1)