Appetizers · Part 2 of 3: Instructions
Crispy Tortilla Cheese Twists with White Queso in 25 Minutes Step-by-step instructions
- Prep
- Cook
- Total
- Serves
- 4
Before you start
Heat the oven to 400°F (200°C) and line a baking sheet with parchment paper so the twists release cleanly and the cheese that escapes does not stick. Shred the mozzarella and cheddar if they are not already shredded, mince the garlic, and chop the parsley finely so it disperses through the butter.
Melt the butter and stir the aromatics in, keeping the mixture warm. Set the tortillas out to take the chill off, put the queso, tomatoes, and chorizo within reach, and have a sharp knife or pizza cutter and a pastry brush on the board before the first tortilla goes down.
Ingredients at a glance (10)
- 2 tbsp unsalted butter, melted
- 1 tsp garlic, finely minced
- 1 tsp fresh parsley, finely chopped
- 2 flour tortillas, 8-inch
- 3/4 cup shredded mozzarella
- 3/4 cup shredded cheddar
- 1 tsp taco seasoning
- 2 cups white queso blanco, store-bought or made ahead, warmed
- 1/3 cup diced tomatoes, drained
- 1/3 cup cooked chorizo, crumbled
Instructions
Butter, stack, and cut
- Make the garlic butterMelt the butter in a small bowl in the microwave or in a saucepan over low heat. Stir in the garlic and parsley, then let the mixture sit for a minute so the garlic perfumes the butter. Keep it warm; brushed-on butter spreads far more evenly than butter that has started to set.Look for The butter should smell garlicky and look pale and green-flecked, with no browning at the edges of the bowl.Tip Grate the garlic on a microplane so it disperses through the butter instead of sitting in sharp, bitter bites.
- Brush the tortillasLay the two flour tortillas flat on a cutting board and brush the top of each with the garlic butter, all the way to the edges. Reserve a little butter for the finished twists. A thin, complete coat matters more than a thick one; pooled butter makes the layers slide apart when cut.Look for Look for a thin, glossy coat on both tortillas; dry patches near the edges mean the brush needs reloading.Tip If the butter has started to firm up, warm it for a few seconds; it should flow like cream, not paste.
- Build the cheese sandwichScatter the mozzarella and cheddar over one tortilla in an even layer that reaches the edges, then sprinkle the taco seasoning over the cheese. Press the second tortilla, buttered side down, firmly on top so the layers bond. Firm pressure here is what keeps the sandwich from separating later.Look for Cheese should reach every edge with no tortilla showing through, and the top tortilla should hold when lifted lightly.Tip Mozzarella gives the stretch and cheddar the flavor; all-cheddar twists brown faster, so watch the final minutes.
- Cut into stripsWith a sharp knife or a pizza cutter, slice the stacked tortillas into strips about 1 inch wide, wiping the blade between cuts so the cheese does not drag. Make one confident pass per strip; a sawing motion shreds the tortilla edges and opens gaps where cheese can escape while baking.Look for Strips should be even, about 1 inch wide, with the cheese layer sealed and only barely peeking at the cut edges.Tip A pizza cutter gives the cleanest lines; a dull knife drags and pulls the tortilla layers out of alignment.
By the end of this phase, the work is done and the sheet is ready. Both tortillas should carry a thin, even coat of garlic butter, the cheese layer should reach every edge with taco seasoning scattered over it, and the second tortilla should sit bonded on top with no sliding.
The strips should be an even inch wide with clean, sealed cut edges. Run a fingertip along a strip: if the layers separate, press the stack once more before twisting, because a loose sandwich only gets looser in the oven.
Twist and bake
- Twist the stripsPick up each strip, hold both ends, and twist it two or three full turns into a spiral, then lay it on a parchment-lined baking sheet. Keep the twists snug but not compressed, and leave a finger-width of space between them so hot air circulates and the edges blister instead of steaming.Look for Each spiral should hold its shape loosely when set down, with visible gaps of tortilla between the cheese layers.Tip Twist in the direction the strip already wants to curl; forcing it the other way squeezes the cheese out.
- Bake until goldenBake at 400°F (200°C) for about 9 minutes, rotating the sheet halfway through so the twists color evenly. They are ready when deeply golden, blistered in spots, and firm to the touch. Brush the hot twists with the reserved garlic butter the moment they leave the oven so it soaks in glossy.Look for Deep golden color, blistered bubbles on the surface, and a dry, firm feel when a twist is tapped with a fingertip.Tip Ovens run hot and cold; start checking at 7 minutes if the strips were cut slightly thinner than a full inch.
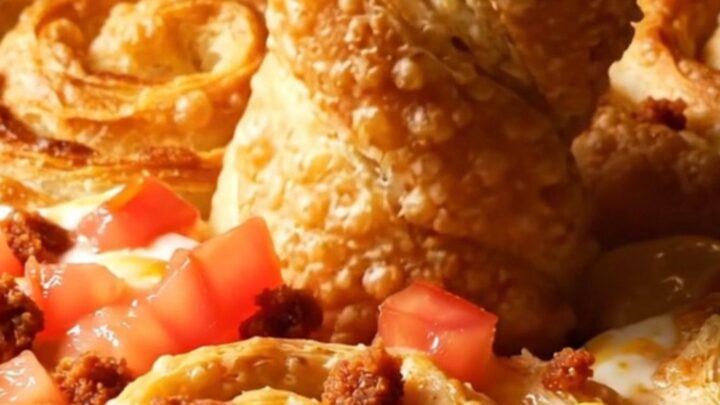
The spirals should be laid out with breathing room, each holding a loose spiral shape with visible tortilla ridges. After baking, they should be deep golden, blistered in spots, and firm; tap one and it should feel dry and crisp, not bendy. Tear one open over the board: the cheese should be melted all the way through and pull in strings. If the edges are golden but the centers still feel soft, give the sheet 2 more minutes. Brush with the reserved garlic butter while they are piping hot.
Queso and the table
- Warm the quesoWhile the twists bake, set the queso blanco in a small cast-iron skillet or saucepan over low heat and stir often until it loosens and bubbles gently at the edges, 5 to 6 minutes. Keep the heat low; queso that boils hard can split and turn grainy, and a slow warm-up keeps it smooth and dippable.Look for The queso should stir easily, look glossy, and bubble lazily at the edges, never rollicking in the center.Tip A splash of milk loosens thick queso without thinning the flavor; add it a tablespoon at a time.
- Top and serveSlide the warm queso off the heat and scatter the diced tomatoes and crumbled chorizo over the surface, leaving the flecks distinct on top rather than stirred in. Set the skillet in the middle of the table with the twists alongside, still warm from the oven, and serve while the queso flows.Look for Tomatoes should sit bright on the surface and the chorizo flecks should stay distinct, not folded into the queso.Tip Warm the serving board if the table sits far from the kitchen; queso tightens quickly on a cold dish.
The queso should be loose, glossy, and just bubbling at the edges, with no skin on top and no graininess when stirred. The tomatoes should sit bright and distinct on the surface and the chorizo flecks should stay visible rather than folding in. Taste the dip with the first twist: it should coat the bread heavily and flow slowly off the spoon. If it has tightened while waiting, warm it over low heat with a splash of milk. Serve everything right away, while the twists still crackle.
Common mistakes
The most common failure is overfilling: more than an even single layer of cheese pushes out at the cut edges and burns on the sheet. Sawing at the strips with a dull blade drags the layers apart, so cut in one clean pass.
Twisting too tightly squeezes cheese from the ends; the spiral should be snug, not strangled. An oven that runs cool gives pale, chewy twists, so trust the color over the clock. Finally, queso brought to a hard boil splits and turns grainy; keep it at a lazy simmer and stir often.
How to tell it’s done
The twists are done when they are deeply golden, blistered with small bubbles across the surface, and firm and dry to a light fingertip tap; the edges should crackle rather than bend. About 9 minutes at 400°F is the guide, but color is the real signal, so start checking early.
The cheese inside should be fully melted and stretchy when a twist is torn apart. The queso is ready when it stirs smoothly, looks glossy, and bubbles gently at the edges; if it thickens on the table, a spoonful of warm milk brings it back.
Up next · Part 3 of 3
4 variations · storage & make-ahead · 5 answers · printable card
Tips, FAQ & printable recipe (Part 3)← Back to the ingredients (Part 1)