Dinner · Part 2 of 3: Instructions
Crispy Tonkatsu Onigirazu: Easy Sushi Rice Sandwich Step-by-step instructions
- Prep
- Cook
- Total
- Serves
- 2
Before you start
Before starting, make sure you have cooked sushi rice ready. If using leftover rice, warm it gently so it's pliable. Prepare the katsu cutlet by frying it until it's golden and crispy; keep it warm.
Shred the cabbage finely and set aside. Lay out a large piece of plastic wrap on your work surface. Have a small bowl of water for wetting your hands to prevent sticking. Gather all ingredients and equipment within reach.
Ingredients at a glance (7)
- 2 sheets toasted nori seaweed
- 300 g seasoned cooked sushi rice
- 1 crispy fried pork or chicken katsu cutlet
- 2 tbsp Japanese tonkatsu sauce
- 1 tbsp Kewpie mayonnaise
- 1 cup shredded green cabbage
- Plastic wrap for wrapping and tight slicing, to taste
Instructions
Assemble the layers
- Prepare the rice and cabbageHave the seasoned sushi rice ready at room temperature. If it was refrigerated, gently warm it in the microwave or over a double boiler until it is just slightly warm to the touch. Shred the green cabbage finely and set aside. Place a sheet of plastic wrap on a clean work surface.Look for The rice should be sticky and slightly warm, not hot.Tip Keep a small bowl of water nearby to wet your hands when handling the rice to prevent sticking.
- Lay the nori and ricePlace one sheet of nori diagonally on the plastic wrap. Wet your hands with water and take about half of the sushi rice. Spread it evenly in a square shape in the center of the nori, about 1/2-inch thick, leaving a border of nori around the edges.Look for The rice square should be about 4 inches across.Tip Use a spatula or your wet fingers to press the rice evenly without compacting it too much.
- Add cabbage and katsuSprinkle half of the shredded cabbage over the rice. Place the crispy katsu cutlet on top of the cabbage. Drizzle with half of the tonkatsu sauce and then half of the Kewpie mayonnaise in a zigzag pattern.Look for The katsu should be centered and the sauce should cover the surface.Safe temperature 165°F (74°C) internal temperature (poultry)Tip If the katsu is large, trim it to fit within the rice square.
- Top with remaining riceWet your hands again and take the remaining sushi rice. Spread it evenly over the katsu and cabbage, covering them completely. Press gently to make an even layer.Look for The rice should completely cover the filling, with no gaps.Tip If the rice sticks to your hands, wet them again.
At this point, you should have a square of rice on the nori, topped with cabbage, katsu, sauce, and mayo, and covered with another layer of rice. The stack should be about 1 to 1 1/2 inches tall. The nori should be dry and crisp, and the rice should be sticky enough to hold the layers together. Check that the katsu is centered and the sauce is evenly drizzled.
Fold and wrap
- Fold the noriFold the four corners of the nori over the rice, one at a time, like an envelope. Press gently to adhere. The nori should wrap snugly around the rice and filling.Look for The nori should be taut and cover the rice completely.Tip If the nori doesn't stick, moisten the edges with a little water.
- Wrap in plasticWrap the folded onigirazu tightly in the plastic wrap, twisting the ends to secure. Let it rest at room temperature for 5 to 10 minutes so the nori softens slightly and the sandwich holds its shape.Look for The package should feel firm and compact.Tip Resting helps the nori become chewy and easier to slice.
After folding the nori corners and wrapping in plastic, the package should be compact and secure. The nori should be slightly softened from the moisture of the rice, but still intact. The plastic wrap should be tight, with no air pockets. The sandwich should feel firm when pressed gently. Resting for a few minutes allows the nori to become chewy and the layers to meld.
Slice and serve
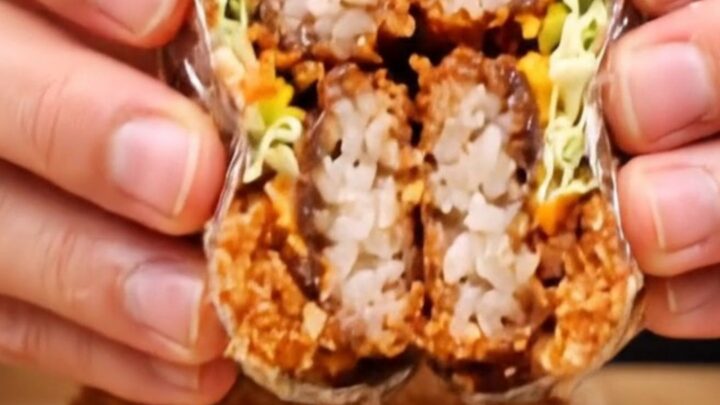
- Slice and serveUsing a sharp knife, slice the wrapped onigirazu in half crosswise. Keep the plastic wrap on while slicing to prevent the filling from spilling. Remove the plastic wrap and serve the halves with the cut sides facing up.Look for A clean slice reveals the beautiful layers of rice, cabbage, and katsu.Tip Use a moistened knife for cleaner slices.
When you slice the onigirazu in half, you should see a clean cross-section with distinct layers of rice, cabbage, and katsu. The nori should be a deep green, and the rice should be glossy.
The katsu should be golden brown, and the sauce and mayo should be visible as ribbons. The halves should hold their shape without falling apart, and the aroma should be savory and inviting.
Common mistakes
One common mistake is overfilling the onigirazu, which makes folding difficult and causes the filling to spill out. Keep the rice layer about 1/2-inch thick and the filling proportional.
Another mistake is slicing too early—if you slice before the nori has softened and the sandwich has set, the layers may fall apart. Be sure to rest the wrapped sandwich for at least 5 minutes. Also, using a dull knife can crush the rice; use a sharp knife and wipe it clean between cuts.
How to tell it’s done
The onigirazu is done when the nori is slightly softened and the sandwich holds its shape after being wrapped and rested. When sliced, the cross-section should show distinct layers: rice, cabbage, katsu, and sauce.
The katsu should be crispy on the outside and juicy on the inside, with an internal temperature of 165°F (74°C) for chicken or 145°F (63°C) for pork, followed by a 3-minute rest. The rice should be tender and seasoned, and the cabbage should retain a fresh crunch.
- Poultry: 165°F (74°C) in the thickest part
- Steaks, chops and roasts: 145°F (63°C) in the thickest part, then a 3-minute rest
Up next · Part 3 of 3
4 variations · storage & make-ahead · 5 answers · printable card
Tips, FAQ & printable recipe (Part 3)← Back to the ingredients (Part 1)