Dinner · Part 2 of 3: Instructions
Crispy Smashed Potatoes with Melted Raclette Cheese Step-by-step instructions
- Prep
- Cook
- Total
- Serves
- 4
Before you start
Before you start, set out all your ingredients and tools so the cooking moves quickly once the potatoes are hot. Bring a large pot of salted water to a boil for the potatoes. Scrub the baby potatoes well and leave the skins on, since they crisp up beautifully. Peel the garlic cloves and crush them lightly with the flat of your knife so they release their flavor in the fat. Pull the rosemary leaves from the woody stems and keep them ready. Slice the green onions thinly and set them aside on a small plate. Grate the raclette over a box grater just before you need it, placing it on a plate close to the stove. Have your tongs, your masher and a clean wooden board within reach.
Ingredients at a glance (9)
- 2 lb baby potatoes, scrubbed
- 8 oz raclette cheese, rind removed, for grating
- 6 cloves garlic, peeled and lightly crushed
- 3 sprigs fresh rosemary
- 3 green onions, thinly sliced, for serving
- 3 tbsp unsalted butter
- 3 tbsp neutral oil, such as canola
- kosher salt, to taste
- flaky salt, for serving
Instructions
Boil, drain and smash
- Boil the baby potatoesPlace the baby potatoes in a large pot, cover with cold water and add a generous pinch of kosher salt. Bring to a boil, then simmer until a knife slides into the centers with little resistance. Drain well and let them steam dry in the colander.Look for A knife slides in with slight resistance and the skins look tight and dry.Tip Salt the cooking water well so the potatoes are seasoned from the inside.
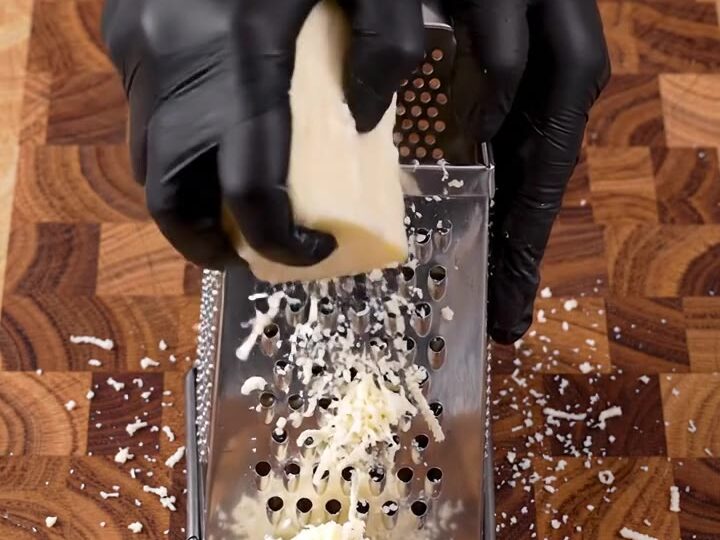
- Prep the garlic and grate the cheesePeel the garlic cloves and lightly crush them with the flat of your knife. Grate the raclette over a box grater so it falls in a fluffy mound. Pull the rosemary leaves from the woody stems and slice the green onions thinly.Look for The raclette forms a light, fluffy pile of shreds on the board.Tip Chill the cheese for 10 minutes first; it grates much more cleanly.
After boiling, the potatoes should be tender enough for a knife to slide into the center with only slight resistance, and their skins should look dry and tight. Drain them well and let them steam for a minute so no water remains. Once smashed, each potato should be a thick disc about half an inch high, with split skins and rough, exposed edges.
Check that the discs are roughly the same thickness so they cook evenly. If any potato is still firm in the middle, return it to the pot for a few more minutes before continuing. Dry potatoes crisp far better than wet ones, so do not skip the steaming step. You are ready for the skillet when the potatoes look sturdy and evenly flattened, with no cracks through the center of the disc.
Golden, crisp and fragrant
- Smash the potatoes flatPlace each boiled potato on the wooden board and press it with a potato masher or the bottom of a glass until it flattens into a thick disc. Slice a few larger potatoes in half with a chef's knife if needed so they flatten evenly.Look for Each potato is flattened to a disc with split skins and exposed edges.Tip Keep the discs about half an inch thick so the centers stay tender.
- Fry in butter and oilHeat the oil and butter in a cast iron skillet over medium-high heat until the butter foams. Add the smashed potatoes in a single layer with the garlic and rosemary. Fry without moving them for 5 to 6 minutes, then flip and fry until the edges turn deep golden and crisp.Look for The butter bubbles around the potatoes and the edges turn deep golden and crisp.Tip Spoon the bubbling fat over the potatoes to crisp the tops evenly.
After frying, the butter and oil should have bubbled around the potatoes and the edges should be deep golden and crisp when you lift one with tongs. The garlic should be golden and fragrant, and the rosemary should smell toasted rather than raw. Look for a crust that releases easily from the pan; if the potatoes stick, let them cook a minute longer before moving them. The tops should look glossy from the spooned fat. Pale, soft edges mean the heat is too low or the pan is overcrowded, so give the potatoes more room. Before adding the cheese, check that the skillet is still sizzling gently and that nothing is burning. Lowering the heat at this point protects the crust while the cheese melts.
Molten cheese and browned finish
- Pile on the racletteReduce the heat to medium-low. Pile the grated raclette generously over the potatoes, covering them as much as possible. Cover the skillet and let the cheese melt for 2 to 3 minutes until it bubbles and softens.Look for The cheese is fully melted and starts to bubble at the edges.Tip Use the lid or a sheet of foil to trap heat and speed up melting.
- Brown the cheese and serveUncover the skillet and cook for 1 to 2 minutes more, until the cheese browns in spots and the potato edges stay crisp. Lift the potatoes with tongs to show the long cheese pulls. Scatter the sliced green onions and flaky salt over the top and serve from the skillet or a board.Look for The cheese is golden and bubbling, and it stretches in long pulls when lifted.Tip Serve immediately while the cheese is still molten and the potatoes crisp.
After the cheese melts, it should be fully liquid and bubbling at the edges, and after a final uncovered minute it should show golden spots across the surface. When you lift a piece with tongs, the cheese should stretch in long, glossy pulls without breaking. The potato edges should still be crisp, not soft from steam under the lid.
Check the cheese first, then the crust: if the cheese is melted but the potatoes look limp, uncover and cook a little longer over medium heat. Once you see the cheese stretch and the bottoms stay crisp, the dish is ready. Sprinkle the green onions and flaky salt only at the end so they keep their color and bite. Serve right away, because the cheese firms up and the crust softens as the dish cools.
Common mistakes
The most common mistake is crowding the skillet. When too many potatoes share the pan, they release steam instead of frying, and the edges turn pale and soft rather than crisp. Fry in a single layer, and use two batches if your pan is small. Another frequent error is smashing the potatoes too thin; very thin discs dry out and burn before the centers warm through.
Aim for about half an inch and press evenly. Adding the cheese over high heat is also risky, because the outside browns and burns while the middle stays cold and stiff. Lower the heat before the cheese goes on. Finally, do not skip drying the boiled potatoes. Surface moisture cools the fat and prevents the crust from forming, so let them steam dry for a minute before they touch the oil.
How to tell it’s done
The dish is done when the potatoes have deep golden, crisp edges that hold their shape, and the raclette has fully melted into a bubbling, glossy layer with golden spots. Lift a piece with tongs: the cheese should stretch into long pulls without breaking, and the potato should feel tender through the center.
The potatoes themselves are cooked when a knife slides through without resistance, which happens during boiling; the frying and melting steps are about color and texture. There is no protein in this recipe, so no internal temperature applies. Use your eyes and the sound of the pan: the sizzling should soften as the cheese melts, and the aroma should move from butter and garlic to toasty, nutty cheese. When all three signs appear at once, the dish is ready to serve.
Up next · Part 3 of 3
4 variations · storage & make-ahead · 5 answers · printable card
Tips, FAQ & printable recipe (Part 3)← Back to the ingredients (Part 1)