Appetizers · Part 2 of 3: Instructions
Crispy Fried Gnocchi Mozzarella Skewers with Arrabbiata Dip Step-by-step instructions
- Prep
- Cook
- Total
- Serves
- 4
Before you start
Before you start, set up a small assembly line: have the gnocchi dough, mozzarella balls, rosemary stems, beaten egg, and panko within reach. Fill a large skillet with olive oil to a depth of about 2 cm and attach a kitchen thermometer to the side.
Line a plate with paper towels for draining. If the gnocchi dough is sticky, dust your hands and work surface with flour. The oil can heat while you assemble the skewers, so you can start frying as soon as everything is coated.
Ingredients at a glance (8)
- 250 g fresh potato gnocchi dough
- 12 mini ciliegine mozzarella balls
- 4 woody rosemary stems, stripped of leaves
- 1 large egg, beaten
- 100 g garlic-parmesan panko
- Olive oil for frying, to taste
- Warm basil pesto, for dipping, to taste
- Spicy arrabbiata sauce, warmed, for dipping, to taste
Instructions
Wrap and Skewer
- Wrap the gnocchi around mozzarellaDivide the gnocchi dough into 12 equal pieces. Flatten each piece into a small disk. Place a mini mozzarella ball in the center and wrap the dough around it, sealing the edges completely to form a ball. Repeat with the remaining dough and mozzarella.Look for The dough should fully enclose the mozzarella with no gaps.Tip Keep your hands lightly floured to prevent sticking.
- Skewer the gnocchi ballsThread 3 gnocchi balls onto each rosemary stem, pushing them gently but firmly. The rosemary acts as a flavor-infusing skewer and a natural handle.Look for The balls should be snug on the skewer but not squished.Tip Trim the rosemary stems to about 8 inches long for easy handling.
At this stage, you should have 12 neat gnocchi balls, each with a mozzarella center fully enclosed. The dough should feel smooth and pliable, with no cracks. The skewers should hold three balls each, and the rosemary should be stripped of leaves except for the top tuft.
The assembly should feel secure but not overly tight—if the dough cracks, pinch it back together. This is the foundation of the dish, so take your time to get the sealing right.
Coat and Heat
- Coat in egg wash and pankoDip each skewer into the beaten egg, turning to coat all sides. Then roll in the garlic-parmesan panko, pressing gently so the crumbs adhere. Set the coated skewers on a plate while you heat the oil.Look for The coating should be even and fully cover the gnocchi.Tip For a thicker crust, dip again in egg and panko.
The coated skewers should be evenly covered with a thick layer of panko, with no bare spots. The egg wash ensures the crumbs stick, so make sure every surface is coated. The oil should be shimmering and read 365°F (185°C) on the thermometer. When you drop a pinch of panko into the oil, it should sizzle and brown within seconds. If it burns immediately, the oil is too hot—let it cool slightly before frying.
Fry and Serve
- Heat the olive oilPour olive oil into a large skillet to a depth of 2 cm (about 3/4 inch). Heat over medium-high until it reaches 365°F (185°C) on a kitchen thermometer.Look for The oil should shimmer and a breadcrumb dropped in should sizzle immediately.Tip Use a thermometer for accuracy; too hot and the crust burns, too cool and it absorbs oil.
- Fry the skewersCarefully place 2 skewers in the hot oil. Fry for 2.5 minutes per side, turning once, until the coating is deeply blistered and golden brown. The internal temperature of the egg wash should reach 160°F (71°C) to ensure the egg is fully cooked.Look for The crust should be golden brown and crisp, with the rosemary releasing its aroma.Safe temperature 160°F (71°C) internal temperature (egg dishes)Tip Do not crowd the pan; fry in batches to keep the oil temperature steady.
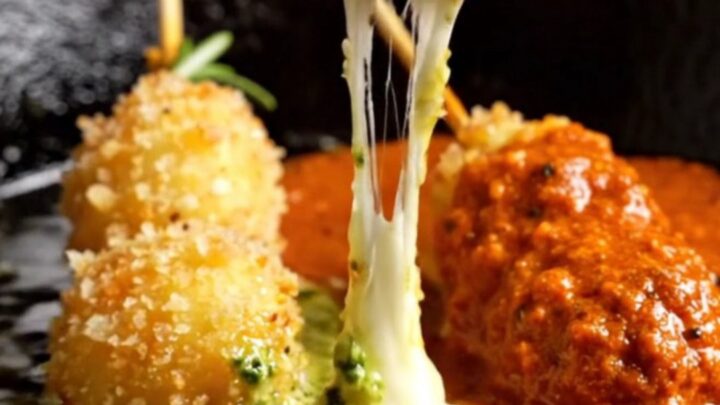
- Drain and serveUse tongs to transfer the fried skewers to a paper-towel-lined plate to drain excess oil. Serve immediately with warm basil pesto and spicy arrabbiata sauce for dipping.Look for The skewers should be crisp outside and the mozzarella molten inside.Tip Let them rest for 1 minute before serving to avoid burning mouths.
The skewers should be deeply golden brown with a blistered, crunchy crust. The rosemary will have darkened slightly and released its aroma. When you lift a skewer, it should feel crisp and light, not greasy. The cheese inside should be molten and stretchy when you pull a ball apart. Serve immediately with warm arrabbiata and pesto, and watch them disappear.
Common mistakes
One common mistake is overcrowding the skillet, which drops the oil temperature and results in greasy, soggy skewers. Fry only two at a time to maintain the heat. Another is not sealing the gnocchi dough properly around the mozzarella, causing the cheese to leak into the oil.
Make sure the edges are pinched tightly. Also, avoid using fresh rosemary stems that are too thin—they can snap under the weight. Use thick, woody stems and push the skewers gently but firmly.
How to tell it’s done
The skewers are done when the coating is deeply golden brown and blistered, and the internal temperature of the egg wash reaches 160°F (71°C). To check, insert an instant-read thermometer into the center of a gnocchi ball, avoiding the mozzarella.
The crust should feel crisp and shatter when pressed, and the cheese inside should be fully melted and molten. If the crust browns too quickly, reduce the heat slightly to ensure the dough cooks through without burning.
- Egg dishes: 160°F (71°C) in the thickest part
Up next · Part 3 of 3
4 variations · storage & make-ahead · 5 answers · printable card
Tips, FAQ & printable recipe (Part 3)← Back to the ingredients (Part 1)