Dinner · Part 2 of 3: Instructions
Crispy Mini Garlic Mushroom Pides with Cheese Pull Step-by-step instructions
- Prep
- Cook
- Total
- Serves
- 4
Before you start
Before starting, gather all the ingredients and measure them out. Warm the milk to about 110°F (43°C) if it's not already warm—this is the ideal temperature to activate the yeast without killing it. Have the flour, salt, and oil ready.
For the garlic paste, peel the garlic cloves and set them aside. Soften the butter. Slice the mushrooms and chop the parsley. Preheat the oven to 410°F (210°C) just before baking. Line a baking sheet with parchment paper. Clear a work surface for kneading and shaping the dough.
Ingredients at a glance (13)
- 1 cup warm milk
- 1 tsp active dry yeast
- 1 tsp salt
- 2 tbsp olive oil
- 2 1/2 cups all-purpose flour
- 12 cloves garlic, peeled
- 2 tbsp unsalted butter, softened
- black pepper to taste
- 1/2 tsp paprika
- 2 tbsp fresh parsley, chopped
- 250 g shredded kaşar cheese (or mozzarella)
- 200 g button mushrooms, sliced
- 1 tsp red pepper flakes
Instructions
Dough and Garlic Paste
- Make the doughIn a large bowl, combine the warm milk, yeast, and salt. Let stand for 5 minutes until the yeast is foamy. Add the olive oil and flour, and mix until a shaggy dough forms. Turn out onto a lightly floured surface and knead for 8–10 minutes until smooth and elastic. Place in a greased bowl, cover, and let rise in a warm spot until doubled, about 1 hour.Look for The dough should be soft, smooth, and spring back when poked.Tip If the dough feels too sticky, add a little more flour, a tablespoon at a time.
- Make the garlic pasteWhile the dough rises, heat a small skillet over medium heat and add the garlic cloves with a splash of oil. Cook, stirring, until the garlic is golden and fragrant, about 3–4 minutes. Remove from heat and let cool slightly. Mash the garlic with the softened butter, black pepper, paprika, and parsley until a smooth paste forms.Look for The garlic should be golden and soft enough to mash easily.Tip Mash the garlic with a fork or use a small food processor for an even smoother paste.
The dough should be smooth, elastic, and doubled in size. The garlic should be golden and fragrant, and the paste should be thick and spreadable. The kitchen will smell of warm milk, yeast, and toasted garlic.
Shaping, Topping, and Baking
- Shape the pidesPunch down the risen dough and divide it into 4 equal pieces. On a lightly floured surface, roll each piece into an oval about 8 inches long and 5 inches wide. Transfer the ovals to a parchment-lined baking sheet.Look for The ovals should be even and about 1/4-inch thick.Tip Keep the edges slightly thicker than the center to form a rim.
- Top the pidesSpread a generous layer of the garlic butter paste over each dough oval, leaving a small border around the edges. Sprinkle the shredded cheese evenly over the paste, then scatter the sliced mushrooms on top. Finish with a pinch of red pepper flakes.Look for The toppings should cover the dough evenly but not overflow.Tip Use your fingers to press the cheese and mushrooms lightly into the dough so they stay put during baking.
- Bake the pidesPreheat the oven to 410°F (210°C). Bake the pides for 18 minutes, or until the crust is golden brown and blistered and the cheese is melted and bubbling. The edges should be crisp and deep golden.Look for The crust should be deeply golden and the cheese bubbling.Tip Rotate the baking sheet halfway through for even browning.
The dough ovals should be even and slightly puffed. The toppings should be evenly distributed. During baking, the crust will turn golden and blistered, and the cheese will melt and bubble. The aroma will be intensely garlicky and buttery.
Finishing and Serving
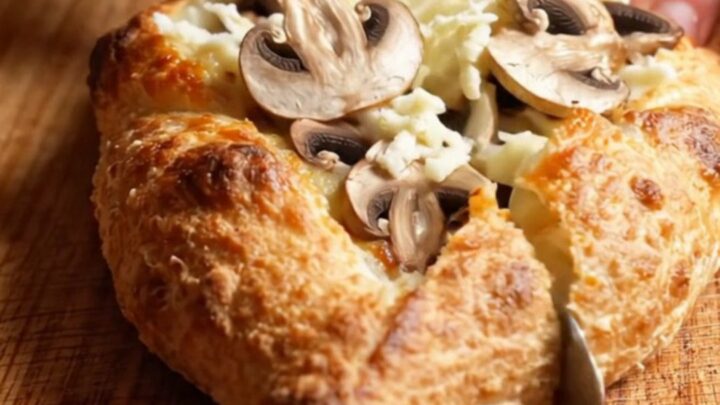
- Finish and serveRemove the pides from the oven and let them cool for 2–3 minutes. Slice each pide diagonally with a sharp knife to expose the gooey cheese. Serve warm, with extra red pepper flakes if desired.Look for The cheese should stretch in long webs when pulled apart.Tip For the best cheese pull, serve immediately while the cheese is still hot and stretchy.
The pides should be deeply golden with crisp edges. When sliced, the cheese should stretch in long, gooey strands. The texture should be crunchy on the outside and soft inside, with a rich, savory flavor.
Common mistakes
One common mistake is over-kneading the dough, which can make it tough. Knead only until smooth and elastic, about 8–10 minutes.
Another pitfall is overloading the pides with toppings, which can make them soggy. Use a moderate amount of cheese and mushrooms, and leave a border to allow the crust to puff.
Also, resist the urge to open the oven door during baking—this lets out heat and can prevent the crust from becoming crisp. Finally, let the pides cool for a few minutes before slicing; cutting too soon can cause the cheese to stick to the knife and the pide to fall apart.
How to tell it’s done
The pides are done when the crust is deeply golden brown and blistered, and the cheese is melted and bubbling. The edges should be crisp and slightly charred in spots. To check, lift one pide with a spatula—the bottom should be golden and firm.
The internal temperature of the bread should be around 200°F (93°C) if checked with an instant-read thermometer. The cheese should be fully melted and stretchy when pulled. Let them cool for a couple of minutes before slicing to allow the cheese to set slightly, making it easier to cut.
Up next · Part 3 of 3
4 variations · storage & make-ahead · 5 answers · printable card
Tips, FAQ & printable recipe (Part 3)← Back to the ingredients (Part 1)