Appetizers · Part 2 of 3: Instructions
Crispy Handmade Sopes with Smoky Chicken Tinga Step-by-step instructions
- Prep
- Cook
- Total
- Serves
- 8
Before you start
Before the first disc is pressed, line up the whole station. Measure the masa harina, salt and warm water, and set a large mixing bowl, a damp kitchen towel, plastic sheets or parchment, and a tortilla press or flat baking dish within reach.
Put the comal on the burner and the deep skillet beside it with the oil and thermometer ready.
Ingredients at a glance (11)
- 2 cups masa harina
- 1 1/2 cups warm water
- 1/2 tsp kosher salt
- 3 cups neutral oil for frying, such as vegetable oil, for shallow frying
- 1 cup refried black beans, warmed
- 2 cups shredded chicken tinga, warmed (store-bought or made ahead)
- 1 cup finely shredded romaine lettuce
- 1/2 cup Mexican crema
- 1/2 cup crumbled queso fresco
- 1/4 cup crumbled cotija cheese
- 1/2 cup salsa verde, for serving
Instructions
Make and press the masa
- Mix the masa doughStir the masa harina and salt together in a large bowl. Pour in the warm water a little at a time, mixing with your hand until shaggy clumps form. Knead for 2 to 3 minutes directly in the bowl until the dough turns smooth, pliable and slightly tacky, like soft play dough, with no dry crumbs left at the bottom.Look for The dough should press into a clean ball that does not crack at the edges.Tip If it cracks, work in warm water a tablespoon at a time; if it sticks, add a dusting of masa harina.
- Rest the doughCover the bowl with a damp kitchen towel and let the dough sit for 15 minutes. This pause lets the masa fully hydrate, so the discs press without cracking and the rims pinch cleanly later. Keep the towel damp the whole time; exposed masa dries out fast and turns crumbly, which makes smooth 4-inch discs much harder to shape.Look for The surface should look moist, not powdery, when the towel comes off.Tip Line the bowl with plastic wrap touching the dough if the kitchen is dry or warm.
- Press thick 4-inch discsDivide the dough into 8 equal balls, keeping them covered. Press each one between plastic sheets or parchment into a thick 4-inch disc, about 1/4 inch thick. Thick is the point here: thin discs turn into tostadas, while this heft gives the sopes the sturdy base that holds beans and tinga without going soggy under the toppings.Look for Edges should look smooth and even, with no cracks around the rim.Tip A flat baking dish pressed on top of a dough ball presses several discs to the same thickness.
At the end of this phase the dough should be smooth, pliable and slightly tacky, pressing into a ball that does not crack, and the eight discs should be a full 1/4 inch thick with even, smooth edges. If a disc cracks when pressed, the dough is dry: knead in warm water a tablespoon at a time and repress.
Cook, pinch and fry
- Cook the discs on the comalHeat a dry cast-iron comal or heavy skillet over medium heat. Cook each disc for about 90 seconds per side, until the underside shows light golden spots and the surface looks dry and slightly puffed. The discs are not finished yet; this dry cook sets the masa so the discs hold their shape when they go into the oil.Look for Pale golden freckles on both sides and a dry, matte surface mean the discs are ready.Tip Stack the cooked discs under a towel so steam keeps them flexible for pinching.
- Pinch the raised rimWhile each disc is still warm and pliable, pinch the outer edge with your thumb and forefinger, working around the rim to build a raised wall about 1/2 inch high. Press firmly enough to make a clean ridge but gently enough not to tear the masa. This border is what turns a flat disc into a boat that holds its filling.Look for The rim should stand on its own, even and continuous, all the way around.Tip Rotate the sope as you pinch so the wall stays the same height everywhere.
- Fry until golden and crispPour the oil into a deep heavy skillet to about 1/2 inch and heat it to 365°F (185°C) on a thermometer. Fry the masa boats in a single layer, about 60 seconds per side, until the bottom and the pinched rim turn golden and crisp. Work in batches and keep the oil steady; a drop in temperature makes the shells greasy.Look for Deep golden color on the rim and a firm, hollow tap when the shell is lifted.Tip Drain the shells upright on paper towels so no oil pools inside the cup.
The comal-cooked discs should show pale golden freckles on both sides and feel dry and flexible, never stiff or browned.
After pinching, each rim should stand about 1/2 inch high, even all the way around, without tears. After the fry, the shells should be deep golden on the bottom and rim, crisp to the tap, and sound faintly hollow.
Fill and finish
- Warm the beans and the tingaSet a small saucepan over medium-low heat and warm the refried black beans, stirring until they loosen enough to spread easily. Warm the shredded chicken tinga in a second pan or in the microwave, stirring occasionally, until it is heated through to 165°F (74°C) on an instant-read thermometer. Both fillings should be warm when they meet the crisp shells, so the sopes taste assembled fresh, not reheated.Look for The beans should stir smoothly with no stiff spots; the tinga should steam lightly.Safe temperature 165°F (74°C) internal temperature (poultry)Tip If the tinga seems dry, loosen it with a tablespoon of water or salsa verde.
- Spread the bean layerSpoon a thin layer of warm refried black beans into each crisp masa cup, spreading it up the pinched walls with the back of the spoon. This bean layer does double duty: it seasons the whole bite and acts as a moisture barrier, keeping the bottom of the shell crisp while the juicier toppings pile on above it.Look for An even, glossy coating that reaches most of the way up the rim.Tip Leave the top of the rim clean so the shell stays crisp where fingers hold it.
- Pile on the tinga and lettuceMound the warm smoky chicken tinga generously over the beans, letting it overflow slightly over the rim the way the best antojito-shop sopes do. Follow with a handful of finely shredded romaine lettuce. The cool, crisp lettuce on top of the warm filling is part of the classic contrast, so add it after the chicken, never before.Look for A generous, slightly overflowing mound that still sits upright in the cup.Tip Shred the lettuce fine; long ribbons slide off and make the sopes hard to eat.
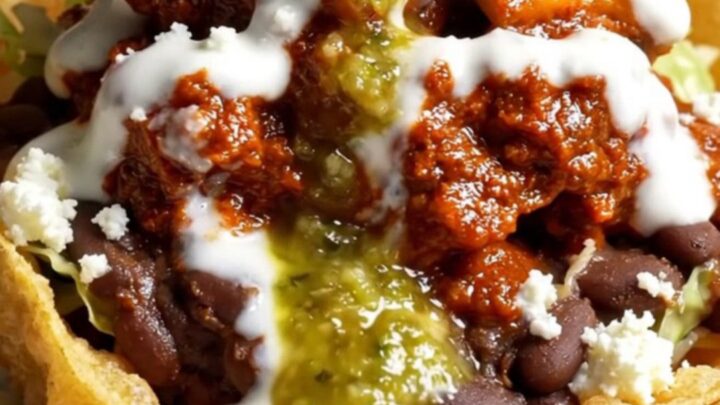
- Finish with crema, cheese and salsaDrizzle Mexican crema over each sope, then scatter crumbled queso fresco and cotija on top, letting some fall onto the plate the way they do at a street stall. Spoon salsa verde over everything just before serving so the shells stay crisp. Serve immediately, while the rims are still warm and crackling under the toppings.Look for Crema drizzling in thin ribbons and cheese clinging to the tinga.Tip Set extra salsa verde on the table; the second drizzle is always wanted.
The beans should be warm and spreadable, coating the inside of each cup and climbing partway up the walls. The tinga should be heated through, glossy with its sauce, mounded generously and slightly overflowing.
The lettuce stays bright green and crisp, the crema drizzles in thin ribbons rather than pooling, and the cheeses cling where they land. Salsa verde goes on last, just before the sopes leave the counter.
Common mistakes
The most common failure is thin discs: pressed too thin, they crisp like tostadas and snap instead of yielding. Keep them a full 1/4 inch thick.
Pinching cold discs tears the masa; pull them off the comal and pinch while warm, working quickly. Oil that drifts below 350°F makes the shells greasy and pale, so fry in small batches and let the temperature recover between them.
How to tell it’s done
A finished sope tells on itself in three places. The shell: deep golden on the bottom and along the pinched rim, firm enough to pick up with two fingers without flexing, and crisp when tapped. The fillings: beans spread glossy and warm, tinga heated through with its sauce clinging to the shreds, and lettuce still cool and bright.
- Poultry: 165°F (74°C) in the thickest part
Up next · Part 3 of 3
4 variations · storage & make-ahead · 5 answers · printable card
Tips, FAQ & printable recipe (Part 3)← Back to the ingredients (Part 1)