Desserts · Part 2 of 3: Instructions
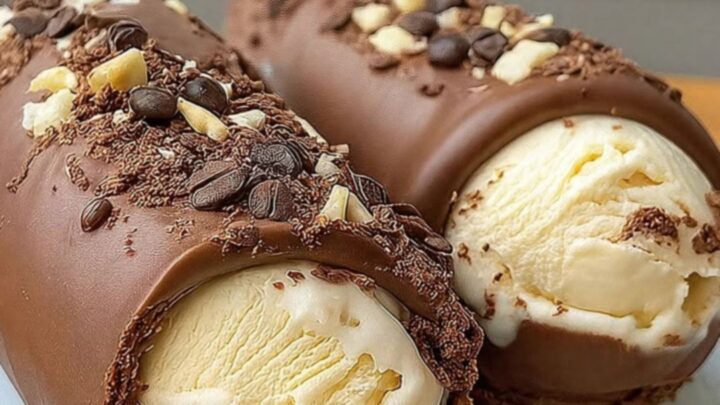
Crispy Chocolate Ice Cream Logs for an Easy Indulgent Dessert Step-by-step instructions
- Prep
- Cook
- Total
- Serves
- 8
Before you start
Before beginning, clear enough space in your freezer to accommodate a baking sheet.
Ensure all your ingredients are measured and ready, as the coating process happens quickly once the chocolate is melted.
Have your parchment paper and garnishes within easy reach to ensure the chocolate does not harden before you can finish decorating.
Ingredients at a glance (4)
- 1 quart premium vanilla ice cream, slightly softened
- 12 oz semisweet chocolate, chopped
- chocolate shavings for serving
- chopped nuts for serving
Instructions
Shaping the ice cream
- Shape the ice cream logsPlace the softened vanilla ice cream onto a sheet of plastic wrap and use your hands to shape it into two cylinder-shaped logs. Wrap each log tightly in the plastic wrap and freeze for at least one hour until firm enough to handle.Look for The ice cream should be firm enough to hold its shape when unwrapped.Tip If the ice cream is too soft, put it back in the freezer for longer before attempting to shape.
The ice cream should be shaped into smooth, uniform cylinders. They should be wrapped tightly in plastic to ensure they maintain their form and do not absorb any freezer odors while firming up.
Melting the chocolate
- Prepare the chocolate coatingMelt the chopped semisweet chocolate using a double boiler over low heat. Stir the mixture continuously until completely smooth and glossy, then remove from the heat and allow it to cool slightly so it does not melt the ice cream too quickly.Look for The mixture should be thin enough to coat the logs evenly.Tip Ensure no water droplets fall into the chocolate, as this can cause it to seize.
The chocolate should be completely smooth, silky, and free of any lumps. It should be warm to the touch but not hot, ensuring it can coat the ice cream without melting it instantly.
Coating and finishing
- Coat and garnish the logsRemove the frozen ice cream logs from the plastic wrap and place them on a parchment-lined baking sheet. Pour the melted chocolate over the logs, ensuring they are fully covered. Immediately sprinkle with chocolate shavings and chopped nuts before the chocolate shell hardens completely. Return to the freezer until ready to serve.Look for The chocolate will begin to set and crackle within seconds of touching the cold ice cream.Tip Work quickly to ensure the toppings stick firmly to the chocolate before it sets.
The chocolate should be poured evenly over the logs, creating a shiny, solid shell. The garnishes should be applied immediately while the chocolate is still tacky so they adhere securely to the surface.
Common mistakes
A common mistake is using chocolate that is too hot, which will melt the ice cream before the shell can set. Always allow the melted mixture to cool to room temperature before pouring.
Another issue is failing to freeze the logs sufficiently, which results in a messy, misshapen final product that is difficult to slice cleanly.
How to tell it’s done
The logs are ready when the chocolate coating is completely firm and snaps cleanly when touched with a fork. The ice cream should remain frozen solid throughout the process.
When slicing, use a sharp, warm knife to ensure the chocolate shell cracks without crushing the ice cream underneath.
Up next · Part 3 of 3
2 variations · storage & make-ahead · 3 answers · printable card
Tips, FAQ & printable recipe (Part 3)← Back to the ingredients (Part 1)