Dinner · Part 2 of 3: Instructions
Crispy Chicken Chimichangas with Molten Pepper Jack Step-by-step instructions
- Prep
- Cook
- Total
- Serves
- 6
Before you start
Set everything out before the oil goes on the heat, because frying moves fast. Pull the rotisserie chicken from the bone and shred it into bite-size strands, discarding the skin and bones. Let the cream cheese soften on the counter. Shred the pepper jack if it is not already shredded. Lay the six tortillas out on the work surface, and set a wire rack over a paper-towel-lined sheet pan near the stove for draining. Warm the queso blanco and enchilada sauce just before or during frying, and stir the guacamole until it drizzles.
Ingredients at a glance (10)
- 2 cups shredded rotisserie chicken
- 3 oz cream cheese, softened
- 2 tbsp diced green chiles
- 1 tsp ground cumin
- 1 cup shredded pepper jack cheese
- 6 large 10-inch flour tortillas
- 6 cups vegetable oil, for frying
- White queso blanco, warmed (store-bought or made ahead), for serving
- Red enchilada sauce (store-bought or made ahead), for serving
- Guacamole (store-bought or made ahead), for serving
Instructions
Mix the green-chile chicken filling
- Build the creamy chicken fillingIn a large bowl, stir the softened cream cheese until smooth, then add the shredded rotisserie chicken, diced green chiles and ground cumin. Mix until every strand of chicken is coated in the creamy base and the chiles and cumin are evenly distributed, with no streaks of plain cream cheese left.Look for The mixture should look uniform and hold together when pressed against the side of the bowl.Tip Let the cream cheese sit at room temperature ten minutes first so it blends without lumps.
- Fold in the pepper jackSprinkle the shredded pepper jack over the chicken mixture and fold it in gently with a spatula. Stop folding once the cheese is evenly dispersed; overmixing breaks down the shreds and can make the filling dense instead of stretchy. Keep the filling at a cool room temperature while you set up the tortillas.Look for Cheese shreds should stay visible throughout the creamy chicken base.Tip Save a small handful of pepper jack to sprinkle on top before rolling for extra melt.
- Portion onto the tortillasLay the flour tortillas flat on a clean work surface. Spoon an equal portion of the filling down the center of each one, leaving a generous two-inch border on all sides so nothing escapes during rolling. Divide the filling evenly; each tortilla should look plump but still be able to close comfortably.Look for A two-inch clear border of tortilla should show on every side of the filling line.Tip Warm the tortillas for fifteen seconds in the microwave so they roll without cracking.
At the end of this phase, the filling should look like a thick, cohesive chicken salad: every strand of rotisserie chicken coated in cream cheese, flecked with green chiles and cumin, with pepper jack shreds visible throughout. Press a little between two fingers — it should hold its shape without weeping liquid.
Taste and adjust; the filling should taste slightly saltier and spicier than feels right, because the tortilla dilutes it. If the tortillas crack when you start portioning, microwave them for fifteen seconds each. Proceed once every tortilla holds an even, plump line of filling with a clean two-inch border on all sides.
Roll tightly and fry at 365°F
- Roll and seal the chimichangasFold the two short ends of each tortilla in over the filling, then roll tightly from one long side to the other, ending seam-side down. Roll each one snugly so the filling is fully enclosed and the seam lies flat, which keeps the chimichanga closed while it fries and puffs.Look for Each roll should sit seam-side down, tight and smooth, with no filling peeking out.Tip If a seam won't stay shut, seal it with a dab of the cream cheese mixture.
- Heat the oil to 365°FPour the vegetable oil into a deep heavy pot so it is at least two inches deep, and clip on a deep-fry thermometer. Heat over medium-high until the oil reaches 365°F. Watch the thermometer closely; oil that is too hot blisters the tortilla dark before the filling warms through.Look for The thermometer should read a steady 365°F, with light shimmer on the oil surface.Tip Fry in batches and let the oil come back to 365°F between each batch.
The rolled chimichangas should be firm cylinders, seam-side down, with no filling visible anywhere. When the oil reads a steady 365°F, lower them in gently — the oil should bubble vigorously around each one immediately. After about three minutes, turning occasionally, the shells should be puffed, deep golden brown and blistered, with flaky crackled patches.
Sound is a good guide: steady, lively sizzling means the temperature is right; sluggish fizzing means the oil has cooled and needs a minute to recover. Lift one out and tap it — it should feel hard and hollow, not soft or bendable, before draining.
Drizzle, bite and serve
- Fry until flaky and blisteredLower two or three chimichangas into the hot oil seam-side down using tongs. Fry for about 3 minutes, turning occasionally so every side blisters evenly, until the shells puff and turn deep golden brown with flaky, crackled patches. Work in batches so the oil temperature stays close to 365°F.Look for The shell should puff, blister and turn deep golden brown with an audible crackle.Tip Hold each chimichanga seam-side down for the first thirty seconds to set the seal.
- Drain and rest brieflyLift each fried chimichanga from the oil with tongs, letting excess oil drip back into the pot, and transfer to a wire rack set over a sheet pan lined with paper towels. Let them rest two or three minutes so the crust crisps fully and the molten cheese settles before saucing.Look for The bottoms should sound hollow and crisp when tapped lightly with tongs.Tip Never stack chimichangas on paper towels alone; trapped steam softens the crust.
- Warm the sauces and guacamoleWhile the chimichangas rest, warm the white queso blanco gently in a small saucepan over low heat, stirring until it flows off the spoon in a smooth ribbon. Give the red enchilada sauce a quick warm-up as well, and stir the guacamole until it is smooth enough to drizzle from a spoon.Look for The queso should pour in a slow, glossy ribbon without breaking or thickening.Tip Thin a thick queso with a splash of milk, one tablespoon at a time.
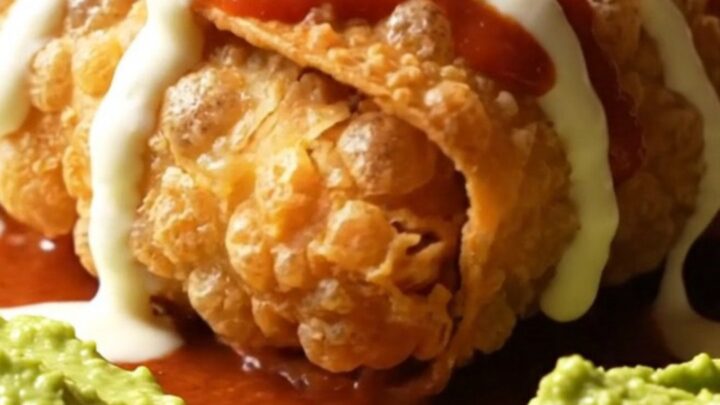
- Drizzle and serve hotSet each chimichanga seam-side down on a warm plate and drizzle generously with the warm queso blanco, then zigzag the red enchilada sauce over the top. Spoon ribbons of guacamole across everything and serve immediately, while the crust still shatters under the fork and the pepper jack inside stays molten.Look for The crust should crack audibly at the first bite with steam rising from the filling.Tip Drizzle just before serving; sauces left on too long soften the blisters.
This is the phase that disappears fastest. The drained chimichangas should rest just long enough for the crust to harden fully — two or three minutes on the wire rack — while the queso warms to a pourable ribbon and the enchilada sauce and guacamole are ready beside it.
Drizzle generously and serve at once: the crust should shatter audibly at the first bite, steam should rise from the green-chile chicken, and the pepper jack should stretch in long, molten strands. If the crust has softened anywhere, the chimichangas sat too long under the sauces; plate and eat without delay.
Common mistakes
Cold cream cheese is the most common stumble: it leaves lumps in the filling and makes rolling uneven, so soften it first. Overfilling the tortillas is the second — more than an even portion per tortilla and the seams burst in the oil, sending cheese into the fryer.
Rolling loosely has the same result, so take the extra seconds to roll tight and close the seam well. Frying at the wrong temperature ruins the texture: below about 350°F the tortilla drinks oil and turns heavy, while above 375°F it browns before the cheese melts. Overcrowding the pot drops the temperature, so fry two or three at a time.
How to tell it’s done
A finished chimichanga is deep golden brown all over, puffed, and covered in flaky, blistered patches that crackle when tapped with tongs. The crust should feel firm and dry, never greasy or bendable, and the filling should steam when the shell is cut. The pepper jack should be fully molten and the cream cheese base warmed through — the brief fry, given already-cooked chicken, is enough to heat the center safely and thoroughly. If any chimichanga looks pale after three minutes, give it an extra thirty seconds; pale shells stay chewy.
Up next · Part 3 of 3
4 variations · storage & make-ahead · 5 answers · printable card
Tips, FAQ & printable recipe (Part 3)← Back to the ingredients (Part 1)