Dinner · Part 2 of 3: Instructions
Crispy Chicken Alfredo Garlic Bread Step-by-step instructions
- Prep
- Cook
- Total
- Serves
- 6
Before you start
Before starting, gather all ingredients and equipment. Pat the chicken dry and pound to an even thickness if needed. Combine the spice rub in a small bowl. Have the butter, garlic, cream, and Parmesan measured and ready for the sauce.
Line a baking sheet with aluminum foil for easy cleanup. Preheat the oven to 400°F (200°C) when you're ready to toast the bread. Read through the entire recipe once so the steps flow smoothly, especially the timing between searing, sauce-making, and broiling.
Ingredients at a glance (14)
- 1 lb chicken breast cutlets, pounded
- 1 tbsp smoked paprika
- 1 tbsp garlic powder
- 1 tsp onion powder
- Black pepper to taste
- Salt to taste
- 2 tbsp butter, for searing
- 2 tbsp minced garlic
- 2 tbsp butter
- 1 cup heavy cream
- 1/2 cup grated parmesan cheese
- 1 French loaf, halved lengthwise
- Roasted garlic herb butter, for spreading, to taste
- 2 cups shredded mozzarella cheese
Instructions
Phase 1: Sear and Sauce
- Season and Sear the ChickenPat the chicken breast cutlets dry with paper towels. In a small bowl, combine the smoked paprika, garlic powder, onion powder, black pepper, and salt. Rub the spice mixture evenly over both sides of the chicken. In a large skillet over medium-high heat, melt the butter. Add the chicken and cook for 3 minutes per side, until golden brown and cooked through. Remove from the skillet and let rest for 3 minutes before slicing.Look for The chicken should be deeply golden and register 165°F (74°C) in the thickest part.Safe temperature 165°F (74°C) internal temperature (poultry)Tip Pounding the cutlets to an even thickness helps them cook quickly and evenly.
- Make the Alfredo SauceIn the same skillet, reduce the heat to medium. Add the butter and minced garlic, and cook for 1 minute until fragrant. Pour in the heavy cream and bring to a gentle simmer. Stir in the grated parmesan and cook for 2–3 minutes, stirring constantly, until the sauce thickens slightly. Remove from heat.Look for The sauce should coat the back of a spoon but still be pourable.Tip Stir frequently to prevent the cream from scorching on the bottom.
The chicken should be golden brown on both sides and cooked through to 165°F (74°C). The skillet will have browned bits, which add flavor to the sauce. The Alfredo sauce should be smooth and slightly thickened, with a rich garlic aroma. The kitchen will smell of butter, garlic, and Parmesan. Before moving on, slice the chicken and set aside.
Phase 2: Toast and Top
- Slice the ChickenTransfer the rested chicken to a cutting board. Using a sharp knife, slice the chicken into 1/2-inch strips. Set aside.Look for The strips should be clean and evenly sized.Tip Slicing against the grain keeps the chicken tender.
- Toast the Garlic BreadPreheat the oven to 400°F (200°C). Place the halved French loaf cut-side up on a baking sheet. Spread the roasted garlic herb butter evenly over both halves. Bake for 7 minutes, until the edges are golden and the bread is crisp.Look for The bread should be crunchy on the outside but still slightly soft inside.Tip Toasting the bread first prevents it from becoming soggy under the sauce.
- Assemble the ToppingRemove the toasted bread from the oven. Arrange the sliced chicken evenly over both halves. Pour the Alfredo sauce over the chicken, spreading it to the edges. Sprinkle the shredded mozzarella over the top, covering the sauce completely.Look for The bread should be fully topped with chicken, sauce, and cheese.Tip Use a spoon to spread the sauce so it doesn't spill over the edges.
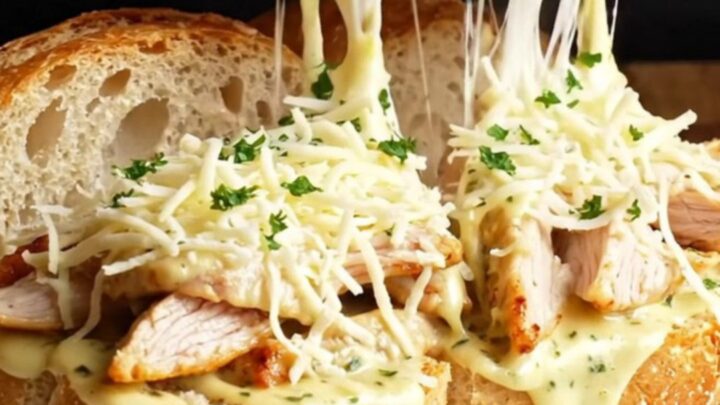
The bread should be crunchy on the outside with a soft interior, and the edges lightly browned. The chicken strips are ready to be arranged, and the sauce is still warm. The assembled bread should be evenly covered with chicken, sauce, and mozzarella, with no bare spots. The cheese should be piled on generously for the perfect melt.
Phase 3: Broil and Serve
- Broil Until BubblingSwitch the oven to broil. Place the baking sheet back in the oven and broil for 3 minutes, until the cheese is melted, bubbling, and blistered in spots. Keep a close eye to prevent burning.Look for The cheese should be golden brown in spots and the sauce bubbling around the edges.Tip If the cheese browns too quickly, move the rack lower.
- Slice and ServeRemove the baking sheet from the oven. Let the bread rest for 2 minutes. Using a sharp knife, cut the bread into batons or slices. Serve hot, pulling apart for the cheese pull.Look for The cheese should stretch when pulled apart, and the bread should crackle when cut.Tip Letting it rest briefly keeps the cheese from sliding off when cutting.
The cheese should be fully melted, bubbling, and blistered in spots, with a golden-brown color. The edges of the bread may darken slightly. The dish should be fragrant with toasted bread and melted cheese.
After a short rest, cutting through the bread should produce an audible crackle, and pulling two pieces apart should reveal a long, stretchy cheese pull.
Common mistakes
One common mistake is not toasting the bread enough, leading to a soggy base. Another is overcooking the chicken, which makes it dry; use a meat thermometer to avoid this. The Alfredo sauce can curdle if the heat is too high—keep it at a gentle simmer.
When broiling, stay nearby because the cheese can go from golden to burnt in seconds. Also, don't overload the bread with sauce; too much can make it difficult to handle and cause the bread to become soft.
How to tell it’s done
The chicken is done when it reaches an internal temperature of 165°F (74°C) in the thickest part, with a golden-brown sear. The Alfredo sauce should be thick enough to coat a spoon but still pourable. The bread is toasted when the edges are golden and the surface is crisp to the touch.
The final dish is ready when the mozzarella is fully melted, bubbling, and blistered in spots—watch closely to avoid burning. Let it rest for 2 minutes before slicing to allow the cheese to set slightly.
- Poultry: 165°F (74°C) in the thickest part
Up next · Part 3 of 3
4 variations · storage & make-ahead · 5 answers · printable card
Tips, FAQ & printable recipe (Part 3)← Back to the ingredients (Part 1)