Dinner · Part 2 of 3: Instructions
Crispy Cheesy Beef Chimichangas Step-by-step instructions
- Prep
- Cook
- Total
- Serves
- 4
Before you start
Before beginning, ensure all ingredients are prepped and ready to go. Measure out the ground beef, spices, and cheese. Shred the lettuce, dice the fresh tomatoes, and set aside the sour cream and salsa in ramekins.
Keep a plate lined with paper towels nearby to drain the fried chimichangas. Warm the tortillas in the microwave for 15 seconds to make them pliable. Heat the oil in a heavy-bottomed skillet or Dutch oven so it is ready for frying as soon as the chimichangas are rolled.
Ingredients at a glance (10)
- 1 lb ground beef
- 2 tbsp taco seasoning
- 4 large flour tortillas
- 1 1/2 cups shredded cheddar cheese, divided
- 2 cups vegetable oil for frying
- 1/2 cup red enchilada sauce, warmed
- 1 cup shredded lettuce for garnish
- 1/2 cup diced tomato for garnish
- 1/2 cup sour cream for serving
- 1/2 cup salsa for serving
Instructions
Preparing the Savory Beef Filling
- Brown the Ground BeefBrown the ground beef in a large skillet over medium-high heat, breaking it apart with a wooden spoon, until no pink remains. Drain any excess grease from the skillet.Look for The beef should be completely browned and broken into small, uniform crumbles.Tip Using a flat-edged wooden spoon helps scrape up flavorful browned bits from the pan.
- Season and Simmer the MeatSprinkle the taco seasoning over the beef. Simmer over medium-low heat for 5 to 7 minutes until the spices are thoroughly incorporated and the beef is well-coated. Ensure the beef reaches a safe internal temperature of 160 degrees Fahrenheit (71 degrees Celsius).Look for The mixture should be thick and fragrant, with the spices evenly coating the beef.Safe temperature 160°F (71°C) internal temperature (ground meat)Tip Simmering allows the spices to bloom and fully penetrate the meat.
The beef filling should be deeply browned, aromatic, and thoroughly cooked. The spices should be well incorporated, leaving a thick, savory glaze coating the ground beef.
The meat must reach a safe internal temperature of 160 degrees Fahrenheit (71 degrees Celsius) before proceeding. It should smell rich with cumin and chili, and look moist but not watery, ensuring it will not make the tortillas soggy during assembly.
Rolling and Frying to Golden Perfection
- Assemble and Roll the ChimichangasLay the warm flour tortillas flat on a clean surface. Place a portion of the seasoned beef and one cup of the shredded cheddar cheese in the center of each. Fold in the left and right sides tightly, then roll from the bottom up to fully enclose the filling.Look for The tortillas should be tightly rolled into secure, neat rectangular packets.Tip Warming the tortillas in the microwave for 15 seconds makes them pliable and prevents tearing.
- Fry Until Golden and CrispyHeat the vegetable oil in a deep skillet to 350 degrees Fahrenheit (177 degrees Celsius). Carefully lower the rolled chimichangas seam-side down into the hot oil. Fry for 2 to 3 minutes per side until golden brown and ultra-crispy, then drain on paper towels.Look for The exterior should be blistered, bubbly, and a deep golden-brown color.Tip Frying seam-side down first immediately seals the tortilla closed so it does not unravel.
The chimichangas should emerge from the hot oil with a beautiful, uniform golden-brown hue. The exterior tortilla shell will appear blistered, bubbly, and incredibly crisp to the touch. You should hear a distinct crunch when lightly tapped with tongs. Any excess oil should be drained on paper towels, leaving a dry, non-greasy, and structurally intact crispy packet.
Garnishing and Plating
- Top with Sauce and Melted CheesePlace the hot, fried chimichangas on a serving plate. Spoon the warmed red enchilada sauce generously over the center of each, then sprinkle with the remaining half cup of shredded cheddar cheese, letting it melt slightly from the residual heat.Look for The cheese on top should begin to melt and cling to the warm red sauce.Tip Warm the enchilada sauce in a small saucepan beforehand so it does not cool down the crispy shell.
- Garnish and ServeArrange the shredded lettuce and diced tomatoes around the plated chimichangas. Serve immediately while hot, alongside small ramekins of cool sour cream and fresh salsa for dipping.Look for The plate should look colorful and fresh, ready to be served immediately.Tip Slicing the chimichangas diagonally just before serving reveals the steaming, cheesy interior.
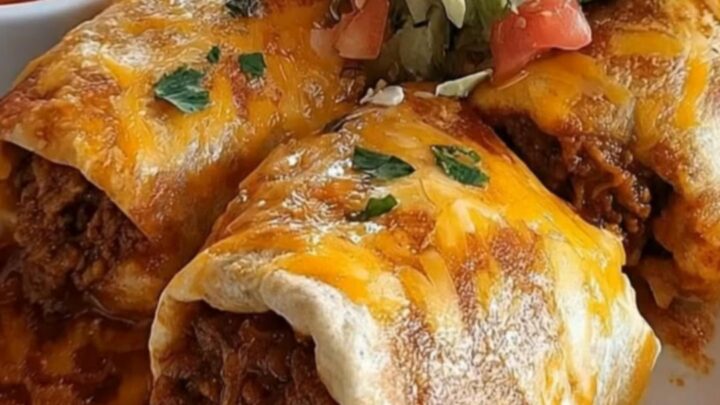
The final presentation is a feast for the eyes. The hot, crispy chimichangas are topped with warm, rich red sauce and a blanket of melted cheese. The surrounding plate is vibrant with cool, shredded lettuce and bright diced tomatoes. The hot, steaming beef and gooey melted cheese inside contrast beautifully with the cold, refreshing toppings and dipping sauces.
Common mistakes
One common mistake is overfilling the tortillas, which leads to tearing or bursting during the frying process. Stick to the recommended filling amounts and roll them tightly, folding in the sides securely.
Another error is frying in oil that is too cold, which causes the tortillas to absorb excess oil and become soggy rather than crispy. Ensure the oil is heated to 350 degrees Fahrenheit (177 degrees Celsius) before frying. Lastly, failing to drain the fried chimichangas properly can result in a greasy texture; always use paper towels.
How to tell it’s done
Doneness is determined by both the internal temperature of the beef and the texture of the tortilla. The ground beef must be cooked to a safe internal temperature of 160 degrees Fahrenheit (71 degrees Celsius) during the simmering phase.
For the final chimichanga, the outer shell is perfectly done when it turns a rich, golden-brown color and feels completely firm and crispy. The cheese inside should be fully melted and gooey, which you can verify by the steam and cheese pull when sliced.
- Ground meat: 160°F (71°C) in the thickest part
Up next · Part 3 of 3
2 variations · storage & make-ahead · 3 answers · printable card
Tips, FAQ & printable recipe (Part 3)← Back to the ingredients (Part 1)