Dinner · Part 2 of 3: Instructions
Crispy Caesar Chicken Tacos with Homemade Dressing Step-by-step instructions
- Prep
- Cook
- Total
- Serves
- 4
Before you start
Before starting, gather all ingredients and equipment. Season the ground chicken with salt and pepper in a bowl and set aside. Make the Caesar dressing by whisking together the mayonnaise, Dijon, olive oil, Worcestershire, lemon juice, and garlic in a small bowl; set aside.
Chop the romaine and shave the parmesan. Heat a large cast-iron griddle or skillet over high heat with the olive oil. Have a spatula and a plate ready for the cooked tacos. This prep ensures a smooth cooking process.
Ingredients at a glance (13)
- 2 lb ground chicken
- 1 tsp salt
- 1/2 tsp black pepper
- 8 small flour tortillas
- 2 tbsp olive oil, for the griddle
- 1 cup mayonnaise
- 2 tsp Dijon mustard
- 3 tbsp olive oil
- 1 tsp Worcestershire sauce
- 2 tsp lemon juice
- 2 cloves garlic, minced
- 2 cups chopped romaine lettuce
- 1/2 cup shaved parmesan cheese
Instructions
Sear the Chicken Tortillas
- Season and Press the ChickenIn a bowl, combine the ground chicken with salt and black pepper. Mix gently until evenly seasoned. Divide the mixture into 8 portions, about 4 ounces each. Place each portion onto a small flour tortilla and press it out paper-thin, covering the entire surface of the tortilla. The chicken layer should be thin and even, like a patty.Look for The chicken is spread in a thin, even layer over each tortilla, with no thick spots.Tip Use slightly damp hands to press the chicken without it sticking to your fingers.
- Heat the GriddlePlace a large cast-iron griddle or skillet over high heat. Add the olive oil and swirl to coat the surface. Let the oil heat until it shimmers, but not smoking. The griddle should be scorching hot before adding the tortillas.Look for The oil shimmers and a drop of water sizzles instantly when flicked onto the surface.Tip If the oil starts to smoke, lower the heat slightly to avoid burning the tortillas.
- Sear the Chicken-Side DownPlace the tortillas chicken-side down onto the hot griddle. Work in batches if needed. Sear for about 4 minutes until the chicken is deeply golden brown and cooked through. The tortilla will crisp and the chicken will release from the griddle when ready.Look for The chicken is golden brown and crisp on the bottom, and the tortilla is lightly toasted.Safe temperature 165°F (74°C) internal temperature (poultry)Tip Do not move the tortillas while searing; let them develop a crust.
- Flip and Crisp the TortillaUsing a spatula, carefully flip each tortilla to crisp the other side for 1-2 minutes, until the tortilla is golden and slightly charred in spots. The chicken should reach 165°F (74°C) in the thickest part. Remove from the griddle and keep warm.Look for The tortilla is crisp and golden on both sides, and the chicken is fully cooked.Safe temperature 165°F (74°C) internal temperature (poultry)Tip If the chicken is browning too quickly, reduce the heat to medium-high.
After this phase, the chicken should be golden brown and crisp, with the tortilla lightly toasted. The kitchen will smell of savory chicken and toasted tortillas.
Check that the chicken is fully cooked by cutting into the thickest part—it should be white throughout with no pink. If some tortillas are browning too quickly, reduce the heat slightly.
Make the Dressing and Prep Toppings
- Make the Caesar DressingIn a small bowl, whisk together the mayonnaise, Dijon mustard, olive oil, Worcestershire sauce, lemon juice, and minced garlic. Season with a pinch of black pepper. Whisk until smooth and creamy. The dressing should be thick and emulsified.Look for The dressing is smooth, pale yellow, and has a creamy consistency.Tip If the dressing is too thick, add a teaspoon of water or lemon juice to loosen it.
- Prepare the ToppingsChop the romaine lettuce into bite-sized pieces and shave the parmesan cheese into thin curls. Keep the toppings separate until ready to assemble the tacos.Look for The romaine is crisp and dry, and the parmesan is in delicate shavings.Tip Dry the lettuce well after washing to keep the tacos crisp.
The dressing should be smooth, creamy, and well-emulsified, with a balanced flavor of garlic, lemon, and Worcestershire. The romaine should be dry and crisp, and the parmesan shaved into thin curls. The dressing can be made ahead and refrigerated for up to a week.
Assemble and Serve
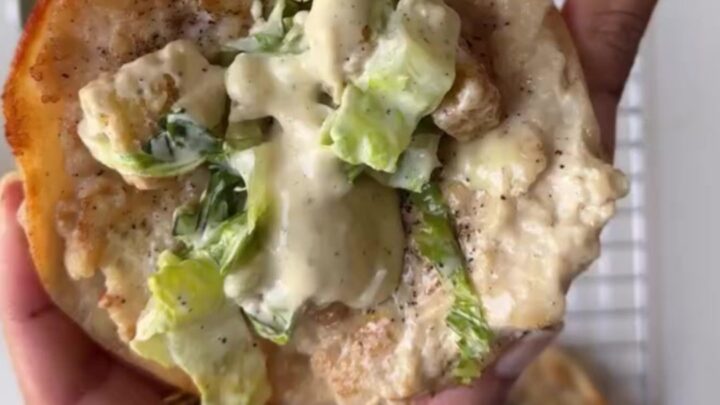
- Assemble the TacosPlace the crispy chicken tortillas on a serving plate. Top each with a handful of chopped romaine, a generous drizzle of the Caesar dressing, and a shower of shaved parmesan. Fold the tortillas in half and serve immediately.Look for The tacos are piled high with crisp lettuce, creamy dressing, and parmesan.Tip For extra crunch, add a few extra shavings of parmesan right before serving.
The tacos are ready when each tortilla is piled with crisp romaine, a generous drizzle of dressing, and shaved parmesan. The contrast of warm, crispy chicken with cold, crisp toppings is the signature of this dish. Serve immediately to enjoy the best texture.
Common mistakes
One common mistake is pressing the chicken too thick, which prevents it from cooking through before the tortilla burns. Another is using too low heat, which makes the tortilla soggy instead of crisp.
Avoid overcrowding the griddle; cook in batches if needed to maintain high heat. Also, don’t flip the tortillas too early—let them sear undisturbed to develop a crust. Finally, make sure the dressing is not too thick; if it is, thin it with a teaspoon of water or lemon juice.
How to tell it’s done
The chicken is done when it reaches an internal temperature of 165°F (74°C) in the thickest part. The meat should be deeply golden brown and crisp on the outside, and the tortilla should be lightly toasted and firm.
When you press the center of the chicken, it should feel firm and spring back. The tacos are best eaten immediately after assembling, while the chicken is still crispy.
- Poultry: 165°F (74°C) in the thickest part
Up next · Part 3 of 3
4 variations · storage & make-ahead · 5 answers · printable card
Tips, FAQ & printable recipe (Part 3)← Back to the ingredients (Part 1)