Desserts · Part 2 of 3: Instructions
Creamy No-Bake White Chocolate Biscuit Cake Step-by-step instructions
- Prep
- Cook
- Total
- Serves
- 8
Before you start
Before beginning, ensure all ingredients are at the appropriate starting temperatures. The heavy cream should be cold directly from the refrigerator to ensure it whips properly.
The white chocolate should be melted and allowed to cool slightly, as adding hot chocolate to whipped cream will melt the fat and cause the mixture to lose its volume.
Prepare your 8-inch glass dish by clearing a space in the refrigerator, as you will want to move the assembled cake to the fridge immediately after the final layer is added.
Ingredients at a glance (4)
- 10 oz tea biscuits, store-bought or made ahead
- 12 oz white chocolate, melted
- 2 cups heavy cream, whipped
- 1/4 cup white chocolate flakes
Instructions
Preparing the filling
- Prepare the cream baseWhip the heavy cream in a chilled mixing bowl until stiff peaks form. Gently fold in the melted white chocolate until the mixture is smooth and completely combined, ensuring a uniform, velvety consistency for the filling.Look for The cream mixture should be thick and hold its shape well.Tip Ensure the melted white chocolate has cooled slightly before folding it into the whipped cream to prevent the mixture from deflating.
The whipped cream and melted chocolate should be combined into a smooth, thick, and consistent mixture. It should be light and aerated, resembling a soft mousse that is easy to spread but holds its own weight well when dolloped into the glass dish.
Layering the cake
- Assemble the cake layersArrange a single layer of biscuits at the bottom of the glass dish, breaking pieces if necessary to fill any gaps. Spread a generous portion of the white chocolate cream over the biscuit layer. Repeat the process with remaining biscuits and cream, ending with a smooth layer of cream on top.Look for The layers should be even and fill the dish corners completely.Tip Press down lightly on the biscuit layers to ensure they adhere well to the cream filling.
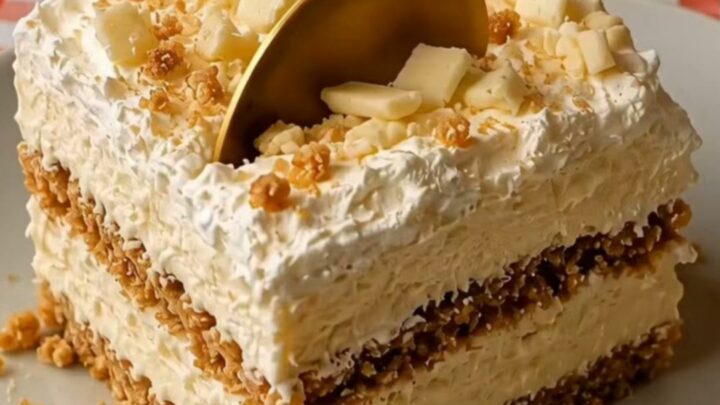
The layers should be clearly visible through the glass dish, with the cream filling completely covering the biscuits to create a uniform structure. The final top layer of cream should be smoothed out with a spatula to provide a clean surface for the chocolate flake garnish.
Chilling for the perfect set
- Chill and garnishSprinkle the white chocolate flakes evenly over the top of the cake. Place the dish in the refrigerator for at least two hours to allow the layers to set properly and the flavors to meld before serving.Look for The cream topping should feel firm to the touch when ready.Tip For cleaner cuts, chill the knife under warm water and wipe dry before slicing the cake into neat squares.
After the chilling period, the entire cake should be firm and cool to the touch. The biscuits should have softened slightly but still provide a distinct contrast to the creamy filling, and the white chocolate flakes should be set into the surface of the top cream layer.
Common mistakes
A common mistake is incorporating hot melted chocolate into the whipped cream, which will collapse the air bubbles and result in a dense, runny filling rather than a light, airy cream. Another error is not allowing enough chilling time; rushing this step will result in a messy cake that falls apart when sliced.
Ensure the biscuits are arranged in a single, even layer to prevent large air pockets or uneven sections. Finally, avoid using overly sweet or low-quality chocolate, as the flavor of the final dish is heavily dependent on the quality of the white chocolate used.
How to tell it’s done
The cake is considered done when the cream layers have firmed up sufficiently to be sliced into clean, neat squares. This typically takes at least two hours in the refrigerator. When you press gently on the surface, it should feel firm and hold its shape.
There are no proteins to cook in this recipe, so no temperature check is required, but ensuring the dessert has reached a consistent, cold temperature is vital for the correct final texture and ease of serving.
Up next · Part 3 of 3
2 variations · storage & make-ahead · 3 answers · printable card
Tips, FAQ & printable recipe (Part 3)← Back to the ingredients (Part 1)