Desserts · Part 2 of 3: Instructions
Creamy No-Bake Coconut Cake for Easy Entertaining Step-by-step instructions
- Prep
- Cook
- Total
- Serves
- 8
Before you start
Before beginning, ensure all ingredients are properly measured and ready. The heavy cream must be chilled in the refrigerator until the last possible moment to ensure it whips effectively. Clear sufficient space in the refrigerator to hold the 8-inch glass baking dish level.
Prepare a spatula and an electric mixer on your workspace. Having all items prepared allows for a smooth assembly process, which is essential for maintaining the integrity of the delicate cream layers as you build the cake.
Ingredients at a glance (4)
- 1 package vanilla wafer cookies
- 2 cups heavy cream
- 1 cup full-fat coconut milk
- 1 cup sweetened shredded coconut
Instructions
Whipping the filling
- Prepare the coconut creamIn a large mixing bowl, combine the heavy cream and full-fat coconut milk. Use an electric mixer to whip the mixture until it reaches a thick, fluffy consistency that holds soft peaks.Look for The mixture should be thick, smooth, and hold soft peaks when the beaters are lifted.Tip Ensure the heavy cream is very cold before whipping to achieve the best volume.
The filling is ready when it is thick, smooth, and holds its shape when the mixer beaters are lifted. It should look like a stable, aerated mousse. If it appears watery or thin, continue whipping for another minute until the volume increases and the texture becomes visibly firmer. Do not over-whip, or the mixture may become grainy.
Layering the cake
- Assemble the cake layersSpread a thin layer of the whipped coconut cream into the bottom of an 8-inch glass baking dish. Arrange a layer of vanilla wafer cookies over the cream. Continue alternating layers of cream and cookies until all ingredients are used, finishing with a generous layer of coconut cream on top.Look for Create even, uniform layers to ensure the cake sets properly and is easy to slice.Tip Press the cookies gently into the cream so they soften evenly while chilling.
At this stage, verify that each layer of cream covers the wafers completely, creating a smooth, even surface before placing the next set of cookies. The layers should be uniform in height across the dish.
If any gaps appear, gently nudge the cream with a spatula to fill them. A level assembly ensures that every slice will have consistent, beautiful layers.
Chilling and finishing
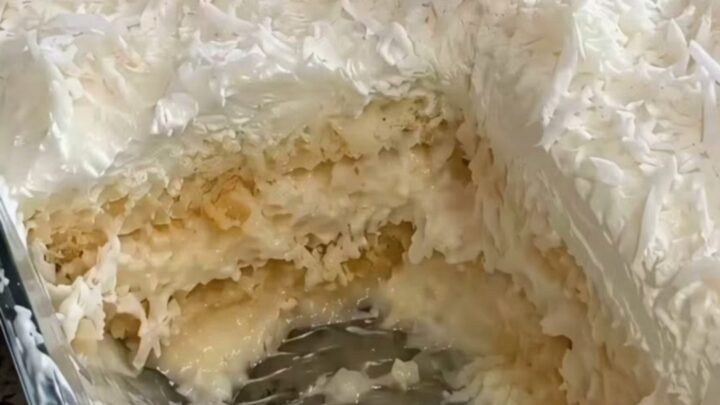
- Chill and garnishSprinkle the sweetened shredded coconut over the top of the cake. Place the dish in the refrigerator for at least four hours, or until the wafers have softened and the cream is set, then serve chilled.Look for The cake is ready when the cream is firm and the wafers are soft when pierced with a fork.Tip Cover the dish with plastic wrap if chilling for longer than a few hours.
The cake is ready to be served once the entire dish feels cold to the touch and the cream has set firmly. The top should be covered evenly with the shredded coconut, providing a nice texture. Test by pressing a corner of the cake; it should feel firm and set like a chilled dessert. If it feels soft or loose, return it to the refrigerator.
Common mistakes
A common mistake is failing to whip the cream to the correct consistency, which results in a runny cake that does not hold its shape. Ensure the mixture reaches stiff, stable peaks before assembly. Another error is rushing the chilling process.
The cake requires at least four hours to allow the wafers to soften and the cream to set; cutting into it too early will result in a messy presentation and a less-than-ideal texture. Always use full-fat ingredients to ensure proper structure.
How to tell it’s done
The cake is done when the cream has firmed up significantly and the vanilla wafers have softened completely. When a knife or spatula is inserted into the center, it should encounter a consistent, soft resistance throughout.
There should be no liquid pooling at the edges of the dish. The top layer of shredded coconut should feel dry and light, while the underlying cream layer should be stable and hold its shape when lifted onto a serving plate.
Up next · Part 3 of 3
2 variations · storage & make-ahead · 3 answers · printable card
Tips, FAQ & printable recipe (Part 3)← Back to the ingredients (Part 1)