Dinner · Part 2 of 3: Instructions
Creamy Green Chile Rice Casserole Step-by-step instructions
- Prep
- Cook
- Total
- Serves
- 6
Before you start
Before beginning, ensure your oven is fully preheated to 350°F (175°C). Have your baking dish clean and ready on a stable surface. Measure out your rice and ensure it is free of any debris. Prepare your creamy green chile broth by whisking the ingredients until uniform.
Shred your Monterey Jack cheese and set it aside. Having all your components measured and within reach will make the assembly process smooth and efficient, allowing you to get the casserole into the oven quickly.
Ingredients at a glance (3)
- 2 cups long-grain white rice, dry
- 2 cups creamy green chile broth
- 2 cups shredded Monterey Jack cheese
Instructions
Base Assembly
- Assemble the basePreheat your oven to 350°F (175°C). In a large rectangular ceramic baking dish, spread the dry long-grain rice in an even, smooth layer across the bottom of the pan to ensure uniform cooking.Look for The rice should be evenly distributed across the bottom of the dish without any large mounds or gaps.Tip Using a flat-bottomed dish helps the rice submerge evenly in the liquid for consistent results.
At this stage, the rice is spread in an even, smooth layer across the bottom of the baking dish. The surface should be flat, ensuring that the liquid will cover all grains equally when added.
Check that your baking dish is clean and dry before adding the rice to prevent any unwanted sticking during the baking process.
Liquid Incorporation
- Add liquid and cheesePour the creamy green chile broth over the layer of dry rice. Use a spoon if necessary to ensure the rice is fully submerged. Evenly strew the shredded Monterey Jack cheese over the top of the liquid layer.Look for The liquid should cover the rice entirely, and the cheese should be spread in an even layer across the surface.Tip Ensure the green chiles are distributed evenly throughout the liquid before pouring to avoid pockets of spice.
The creamy broth and green chiles are poured over the rice, creating a consistent layer. The shredded Monterey Jack cheese is then distributed evenly over the top. Check that there are no large clumps of cheese and that the liquid has reached the corners of the dish for uniform coverage.
Final Baking
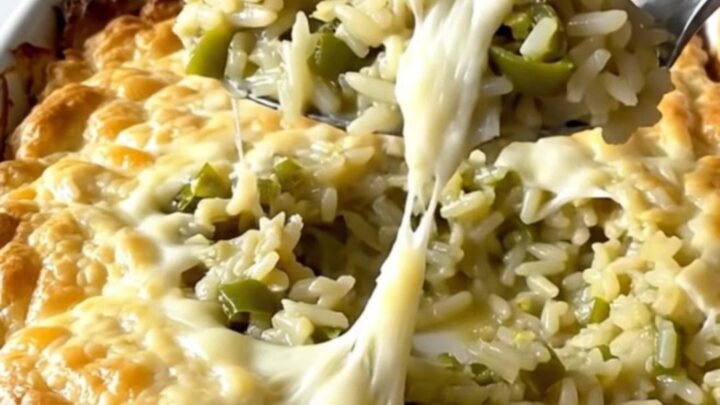
- Bake and servePlace the baking dish into the preheated oven and bake until the rice is tender, the liquid is absorbed, and the cheese is melted and lightly golden on top. Remove from the oven and let rest for five minutes before serving to allow the sauce to set.Look for The edges should be bubbling, and the surface should be lightly golden with a soft cheese stretch.Tip Letting the casserole rest is essential for the creamy texture to stabilize, making it easier to serve.
The casserole emerges from the oven with bubbling edges and a golden, melted cheese crust. The kitchen should smell savory and slightly tangy from the green chiles. Confirm that the rice is tender and the liquid has been absorbed before removing the dish from the oven and letting it sit.
Common mistakes
A common mistake is using the wrong ratio of liquid to rice, which can lead to either crunchy, undercooked grains or a soupy, unappealing texture. Be precise with your measurements and ensure the rice is completely submerged.
Another error is failing to allow the dish to rest after removing it from the oven. Resting is critical, as it allows the internal moisture to redistribute and the sauce to thicken, resulting in a much better texture when portioned out for serving.
How to tell it’s done
The casserole is done when the rice has absorbed almost all of the liquid and has reached a tender, fluffy consistency throughout. You should be able to see the edges of the dish bubbling, indicating that the liquid is fully incorporated.
The cheese topping should be melted, bubbly, and possess a light golden color. When you lift a portion with a spoon, you should observe a short, natural cheese stretch and a creamy, cohesive texture that holds its shape slightly without being overly dry.
Up next · Part 3 of 3
2 variations · storage & make-ahead · 3 answers · printable card
Tips, FAQ & printable recipe (Part 3)← Back to the ingredients (Part 1)