Dinner · Part 2 of 3: Instructions
Creamy Amish Chicken and Noodles Bake Step-by-step instructions
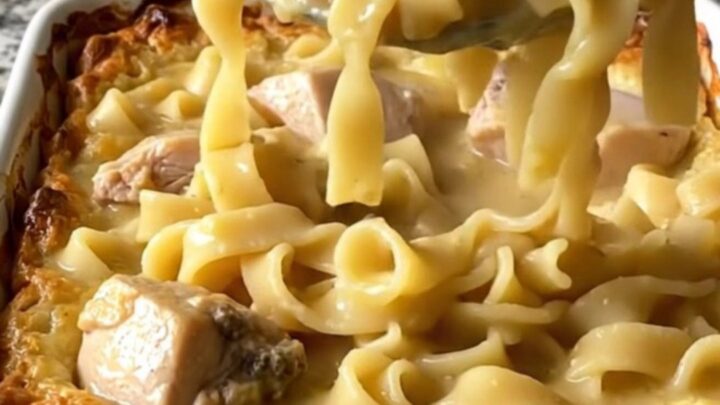
- Prep
- Cook
- Total
- Serves
- 6
Before you start
Before you begin, gather all your ingredients and ensure your workspace is clean. Preheat your oven to 375°F (190°C) so that it is ready as soon as the assembly is complete.
Cut the chicken into uniform, bite-size pieces to ensure they cook through at the same rate as the noodles. Have your baking dish ready on the counter, and make sure your soup, broth, and butter are measured and prepared to allow for a quick and seamless assembly process.
Ingredients at a glance (5)
- 12 oz wide egg noodles, dry
- 1.5 lb chicken breast, cut into bite-size pieces
- 2 cans (10.5 oz each) creamy chicken soup
- 2 cups chicken broth
- 4 tbsp unsalted butter, cut into small pats
Instructions
Preparation and assembly
- Assemble the basePreheat the oven to 375°F (190°C). In a large rectangular ceramic baking dish, combine the dry wide egg noodles and the bite-size pieces of raw chicken breast. Spread them out evenly across the bottom of the dish to ensure uniform cooking.Look for Noodles and chicken are evenly distributed in the dish.Tip Ensure the chicken pieces are cut to a similar size for even cooking.
At the end of this phase, the baking dish should be filled with the dry noodles and raw chicken pieces. Everything should be arranged in a single layer to ensure even cooking, and the oven should be fully preheated, ready for the baking process to begin immediately.
Adding the sauce
- Add liquids and butterIn a mixing bowl, whisk together the creamy chicken soup and the chicken broth until smooth. Pour this mixture over the noodles and chicken in the baking dish. Dot the top of the mixture with the pats of butter.Look for Liquid covers the noodles and chicken, with butter pats scattered on top.Tip Whisking the soup and broth together first ensures a consistent sauce texture.
Once the soup and broth mixture is poured over the top and the butter is added, the dish should look well-moistened. The liquid should almost cover the noodles, providing the necessary moisture for them to hydrate properly during the oven time.
Baking to completion
- Bake until finishedCover the dish with foil and bake for 30 minutes. Remove the foil and bake for an additional 15 minutes, or until the chicken reaches an internal temperature of 165°F (74°C) and the edges are bubbling and golden. Let rest for 5 minutes before serving.Look for The sauce is bubbling, the edges are golden brown, and the chicken is fully cooked.Safe temperature 165°F (74°C) internal temperature (poultry)Tip The rest period allows the sauce to thicken slightly and settle around the noodles.
After the final baking stage, the dish should be golden, bubbling, and aromatic. The chicken must be fully cooked to 165°F (74°C), and the sauce should be thick and creamy. Ensure the dish rests for five minutes before you serve it to allow the consistency to set perfectly.
Common mistakes
A common mistake is using noodles that are too thin, which can disintegrate and become mushy during the long bake. Stick to wide egg noodles for the best texture.
Another error is failing to ensure the chicken is cut into small, even pieces, which can lead to some parts being overcooked while others remain underdone.
Finally, avoid skipping the rest period after baking; this time is vital for the sauce to finish thickening and for the flavors to stabilize before serving.
How to tell it’s done
The dish is finished when the sauce is bubbling vigorously around the edges and the top has developed a light golden-brown color. The most important indicator of doneness is the internal temperature of the chicken, which must reach at least 165°F (74°C).
The noodles should be tender, and the sauce should have a thick, creamy consistency that coats the back of a spoon. Always use a meat thermometer inserted into the thickest piece of chicken to confirm it is fully cooked.
- Poultry: 165°F (74°C) in the thickest part
Up next · Part 3 of 3
2 variations · storage & make-ahead · 3 answers · printable card
Tips, FAQ & printable recipe (Part 3)← Back to the ingredients (Part 1)