Desserts · Part 2 of 3: Instructions
Classic Chocolate Icebox Cake for Easy Chilled Desserts Step-by-step instructions
- Prep
- Cook
- Total
- Serves
- 8
Before you start
Before beginning assembly, ensure all ingredients are ready and the workspace is clean. Have the baking dish prepared and the chocolate pudding at a cool, spreadable temperature. If using a large package of biscuits, open them beforehand to facilitate quick layering.
Having all necessary tools, including the offset spatula, within reach will make the assembly process seamless and efficient, allowing for consistent layer thickness throughout the entire cake.
Ingredients at a glance (2)
- 3 cups chocolate pudding, store-bought or made ahead
- 1 package crisp biscuits
Instructions
Assembly Phase
- Prepare the base layerSpread a thin, even layer of chocolate pudding across the bottom of the 8-inch square baking dish using an offset spatula. This base ensures the bottom layer of biscuits adheres properly and softens correctly during the chilling process.Look for The pudding should cover the entire bottom of the dish.Tip Using a slightly offset spatula helps reach the corners of the dish easily.
- Layer the ingredientsArrange a single layer of crisp biscuits over the pudding base. Follow with a generous layer of chocolate pudding, spreading it smoothly to cover the biscuits completely. Repeat these alternating layers until the dish is filled, finishing with a final layer of chocolate pudding on top.Look for Ensure the top layer of pudding is smooth and level.Tip Break biscuits if necessary to fill gaps and create a solid layer.
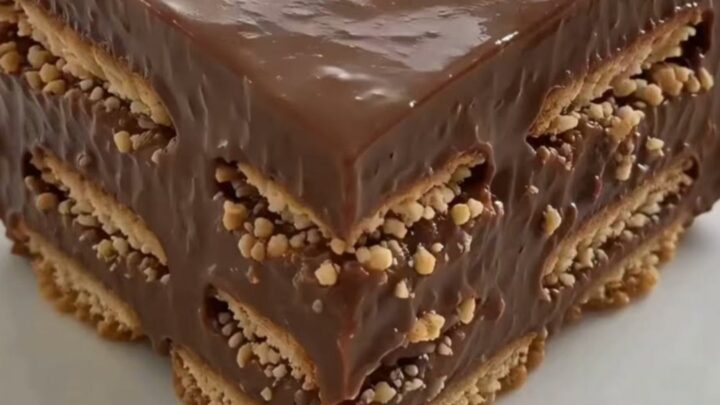
At the end of the assembly, the dish should be filled with distinct, alternating layers. The top surface should be smooth and even, completely covering the final layer of biscuits. Check that the edges of the dish are clean and that the pudding is distributed uniformly to ensure consistent results in every portion of the cake.
Chilling Phase
- Chilling the dessertPlace the assembled cake into the refrigerator. Allow the dessert to chill for at least four hours, or ideally overnight, to ensure the biscuits soften to a cake-like texture while remaining distinct from the creamy pudding layers.Look for The cake should feel firm to the touch.Tip Cover the dish with plastic wrap to prevent the pudding from absorbing other refrigerator odors.
During the chilling phase, the cake undergoes a transformation. The primary check is time; ensure the cake remains in the refrigerator for the full duration.
Upon completion, the surface should be cool and firm to the touch, and the contents should feel stable when the dish is gently tilted, indicating the moisture has properly distributed.
Slicing Phase
- ServingRemove the cake from the refrigerator once fully chilled. Use a sharp knife or spatula to cut the cake into square portions. Carefully lift each slice onto a serving plate and enjoy immediately while cold.Look for The layers should be clearly visible when sliced.Tip Dip the knife in hot water and wipe dry between cuts for clean, professional-looking slices.
As the cake is sliced, watch for the clear definition of layers. A successful cake will produce clean, sharp squares without the pudding leaking or the biscuits separating. If the slices appear clean and the texture is uniform, the dessert is perfectly prepared and ready for immediate service to guests or family members.
Common mistakes
A common mistake is using a pudding that is too thin, which can cause the layers to slide or lose their definition. Ensure the pudding is sufficiently thick before starting.
Another error is rushing the chilling process; skipping the minimum four-hour rest will result in hard, dry biscuits that do not integrate with the pudding. Finally, failing to cover the dish can lead to a dry skin forming on the top layer of pudding.
How to tell it’s done
The dessert is ready when the layers have fused together into a coherent whole. A properly chilled icebox cake will be firm enough to hold its shape when sliced, yet soft enough for a fork to glide through effortlessly.
There is no internal temperature to monitor for this no-bake recipe, so focus on the texture of the biscuits, which should be softened but not mushy, and the pudding, which should be set firmly.
Up next · Part 3 of 3
2 variations · storage & make-ahead · 3 answers · printable card
Tips, FAQ & printable recipe (Part 3)← Back to the ingredients (Part 1)