Desserts · Part 2 of 3: Instructions
Chocolate Wacky Cake — Ultra-Fudgy, No Eggs Needed Step-by-step instructions
- Prep
- Cook
- Total
- Serves
- 9
Before you start
Take the butter for the frosting out of the refrigerator first so it softens while everything else happens — properly softened butter should dent easily under a finger but still hold its shape. Set out the 8-inch square pan, a whisk, a rubber spatula, an electric hand mixer and an offset spatula for spreading.
Preheat the oven to 350°F (175°C) with a rack centered, since the batter goes in almost immediately after mixing. Measure all the cake ingredients and the frosting ingredients before starting: the batter comes together in under two minutes once the water is poured, and there is no time to measure mid-mix.
Ingredients at a glance (14)
- 1 1/2 cups all-purpose flour
- 1 cup granulated sugar
- 1/4 cup unsweetened cocoa powder, plus more for the pan
- 1 tsp baking soda
- 1/2 tsp kosher salt
- 1 cup cool water
- 1/3 cup vegetable oil
- 1 tbsp white vinegar
- 1 tsp vanilla extract
- 1/2 cup unsalted butter, softened
- 1/3 cup unsweetened cocoa powder
- 2 cups confectioners' sugar, sifted
- 3 tbsp whole milk, plus more if needed
- 1 tsp vanilla extract
Instructions
Pan, dry mix and wells
- Heat the oven and prep the panHeat the oven to 350°F (175°C) with a rack in the center. Oil an 8-inch square baking pan, then dust it with a spoonful of cocoa powder, tapping out the excess. Using cocoa instead of flour keeps no dark streaks on the finished cake and releases the crumb cleanly.Look for The oven reads 350°F (175°C) and the pan carries an even, matte cocoa coating with no bare, shiny spots.Tip A glass dish, like the one in the video, bakes evenly; add 3 to 5 minutes if using glass instead of metal.
- Sift the dry ingredients togetherIn the ungreased pan itself or in a mixing bowl, whisk the flour, sugar, cocoa, baking soda and salt. Whisk a full 30 seconds so the cocoa disperses evenly and no pocket of soda survives; this is what makes the cake rise uniformly instead of doming in one spot.Look for The mixture reads as one even, dark-brown powder with no pale streaks of flour or sugar visible.Tip Cocoa clumps badly after storage; press any lumps through a fine sieve before whisking.
- Make three wells and add the wet ingredientsWith the back of a spoon, press three shallow wells into the dry mix: two small, one larger. Pour the oil into one small well, the vinegar into the other, and the vanilla into the big one. This old diner trick keeps the acid and the soda apart until the last moment.Look for Three distinct wells hold their shape, each ingredient sitting in its own pocket without spilling over.Tip Measure the vinegar over a spoon, not directly into the pan, so an accidental double pour cannot happen.
By the end of this phase the oven holds a steady 350°F (175°C), the pan carries an even cocoa dusting, and the dry mixture reads as one uniform dark-brown powder with no visible streaks of flour, sugar or white soda.
Three wells sit in the mix — two small ones holding the oil and the vinegar, one larger one holding the vanilla — each still distinct and separate. Give the dry mix one final check for cocoa lumps before moving on, because nothing can be fixed once the water is in. The whole phase takes about five minutes, and nothing here should look wet yet.
Mix, bake and cool
- Pour the water and stir the batterPour the cool water over everything and stir with a fork or the whisk until the batter turns smooth and glossy, scraping the corners well. Forty to sixty strokes is usually enough. The batter will look thin, almost like hot fudge sauce, and that is exactly right.Look for A dark, pourable batter with no dry flour at the bottom; it ribbons off the whisk in a slow, glossy stream.Tip Stir by hand, never with a mixer: overworked batter toughens once the gluten grabs hold.
- Level the pan and bakeSpread the batter level with the spatula and tap the pan twice on the counter to release air bubbles. Bake 28 to 32 minutes, until a toothpick in the center comes out with only moist crumbs attached. Rotate the pan once at the 20-minute mark for even browning.Look for The top looks dry and slightly crackled, the edges pull from the sides, and a toothpick emerges with damp crumbs but no wet batter.Tip Start checking at 26 minutes; an extra few minutes is the difference between fudgy and dry.
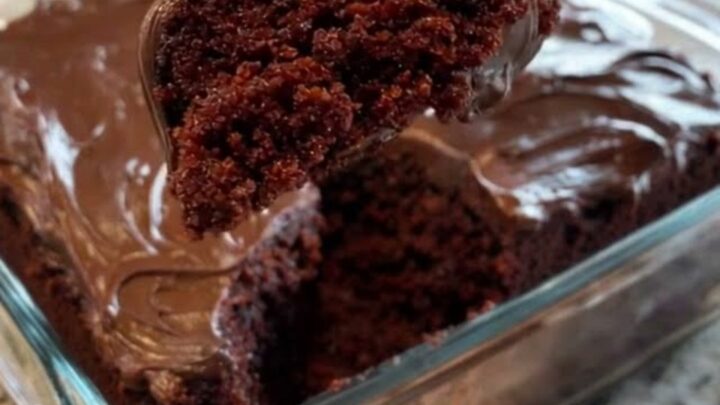
- Cool the cake before frostingSet the pan on a rack and cool the cake 20 minutes. Warm cake is fine for frosting, but hot cake melts it into a glaze. Twenty minutes gives a surface just warm enough for the frosting to soften and grip, exactly the spread shown in the video.Look for The pan releases steam gently and the bottom of the pan feels comfortably warm, not hot, against a bare palm.Tip Never leave the cake longer than 2 hours at room temperature before covering and storing it.
The batter should now be smooth, dark and pourable, with the consistency of warm fudge sauce and no dry flour hiding at the bottom corners of the pan. After 28 to 32 minutes in the oven, the top is dry and lightly crackled, the edges pull from the sides, and a toothpick in the center emerges with moist crumbs but no wet batter. The cake then cools 20 minutes on a rack — warm to the touch, never hot — so the frosting will soften and grip instead of melting into a glaze. If the toothpick shows streaks, give it 3 more minutes and test again.
Frost and slice
- Beat the chocolate frostingWhile the cake cools, beat the softened butter with the hand mixer until creamy, about 1 minute. Add the cocoa, half the confectioners' sugar, the milk and the vanilla, beat smooth, then add the remaining sugar and beat 2 minutes more until light and glossy.Look for The frosting holds soft peaks, spreads without tearing the cake, and shines without looking greasy.Tip If it stiffens, work in milk 1 teaspoon at a time; if it loosens, beat in a few extra tablespoons of confectioners' sugar.
- Frost the warm cake and serveDollop the frosting over the cake and spread it edge to edge with the offset spatula, using long strokes so the surface stays glossy. Slice into nine squares and lift them straight from the dish. Serve warm or at room temperature; the crumb is at its fudgiest the day it is baked.Look for A smooth, mirror-like frosting layer covers every square, and the first slice releases cleanly from the dish.Tip Dip the spatula in hot water and wipe it dry between strokes for a perfectly glassy finish.
The frosting should be light, glossy and spreadable, holding soft peaks without sliding, and it should cover the cake edge to edge in smooth, glassy strokes. A slice lifted from the dish comes out cleanly with neat sides, revealing an even, moist, dark crumb from top to bottom.
The surface of the frosting looks shiny rather than greasy or matte and cracked. Taste check: deep cocoa, a tender fudgy crumb, and sweetness balanced by the cocoa rather than buried by sugar. If the frosting tears the cake as it spreads, it is too stiff — work in a teaspoon of milk and continue.
Common mistakes
The most common failure is overmixing once the water goes in. The batter looks thin and unstructured, which tempts bakers to keep stirring for reassurance — resist it. Sixty seconds of vigorous stirring develops the gluten and turns fudgy into rubbery. The second mistake is using Dutch-processed cocoa, which lacks the acidity natural cocoa brings to the baking soda; the cake rises less and tastes flatter.
Skipping the three-well arrangement is forgivable, but skipping the vinegar is not: without acid, the soda never activates and the cake bakes dense. Frosting a hot cake is another frequent error — at oven-fresh temperatures the butter in the frosting melts and soaks in rather than spreading.
How to tell it’s done
The cake is done when the top looks dry and matte, the edges have just pulled away from the pan sides, and a toothpick inserted in the center comes out with moist crumbs clinging to it but no wet batter. Expect 28 to 32 minutes at 350°F (175°C); glass pans run a little slower than metal, so lean toward the longer end. The center should feel set when pressed lightly with a fingertip, springing back rather than leaving a dent.
Up next · Part 3 of 3
4 variations · storage & make-ahead · 5 answers · printable card
Tips, FAQ & printable recipe (Part 3)← Back to the ingredients (Part 1)