Desserts · Part 2 of 3: Instructions
Chocolate Wacky Cake — One-Pan, No Eggs, Ready in an Hour Step-by-step instructions
- Prep
- Cook
- Total
- Serves
- 9
Before you start
Set the oven to 350°F (175°C) with a rack in the center, and place the 8x8-inch baking dish within reach along with a whisk, a fork and a spatula. Take the butter for the frosting out of the refrigerator now so it softens while the cake bakes and cools.
Measure all the cake ingredients before starting — the batter comes together in under a minute once the water is poured, and there is no time to hunt for the vanilla.
Ingredients at a glance (14)
- 1 1/2 cups all-purpose flour
- 1 cup granulated sugar
- 1/4 cup unsweetened cocoa powder
- 1 tsp baking soda
- 1/2 tsp kosher salt
- 1/3 cup vegetable oil
- 1 tbsp white vinegar
- 1 tsp vanilla extract
- 1 cup water, cool
- 1/2 cup unsalted butter, softened
- 1/4 cup unsweetened cocoa powder
- 2 cups confectioners' sugar, sifted
- 3 tbsp whole milk, plus more if needed
- 1 tsp vanilla extract
Instructions
Mix the batter in the pan
- Heat the oven and prepare the dishPosition a rack in the center of the oven and heat it to 350°F (175°C). Take an 8x8-inch square baking dish and either grease it lightly with oil or leave it ungreased — wacky cake was traditionally mixed and baked right in an ungreased pan, and it releases fine once cooled. Set the dish on a baking sheet to catch any stray batter.Look for The oven should read 350°F on the thermometer before the batter goes in.Tip Mixing directly in a glass dish saves washing up; a metal pan bakes about 3 minutes faster.
- Whisk the dry ingredients in the panPour the flour, granulated sugar, cocoa powder, baking soda and kosher salt straight into the baking dish. Whisk them together thoroughly, right in the pan, scraping into every corner until the mixture is one uniform, deep-brown powder with no streaks of white sugar or pale flour left. This in-pan mixing is the signature of a true wacky cake.Look for No pale streaks anywhere — the dry mix should look evenly chocolate-colored.Tip Sift the cocoa first if it is lumpy; dry cocoa clumps stay as bitter specks after baking.
- Make the wells for the wet ingredientsWith the back of a spoon, press three depressions into the dry mix: one larger hole in the middle and two smaller ones on opposite sides. This old-fashioned trick keeps the oil, vinegar and vanilla separated until the last moment, so the baking soda stays as reactive as possible until everything comes together.Look for The bottom of the pan should show through the center well, not just a shallow dent.Tip Make the center well about twice the width of the two side wells.
- Add the wet ingredients to the wellsPour the vegetable oil into the large center well, then the white vinegar and the vanilla extract into the two smaller ones. Pour the cool water over the whole pan at once. The baking soda will fizz against the vinegar immediately — that lively fizz is exactly what should happen, so do not stir yet.Look for Visible fizzing and tiny bubbles spreading across the surface of the water.Tip Cool water keeps the baking soda reaction from exhausting itself before the pan reaches the oven.
- Stir into a smooth batterUsing a fork or a small whisk, stir everything together right in the dish, working in steady circles from the center outward. Scrape the corners and the bottom of the pan so no dry pockets hide there. Stop as soon as the batter is smooth and glossy — about 30 seconds of stirring is plenty.Look for A uniform, pourable batter with no dry patches clinging to the bottom corners.Tip Overstirring toughens the crumb; count to thirty and put the fork down.
By the end of this phase the pan holds a smooth, glossy, pourable chocolate batter, uniformly dark with no streaks of flour or sugar, fizzing gently on the surface.
The corners and bottom of the dish should be scraped clean of dry pockets — run the fork along them once more before the pan goes in the oven. If the batter looks curdled or shows pale swirls, keep stirring briefly; it should come together within seconds.
Bake and cool the cake
- Bake until springySlide the dish, sitting on its baking sheet, onto the center rack. Bake for 30 to 35 minutes, rotating the pan once halfway through so the corners bake evenly. The cake is ready when the top looks matte and evenly risen, the edges pull slightly from the sides, and a gentle press in the center springs back.Look for A toothpick in the center comes out with moist crumbs but no wet batter.Tip Glass dishes bake gently; if using dark metal, start checking at 28 minutes.
- Cool completely on a rackSet the pan on a wire rack and let the cake cool completely, at least 45 minutes. Wacky cake stays remarkably moist as it cools, and the crumb sets from tender to sliceable. Do not rush this — frosting a warm cake melts the buttercream into a shiny puddle instead of a thick, spreadable layer.Look for The pan feels room temperature on the underside when touched with a palm.Tip Speed this along by chilling the pan in the refrigerator for 20 minutes after 15 on the rack.
The baked cake has a matte, evenly domed top that springs back when pressed lightly in the center, and the edges have pulled just barely from the sides of the dish. A toothpick in the middle emerges with moist crumbs, never wet batter.
The pan is then left to cool completely — the underside of the dish should feel room temperature. Frosting before this point melts the buttercream, so patience here is the difference between thick frosting and a shiny soak.
Frost and serve
- Beat the cocoa frosting baseIn a mixing bowl, beat the softened butter with a hand mixer on medium speed for about 1 minute, until it turns pale and creamy. Add the cocoa powder and beat again, scraping the bowl, until the mixture looks uniform and glossy. Starting with butter alone keeps the frosting smooth instead of dusty.Look for The butter and cocoa form a shiny, uniform paste with no dry streaks.Tip Butter at 65°F (18°C) — soft but cool — gives the fluffiest frosting.
- Finish the frostingAdd the confectioners' sugar, the milk and the vanilla extract. Beat on low speed until the sugar is absorbed, then on medium for 1 to 2 minutes, until the frosting turns thick, glossy and spreadable. If it seems stiff, add milk a teaspoon at a time; if it seems loose, beat in a few more tablespoons of sifted sugar.Look for The frosting holds a soft peak when the beater is lifted.Tip Always start the mixer on low or a cloud of sugar will coat the kitchen.
- Frost and sliceSpoon the frosting onto the cooled cake and spread it edge to edge with a spatula, using light strokes so the crumb does not tear. Leave the frosting in soft swirls or smooth it flat, as preferred. Cut into 9 squares with a sharp knife, wiping the blade between cuts, and lift out the first slice to serve.Look for Clean-edged squares with a thick, glossy layer of frosting on top.Tip A knife dipped in hot water and dried between cuts gives bakery-neat edges.
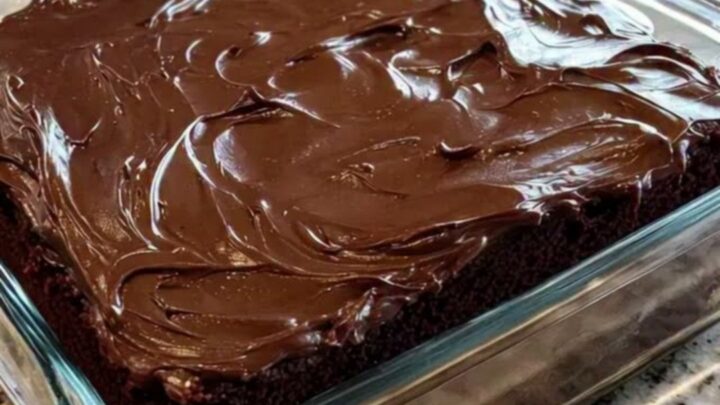
The finished cake wears a thick, glossy layer of cocoa buttercream spread edge to edge, holding soft swirls where the spatula lifted. When a slice is cut, the edges come away clean and the crumb inside looks evenly dark, tender and moist.
The frosting should cling to the knife rather than smear. Wipe the blade between cuts for the neatest squares, and serve the first slice while the rest still looks untouched.
Common mistakes
Three things go wrong most often. First, overstirring: once the water hits the pan, thirty seconds of stirring is enough — longer develops gluten and pops the bubbles the baking soda just made, giving a dense, rubbery crumb. Second, using Dutch-processed cocoa: the recipe's lift depends on the acidity of natural cocoa reacting with the baking soda, so check the label.
How to tell it’s done
The cake is done when the top is matte, evenly risen and springy in the center, the edges pull slightly from the sides of the dish, and a toothpick inserted in the middle comes out with moist crumbs attached but no wet batter — about 30 to 35 minutes. Underbaked wacky cake looks glossy and wet in the center; overbaked it turns dry at the edges.
Up next · Part 3 of 3
4 variations · storage & make-ahead · 5 answers · printable card
Tips, FAQ & printable recipe (Part 3)← Back to the ingredients (Part 1)