Desserts · Part 2 of 3: Instructions
Chocolate Wacky Cake: One-Pan, Egg-Free and Ready in an Hour Step-by-step instructions
- Prep
- Cook
- Total
- Serves
- 9
Before you start
Pull the butter for the frosting out of the refrigerator first so it has time to soften while the cake bakes and cools; it should give slightly when pressed but still hold its shape.
Measure every ingredient before starting, since the batter comes together in the pan fast and there is no second chance once the water hits the soda.
Ingredients at a glance (14)
- 1 1/2 cups all-purpose flour
- 1 cup granulated sugar
- 3 tbsp unsweetened cocoa powder
- 1 tsp baking soda
- 1/2 tsp kosher salt
- 1 cup water
- 1/3 cup vegetable oil
- 1 tbsp white vinegar
- 1 tsp vanilla extract
- 6 tbsp unsalted butter, softened
- 1/3 cup unsweetened cocoa powder
- 2 cups confectioners' sugar, sifted
- 3-4 tbsp whole milk
- 1 tsp vanilla extract
Instructions
Mixing in the pan
- Sift the dry ingredients into the panPreheat the oven to 350°F (175°C) and set an oven rack in the center. Sift the flour, sugar, cocoa, baking soda and salt directly into the ungreased 8x8-inch glass baking dish through a fine-mesh sieve, breaking up any clumps of cocoa with your fingers.Look for The dry mix should look evenly brown with no pale streaks of flour or sugar left in the pan.Tip Sifting straight into the pan is the whole point of wacky cake: no bowl to wash and no mixer to drag out.
- Make three wells for the wet ingredientsWith the back of a spoon, press three shallow wells into the dry mix: one large one in the center and two smaller ones on either side. This old-fashioned trick keeps the oil, vinegar and vanilla separated until the water goes in, so the leavening reaction starts exactly when it should.Look for The wells should hold their shape, with clean ridges of dry mix between them.Tip Pour the oil into the big well and the vinegar and vanilla into the two small wells to keep them from mingling early.
- Pour in the water and stir it all togetherPour the cup of water over everything, then stir with a fork or a small whisk until the batter is smooth and glossy, scraping the corners of the dish so no dry pockets hide there. Take about a minute and a half; the batter will be thin, more like a thick drink than a dough, and that is exactly right.Look for No streaks of dry powder should remain and the batter should flow slowly off the whisk in a thin ribbon.Tip A few small lumps are fine, but keep stirring until the bottom corners are clean — they hide dry cocoa more often than anywhere else.
- Level the batter and get it into the ovenTap the dish gently on the counter twice to release large air bubbles, then tilt and rotate the dish so the batter settles into an even layer. Slide it onto the center rack of the preheated oven, setting it on a small baking sheet to catch any stray drips from the thin batter.Look for The surface should look level and shiny, with the batter reaching roughly the same depth at every corner.Tip Glass conducts heat gently, which suits this delicate crumb; if the dish is dark metal instead, check for doneness five minutes early.
By the end of this phase the batter is smooth, glossy and thin, poured level in the ungreased glass dish and already sliding into the oven.
Run the whisk through one last time and check the bottom corners of the pan — dry cocoa hides there more than anywhere else, and a missed pocket bakes into a hard streak. The surface should look even and wet with no pale flour patches.
Baking and cooling
- Bake until a pick comes out cleanBake for 28 to 32 minutes, rotating the dish once halfway through if the oven runs uneven. The cake is done when the top springs back from a light touch and a wooden pick inserted in the center comes out with only a few moist crumbs attached, never wet batter.Look for A pick with two or three clinging crumbs is perfect; wet batter means two to four more minutes in the oven.Tip Resist opening the door before the 20-minute mark — the soda-and-vinegar lift is delicate while the crumb is still setting.
- Cool the cake completelySet the dish on a wire cooling rack and leave the cake until it reaches room temperature, at least 45 minutes. A warm crumb will melt the butter in the frosting and turn those glossy swirls into a greasy sheen, so treat this pause as part of the recipe, not a delay.Look for The bottom of the dish should feel barely warm against the palm, and the cake should have pulled slightly from the sides.Tip Speed things up by placing the dish in the refrigerator for 20 minutes once it has cooled for 15 at room temperature.
The baked cake should be risen evenly across the top, deeply chocolate-brown, and spring back from a light touch with no shiny wet patches in the middle. A wooden pick in the center should come out with moist crumbs but no batter.
Frosting and serving
- Beat the butter and cocoa until smoothBeat the softened butter with an electric hand mixer on medium speed for about a minute, until it looks creamy and pale. Add the cocoa powder and beat again, scraping the bowl once, until the mixture is uniformly dark with no dry streaks of powder clinging to the sides.Look for The butter-cocoa base should look glossy and hold a soft peak when the beaters are lifted.Tip Butter that gives slightly when pressed but still holds its shape whips far better than butter left out for hours.
- Add the sugar, milk and vanillaAdd the confectioners' sugar one cup at a time, beating on low speed so it does not fly out of the bowl, then pour in the vanilla and 3 tablespoons of milk. Beat on medium for two minutes, adding the last tablespoon of milk only if the frosting still feels stiff.Look for The frosting should spread in thick ribbons and hold a swirl without slumping or cracking.Tip Stop and scrape the bowl halfway through — a pocket of unmixed sugar at the bottom is the most common frosting flaw.
- Frost the cake in deep swirlsSpoon all the frosting onto the center of the cooled cake. Spread it to the edges with an offset spatula, then go back over the top with the tip of the spatula, lifting and turning to build tall, glossy swirls. Work confidently; the frosting skins over quickly and re-swirling later pulls up crumbs.Look for Deep ribboned swirls with peaks that hold their shape, and frosting reaching all four edges of the square.Tip Dip the spatula in hot water and wipe it dry between passes for the sharpest, most polished swirls.
- Slice and serveCut the frosted cake into nine squares with a sharp knife, wiping the blade with a damp cloth between cuts so each piece shows a clean edge against the moist crumb. Lift the first slice out with a spatula and serve it while the frosting still has that fresh, glossy sheen.Look for The crumb should cut cleanly, dark and even, with the frosting holding its swirl on top.Tip For the neatest squares, chill the frosted cake for 10 minutes before slicing, then bring the pieces back to room temperature.
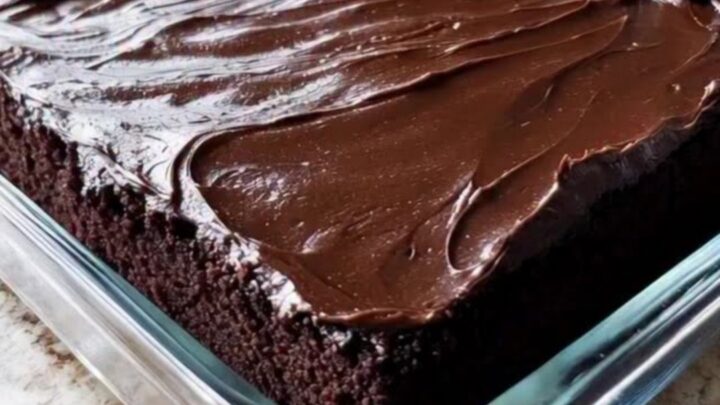
The finished cake carries a thick layer of fudge frosting with tall, glossy swirls that hold their shape right to the edges of the square.
The frosting should look smooth and satiny, not grainy or greasy, and a spatula dipped back in should drag through it cleanly. When a slice is cut, the crumb should be dark, even and moist, holding together without crumbling apart.
Common mistakes
The most common failure is overworking the batter. Once the water is in, stir only until the dry streaks disappear; extra stirring builds gluten and turns a tender crumb dense and rubbery.
The second mistake is frosting a warm cake: even mild warmth melts the butter and the swirls slide into a flat, greasy film, so let the dish cool fully, bottom included.
How to tell it’s done
The cake is done when the top springs back slowly from a gentle fingertip press and a wooden pick inserted in the center comes out with a few moist crumbs but no wet batter. The edges will have pulled slightly away from the sides of the glass dish, and the surface will look matte rather than shiny.
Up next · Part 3 of 3
4 variations · storage & make-ahead · 5 answers · printable card
Tips, FAQ & printable recipe (Part 3)← Back to the ingredients (Part 1)