Dinner · Part 2 of 3: Instructions
Cheesy Walking Taco Casserole with Crunchy Corn Chips Step-by-step instructions
- Prep
- Cook
- Total
- Serves
- 6
Before you start
Before you begin cooking, measure out all of your ingredients to ensure a smooth assembly process. Dice the fresh tomatoes and shred the lettuce, then store them in the refrigerator so they remain cold and crisp until the very end.
Drain the canned black beans thoroughly to prevent excess moisture from making the corn chips soggy. Shred the cheddar cheese from a block if you are not using pre-shredded cheese. Finally, preheat your oven to 375°F (190°C) so it is ready to bake the casserole immediately after layering.
Ingredients at a glance (8)
- 1 lb ground beef
- 1 oz taco seasoning
- 15 oz canned black beans, drained
- 9 oz corn chips
- 2 cups shredded cheddar cheese
- 1/2 cup sour cream
- 1 cup shredded lettuce
- 1/2 cup diced tomatoes
Instructions
Prepare the Beef Filling
- Brown the Ground BeefPlace a large skillet over medium-high heat. Add the ground beef and cook, breaking it up with a spatula, until it is fully browned and no pink remains. Ensure the beef reaches a safe internal temperature of 160°F (71°C) to eliminate any foodborne pathogens. Once cooked, carefully drain any excess grease from the skillet to keep the casserole from becoming oily.Look for The beef is fully browned with no pink remaining.Safe temperature 160°F (71°C) internal temperature (ground meat)Tip Use a wooden spoon or spatula to break the beef into small, uniform crumbles.
- Season and SimmerReduce the heat to medium. Stir the taco seasoning and the drained black beans into the skillet with the browned beef. Pour in a splash of water, about one-fourth of a cup, to help distribute the seasoning. Stir everything together and let it simmer for five minutes until the liquid has mostly evaporated and the mixture is thick and fragrant.Look for The mixture is thick, bubbling, and highly fragrant.Tip Do not let the mixture dry out completely; it should remain moist.
By the end of this phase, the ground beef is fully browned, seasoned, and simmered with the black beans. The mixture in the skillet should smell highly aromatic, with the taco seasoning fully coating the beef and beans.
There should be very little standing liquid left in the pan, resulting in a thick, savory filling that is ready to be layered.
Bake to Cheesy Perfection
- Layer the CasseroleSpread the corn chips in an even layer across the bottom of a clear glass 9x13-inch baking dish. Carefully spoon the hot simmered beef and black bean mixture directly over the chips, spreading it evenly to the edges. Sprinkle the shredded cheddar cheese generously over the top of the beef layer, covering it completely from corner to corner.Look for The cheese completely covers the beef layer.Tip Keep some corn chips whole for a better texture on the bottom.
- Bake the CasserolePlace the baking dish in the preheated oven at 375°F (190°C). Bake for fifteen to twenty minutes, keeping a close eye on the cheese. The casserole is ready when the cheese is fully melted, bubbly, and starting to turn a light golden brown around the edges. Carefully remove the hot dish from the oven using oven mitts.Look for The cheese is melted, bubbly, and golden brown.Tip Rotate the dish halfway through baking for even browning.
At the end of the baking phase, the cheddar cheese is completely melted, forming a bubbly, golden-brown blanket over the hot beef and corn chips. You should see small bubbles of steam popping through the cheese layer, indicating the entire casserole is heated through. The corn chips at the bottom will be slightly toasted and fragrant.
Garnish and Serve
- Add Fresh ToppingsLet the baked casserole cool for five minutes before topping. Distribute the cold shredded lettuce evenly over the melted cheese layer, followed by the diced tomatoes. Drizzle the sour cream in a smooth, decorative pattern across the top of the fresh vegetables. Serve the warm casserole immediately while the toppings are cold and the base is hot.Look for The toppings are evenly distributed and the sour cream is drizzled.Tip Put the sour cream in a squeeze bottle or plastic bag with the corner snipped for a clean drizzle.
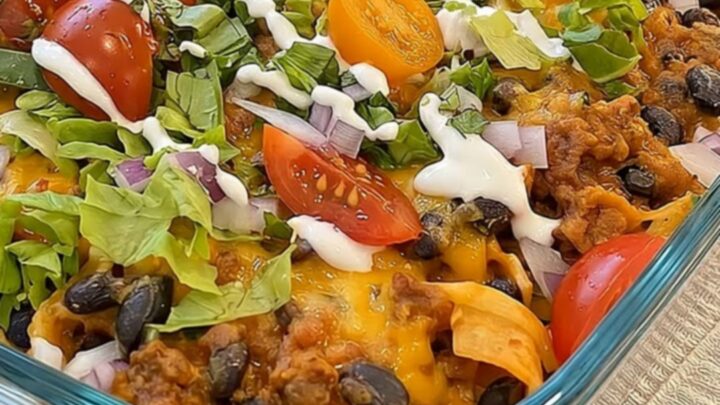
The completed casserole is vibrant and colorful, featuring a stark contrast between the hot, melted cheese and the cool, fresh green lettuce and red tomatoes. The sour cream drizzle is smooth and neatly distributed. The dish should smell of warm spices, toasted corn, and fresh vegetables, ready to be scooped and served immediately.
Common mistakes
One common mistake is failing to drain the ground beef after browning, which leads to a greasy casserole and soggy corn chips. Another error is adding the fresh toppings like lettuce, tomatoes, and sour cream before baking.
This will cause the lettuce to wilt and turn slimy, while the sour cream will split and lose its smooth texture under the high heat of the oven. Always wait until the casserole is fully baked and has cooled slightly before adding these cold ingredients.
How to tell it’s done
The casserole is perfectly done when the cheddar cheese is entirely melted, bubbly, and showing light golden spots around the edges of the baking dish.
Since the ground beef is already fully cooked to a safe internal temperature of 160°F (71°C) in the skillet, the baking process is primarily designed to heat the ingredients through, toast the corn chips, and melt the cheese into a gooey, cohesive layer.
- Ground meat: 160°F (71°C) in the thickest part
Up next · Part 3 of 3
2 variations · storage & make-ahead · 3 answers · printable card
Tips, FAQ & printable recipe (Part 3)← Back to the ingredients (Part 1)