Dinner · Part 2 of 3: Instructions
Cheesy Potato Herb Flatbreads: Golden Skillet Bread Step-by-step instructions
- Prep
- Cook
- Total
- Serves
- 4
Before you start
Before starting, gather all ingredients and equipment. If using leftover mashed potatoes, bring them to room temperature. Grate the cheese if not already grated, and chop the fresh herbs.
Lightly flour a work surface for rolling. Have a large skillet or griddle ready, along with butter for frying. The dough comes together quickly, so having everything ready ensures a smooth cooking process.
Ingredients at a glance (8)
- 400 g mashed potatoes (about 2 cups)
- 1 cup grated kaşar cheese (or mozzarella)
- 1/4 cup fresh dill, chopped
- 1/4 cup fresh flat-leaf parsley, chopped
- 1 large egg, lightly beaten
- 1 1/2 cups all-purpose flour, plus more for dusting
- 1/2 tsp salt
- 2 tbsp butter, for frying
Instructions
Mix and Shape
- Mix the DoughIn a large bowl, combine the mashed potatoes, grated kaşar cheese, chopped dill, and parsley. Add the beaten egg and salt, then stir until well combined. Gradually add the flour, mixing with a fork or your hands until a soft dough forms. The dough will be slightly sticky but should hold together. If it feels too wet, add a little more flour, a tablespoon at a time.Look for The dough should be soft, slightly tacky, and hold its shape when pressed.Safe temperature 160°F (71°C) internal temperature (egg dishes)Tip Use cold mashed potatoes for easier handling; warm potatoes make the dough stickier.
- Shape the RoundsTurn the dough out onto a lightly floured surface. Knead gently a few times to bring it together, then divide into 4 equal portions. Roll each portion into a ball, then flatten into a disc about 1/2-inch thick. Dust with flour as needed to prevent sticking.Look for The discs should be round and evenly thick.Tip Keep the dough covered with a clean kitchen towel while shaping to prevent drying.
The dough should be soft, slightly tacky, and hold together when pressed. It should not be sticky to the touch after dusting with flour.
The mixture will be fragrant with herbs and cheese. You should be able to shape the dough into balls without cracking.
Pan-Fry
- Roll Out FlatbreadsOn a lightly floured surface, roll each disc into a round about 1/4-inch thick and 6-7 inches in diameter. The dough may be slightly irregular; that's fine. Dust with flour to keep from sticking.Look for The rolled flatbreads should be thin but not see-through.Tip Roll from the center outward, rotating the dough for an even circle.
- Preheat the SkilletPlace a large skillet or griddle over medium-high heat. Add the butter and let it melt, swirling to coat the pan. The butter should sizzle gently when the flatbread hits the pan.Look for The butter is foaming but not browning.Tip Use a heavy-bottomed skillet for even heat and better browning.
- Cook First SideCarefully place one flatbread in the hot skillet. Cook for 2 minutes, or until the bottom is golden and blistered. The dough will puff slightly and the surface will show brown spots.Look for The bottom is golden brown with darker blisters.Tip Do not press down on the flatbread; let it puff naturally.
- Flip and Cook Second SideFlip the flatbread with a spatula and cook for another 2 minutes, until the second side is golden and the bread feels puffed and cooked through. Transfer to a plate and repeat with the remaining dough, adding more butter to the skillet as needed.Look for Both sides are golden with blistered spots; the bread feels light and pillowy.Safe temperature 160°F (71°C) internal temperature (egg dishes)Tip If the bread browns too quickly, lower the heat slightly.
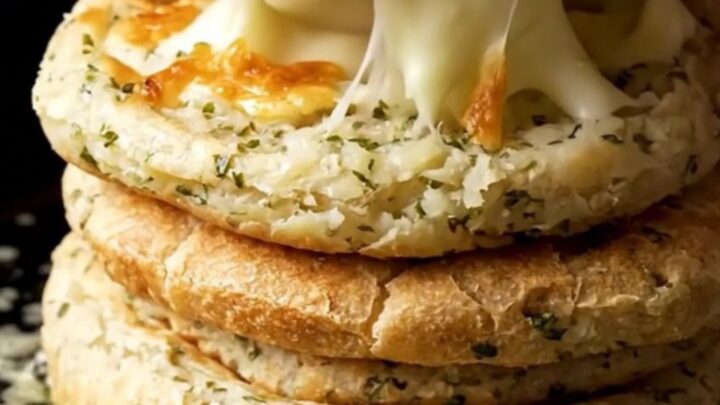
The flatbreads should be golden brown with blistered spots and a slightly puffed appearance. The butter should sizzle as the bread hits the pan, and the kitchen will smell of toasted butter and herbs. The flatbreads should feel light and airy when lifted.
Stack and Serve
- Stack and ServeAs the flatbreads finish, stack them on a warm plate. Serve immediately, tearing them open to reveal the steamy, cheesy interior.Look for The flatbreads are warm, soft, and aromatic with herbs.Tip Keep the stack covered with a towel to stay warm until serving.
The flatbreads should be warm, soft, and aromatic. When torn open, the interior should be steamy with melted cheese stretching between the pieces. The texture should be pillowy and tender, with a lightly crisp exterior.
Common mistakes
A common mistake is overworking the dough, which can make the flatbreads tough. Mix just until the flour is incorporated, and handle the dough gently. Another mistake is using too high heat, which burns the outside before the inside cooks.
Medium-high is ideal. Also, don't overcrowd the skillet—cook one flatbread at a time to ensure even browning and puffing. Finally, resist pressing down on the flatbreads while they cook, as this deflates them and makes them dense.
How to tell it’s done
The flatbreads are done when they are golden brown on both sides, with blistered spots and a slightly puffed appearance. The interior should be cooked through, soft, and pillowy, with the cheese melted and stretchy.
To check, gently press the center of a flatbread; it should feel springy and not doughy. The internal temperature of the egg in the dough reaches 160°F (71°C) when properly cooked.
- Egg dishes: 160°F (71°C) in the thickest part
Up next · Part 3 of 3
4 variations · storage & make-ahead · 5 answers · printable card
Tips, FAQ & printable recipe (Part 3)← Back to the ingredients (Part 1)