Dinner · Part 2 of 3: Instructions
Cheesy Garlic Chicken Spaghetti with Crispy Parmesan Crust Step-by-step instructions
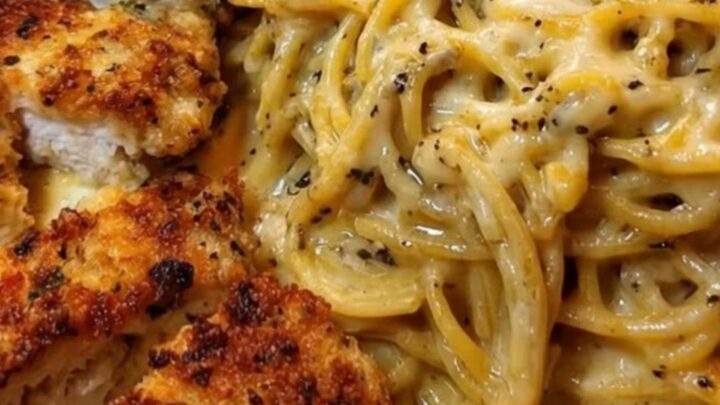
- Prep
- Cook
- Total
- Serves
- 4
Before you start
Set the station before the first pan hits the heat, because this recipe moves quickly once it starts. Grate both cheeses into separate bowls, mince the garlic, and pound the chicken before anything heats up. Mix the dredge in a shallow dish, fill the pasta pot and set it heating on the back burner, and measure the cream.
Ingredients at a glance (14)
- 1 1/2 lb boneless skinless chicken breasts
- 1/2 cup all-purpose flour
- 3/4 cup panko breadcrumbs
- 3/4 cup grated parmesan cheese, divided
- 1 tsp garlic powder
- 1 1/2 tsp kosher salt, divided
- 1/2 tsp black pepper
- 3 tbsp olive oil
- 12 oz spaghetti
- 3 tbsp unsalted butter
- 6 cloves garlic, minced
- 1 cup heavy cream
- 1 1/2 cups shredded mozzarella cheese
- Chopped fresh parsley, for serving
Instructions
Crisp the chicken
- Pound the chicken evenPat the chicken breasts dry with paper towels, then set them between two sheets of plastic wrap. Pound the thicker ends with a mallet or the bottom of a heavy skillet until each piece is an even 3/4 inch thick. Even thickness means the crust browns before the inside overcooks.Look for Each breast should look like a flat, uniform cutlet with no bulging thick end left.Tip Pound from the center outward with firm, even taps so the meat does not tear.
- Build the parmesan crustIn a shallow dish, stir together the flour, panko, 1/4 cup of the parmesan, the garlic powder, 1 tsp of the kosher salt, and the black pepper. Press each chicken piece firmly into the mixture, turning to coat every side, and shake off the loose excess so the crust stays attached while it fries.Look for The coating should look thick and evenly shaggy, with no wet bare patches of chicken showing through.Tip Press the coating on with your palm for ten seconds per side; pressure is what makes it adhere.
- Sear the chicken crispHeat 2 tbsp of the olive oil in a large skillet over medium-high heat. Lay the chicken in without crowding and cook 5 to 6 minutes per side, adjusting the heat so the crust sizzles steadily without darkening too fast. The chicken is done at an internal temperature of 165°F (74°C).Look for The crust should be deep golden brown and release easily from the pan when it is ready to flip.Safe temperature 165°F (74°C) internal temperature (poultry)Tip Resist moving the cutlets early; the crust releases on its own once it crisps.
- Rest the chickenTransfer the chicken to a cutting board and let it rest while the pasta and sauce come together. Resting lets the juices settle back into the meat instead of running onto the board, so every slice stays moist. Tent it loosely with foil if the kitchen is cold.Look for After five minutes, the board should show barely a spoonful of juices when the chicken is cut.Tip Do not cover tightly with foil; trapped steam softens the crust you worked for.
By the end of this phase, the kitchen should smell like toasted parmesan and browned butter. Each cutlet is deep golden on both sides with a crust that clings when nudged with tongs, and the interior reads 165°F (74°C) on an instant-read thermometer. The cutlets rest on a board, loosely covered, while the pasta water comes to a boil behind them.
Build the cheese sauce
- Boil the spaghettiBring a large pot of well-salted water to a rolling boil and cook the spaghetti until just al dente, about 1 minute less than the package directs. Before draining, scoop out 1 cup of the starchy pasta water. Drain the pasta and leave it in the colander for the moment.Look for A strand bitten at the minute mark should bend without snapping and show a thin pale center.Tip The reserved pasta water is the secret binder; it helps the sauce cling to every strand.
- Bloom the garlic in butterReturn the same skillet to medium heat and melt the butter with the remaining 1 tbsp of olive oil, scraping up the browned bits from the chicken with a wooden spoon. Add the minced garlic and cook about 1 minute, just until it smells fragrant and the raw edge softens.Look for The garlic should turn pale gold and perfume the kitchen; the moment it darkens, move to the next step.Tip The fond left by the chicken is pure flavor, so scrape every browned spot loose.
- Make the cheese saucePour in the heavy cream and let it come to a gentle simmer, then lower the heat and stir in the mozzarella and the remaining 1/2 cup of parmesan a handful at a time. Keep stirring until the sauce turns smooth and glossy and coats the back of the spoon thickly.Look for The sauce should ribbon off the spoon and look silky, with no visible strands of unmelted cheese.Tip Add the cheese off the heat if the pan is very hot; high heat can make mozzarella stringy.
The spaghetti sits drained in the colander, glossy and barely resistant, with a full cup of starchy pasta water standing by in a mug. In the skillet, the garlic has bloomed to pale gold in butter, the cream is at a lazy simmer, and the cheeses have melted into a sauce that ribbons off the spoon — smooth, glossy, and thick enough to coat it.
Taste now, before the pasta goes in: the sauce should be slightly saltier than perfect, because the noodles will dilute it in the final toss.
Toss, slice, plate
- Toss pasta through the sauceAdd the drained spaghetti to the skillet and toss with tongs, loosening the sauce with splashes of the reserved pasta water until every strand is coated and the whole thing moves like silk. Season with the remaining 1/2 tsp kosher salt and extra black pepper to taste.Look for Lift a bundle with tongs: the strands should hang together and glisten, not pool sauce in the pan bottom.Tip Add pasta water a few tablespoons at a time; you may not need the full cup.
- Slice and plateSlice the rested chicken against the grain into thick strips. Mound the cheesy spaghetti onto warm plates and lay the strips over the top so the crust stays crisp above the sauce. Work quickly while everything is hot so the cheese stays stretchy at the table.Look for The slices should show juicy white meat with a golden crust edge, and no pink in the center.Tip Angle the strips across the pasta rather than burying them to keep the crust audible.
- Finish and serveScatter chopped parsley over each plate and bring them to the table straight away, while the sauce is still steaming and pulls long cheesy strands with every twirl of the fork. Offer extra grated parmesan at the table for anyone who wants a heavier hand.Look for The fork should twirl a glossy, sauce-coated bundle that stretches cheese as it lifts.Tip Warm plates hold the heat; rinse them under hot water for thirty seconds before plating.
Every strand of spaghetti is coated in a sauce that clings rather than pools, loosened just enough with pasta water to move like silk when the tongs lift it. The chicken is sliced against the grain into thick strips, juicy at the center with a crust that still crackles, laid over the pasta rather than buried.
Parsley is scattered on top and the plates are at the table while the cheese still stretches. If the sauce tightened during plating, a spoonful of hot pasta water brings it back.
Common mistakes
The most common failures are a soggy crust, a broken sauce, and overcooked pasta. A soggy crust comes from crowding the pan, which drops the oil temperature and steams the coating — fry in two batches if needed, and never stack the hot cutlets.
A grainy or stringy sauce comes from boiling the cream after the cheese goes in; keep it at a lazy simmer and add the final handfuls off the heat.
How to tell it’s done
The chicken is done at an internal temperature of 165°F (74°C), measured with an instant-read thermometer inserted into the thickest part of a cutlet; the crust should be deep golden and audibly crisp.
Let the cutlets rest at least 3 minutes before slicing so the juices redistribute. The pasta should be al dente before the toss — it softens slightly in the hot sauce.
- Poultry: 165°F (74°C) in the thickest part
Up next · Part 3 of 3
4 variations · storage & make-ahead · 5 answers · printable card
Tips, FAQ & printable recipe (Part 3)← Back to the ingredients (Part 1)