Dinner · Part 2 of 3: Instructions
Cheesy Garbage Bread for a Satisfying Warm Meal Step-by-step instructions
- Prep
- Cook
- Total
- Serves
- 6
Before you start
Before beginning, ensure all ingredients are ready and at room temperature, especially the bread dough, which is much easier to work with when it is not cold from the refrigerator. Preheating the oven is critical for achieving the right texture, so start this process early.
Clear a large space on your kitchen counter to roll out the dough and assemble the braid comfortably. Having a sharp knife and a sturdy spatula nearby will help with the assembly and final slicing, ensuring that the process remains smooth and efficient from start to finish.
Ingredients at a glance (3)
- 1 lb store-bought or made ahead bread dough
- 1 lb ground beef
- 2 cups shredded mozzarella cheese
Instructions
Browning the filling
- Prepare the fillingHeat a skillet over medium-high heat and add the ground beef. Cook, breaking it up with a spatula, until the meat is browned and reaches an internal temperature of 160°F (71°C). Drain any excess grease from the pan and set aside.Look for The beef should be fully browned and no longer pink.Safe temperature 160°F (71°C) internal temperature (ground meat)Tip Drain the fat thoroughly so the bread does not become soggy.
The ground beef should be completely browned and aromatic, with no visible pink remaining. The fat should be rendered and drained from the skillet.
Ensure the meat has reached the required temperature of 160°F (71°C) before moving to the assembly stage. The texture should be loose and ready to be incorporated into the dough.
Braiding the dough
- Assemble the breadRoll out the bread dough on a floured surface into a rectangle. Spread the cooked ground beef down the center and top generously with the shredded mozzarella cheese. Cut strips along the sides of the dough and braid them over the filling, sealing the ends tightly.Look for The dough should be braided neatly to hold the filling inside.Tip Ensure the ends are well sealed to prevent cheese from leaking out during baking.
The dough should be rolled out evenly to prevent thick spots that might remain undercooked. The braid should be tight and consistent, with the strips overlapping evenly to create a uniform appearance. Check that the filling is contained within the center and that no large gaps exist between the braids.
Baking the loaf
- Bake and serveTransfer the braided bread to a baking sheet and bake in a preheated oven at 375°F (190°C) for about 20 to 25 minutes, or until the crust is golden brown and the cheese is melted. Let it rest for 5 minutes before slicing.Look for The bread is ready when the crust sounds hollow when tapped.Tip Use a sharp knife for clean slices, especially while the cheese is still warm.
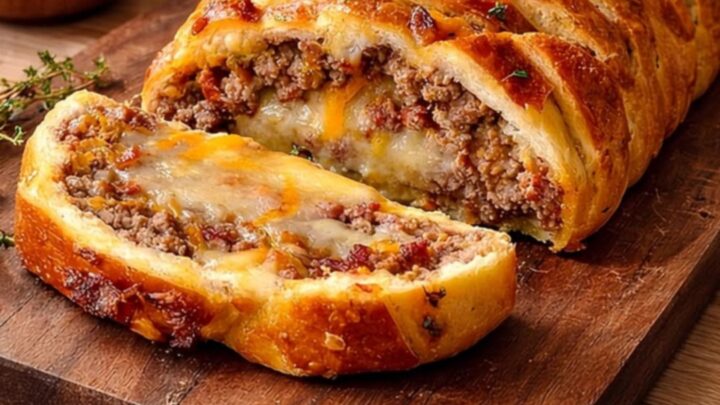
The crust should be a vibrant golden brown across the entire surface. The cheese should be visible through the braids, appearing melted and bubbly. The bread should feel firm to the touch, and the bottom should be crisp. If the top browns too quickly, cover it loosely with foil.
Common mistakes
A common mistake is failing to drain the ground beef adequately, which can lead to a soggy bottom crust. Always remove as much rendered fat as possible before filling the dough. Another error is not sealing the braided ends tightly enough, allowing the cheese to leak out.
Take care to tuck the ends under the loaf to maintain its shape. Finally, avoid rushing the rest time; letting the bread sit for five minutes allows the interior to settle, making it easier to slice without falling apart.
How to tell it’s done
The bread is finished when the crust is deep golden brown and the internal temperature of the filling has reached a safe point. The cheese should be bubbling and fully melted.
When you tap the top of the crust, it should sound hollow, indicating that the dough is fully baked. Because the beef is cooked beforehand, the primary goal for baking is to achieve the perfect texture for the bread and to ensure the cheese is thoroughly heated through.
- Ground meat: 160°F (71°C) in the thickest part
Up next · Part 3 of 3
2 variations · storage & make-ahead · 3 answers · printable card
Tips, FAQ & printable recipe (Part 3)← Back to the ingredients (Part 1)