Appetizers · Part 2 of 3: Instructions
Cheesy Butter Chicken Stuffed Garlic Bread Step-by-step instructions
- Prep
- Cook
- Total
- Serves
- 6
Before you start
Before starting, make sure the chicken is cut into bite-size pieces and all spices are measured. Have the garlic baguette ready, and preheat the oven to 400°F (200°C) when you begin the baking phase.
Line a baking sheet with foil for easy cleanup. The butter chicken filling can be made ahead and refrigerated, but bring it to room temperature before stuffing the bread. Shred the mozzarella in advance so it's ready to sprinkle.
Ingredients at a glance (13)
- 1 lb boneless, skinless chicken breast, cut into bite-size pieces
- 4 tbsp unsalted butter, divided
- 2 tsp garam masala
- 1 tsp ground cumin
- 1 tsp ground coriander
- 1/2 tsp ground turmeric
- 1/2 tsp chili powder
- 1 tbsp garlic ginger paste
- 1 cup tomato puree
- 1/2 cup heavy cream
- 1 tbsp dried fenugreek leaves (kasuri methi)
- 1 garlic baguette (about 12 inches long)
- 2 cups shredded mozzarella cheese
Instructions
Searing and Simmering
- Sear the ChickenIn a large skillet, melt 2 tablespoons of butter over medium-high heat. Add the chicken pieces and season with garam masala, ground cumin, ground coriander, turmeric, and chili powder. Cook, stirring occasionally, until the chicken is golden and cooked through, about 6–8 minutes. The chicken is done when it reaches 165°F (74°C) on an instant-read thermometer.Look for The chicken should be lightly browned and the spices fragrant.Safe temperature 165°F (74°C) internal temperature (poultry)Tip Cut the chicken into uniform pieces so they cook evenly.
- Add AromaticsReduce the heat to medium and add the garlic ginger paste. Cook for 1 minute until fragrant, stirring constantly to avoid burning.Look for The paste should sizzle and smell aromatic.Tip If the paste sticks, add a splash of water.
- Make the SaucePour in the tomato puree and heavy cream. Stir in the remaining 2 tablespoons of butter and the dried fenugreek leaves. Bring to a simmer and cook for 5–7 minutes, stirring occasionally, until the sauce thickens to a rich, orange gravy.Look for The sauce should coat the back of a spoon and be deeply colored.Tip Simmer gently to prevent the cream from curdling.
The chicken should be golden and cooked through, and the sauce should be thick, glossy, and deeply orange. The spices should smell toasted and aromatic. The sauce should coat the back of a spoon and not be watery. If it's too thin, simmer a few minutes longer. This phase sets the flavor foundation for the entire dish.
Stuffing and Baking
- Preheat the OvenPreheat the oven to 400°F (200°C). Line a baking sheet with aluminum foil.Look for The oven should be fully preheated before baking.Tip A hot oven ensures the cheese melts quickly and the bread crisps.
- Hollow the BaguetteUsing a serrated knife, cut a deep V-shaped trench along the top of the garlic baguette, leaving the sides intact. Remove some of the soft bread from the trench to create a cavity for the filling.Look for The trench should be wide enough to hold the filling without breaking the bread.Tip Reserve the removed bread for breadcrumbs or croutons.
- Stuff the BaguetteSpoon the butter chicken mixture into the trench, packing it down gently. Top with the shredded mozzarella, mounding it slightly.Look for The filling should be level with the top of the bread, and the cheese should cover it completely.Tip Use your hands to press the filling in and prevent gaps.
- Bake Until BubblyPlace the stuffed baguette on the prepared baking sheet. Bake for 12–15 minutes, until the cheese is melted, bubbly, and lightly golden in spots.Look for The cheese should be bubbling and the bread edges crisp.Tip If the bread browns too quickly, loosely cover with foil.
The baguette should be neatly hollowed, and the filling packed in without overstuffing. The cheese should cover the filling completely and be mounded slightly.
During baking, the cheese should melt and bubble, and the bread should turn golden and crisp. The kitchen will smell of garlic, butter, and spices. The bread should feel crisp on the outside when gently pressed.
Resting and Serving
- Rest and SliceRemove from the oven and let rest for 5 minutes. Using a serrated knife, slice into thick pieces, ensuring each slice has a good amount of filling.Look for The cheese should be slightly set but still gooey.Tip Letting it rest helps the slices hold together.
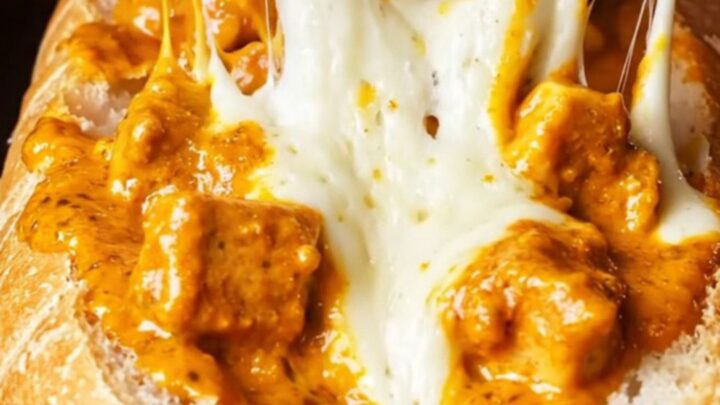
- Serve HotServe immediately while the cheese is hot and stretchy. Enjoy the dramatic cheese pull.Look for The cheese should stretch when you pull a slice apart.Tip Serve with extra sauce on the side if desired.
After resting, the cheese should be slightly set but still gooey. Slicing should reveal distinct layers of bread, filling, and cheese. The cheese should stretch when you pull a slice apart. The bread should be crisp on the outside and soft inside. Serve immediately to enjoy the full cheese-pull effect.
Common mistakes
A common mistake is overfilling the baguette, which can cause it to split during baking. Leave a little room for the cheese to melt and bubble. Another pitfall is baking at too high a temperature, which can burn the bread before the cheese melts; stick to 400°F (200°C).
Also, don't skip the rest time after baking—slicing too soon will cause the filling to spill out. Finally, make sure the chicken is fully cooked before adding the sauce; undercooked chicken is a food safety risk.
How to tell it’s done
The stuffed garlic bread is done when the cheese is fully melted, bubbly, and lightly browned in spots, and the bread is crisp and golden. The internal temperature of the chicken should reach 165°F (74°C) when checked with an instant-read thermometer.
If you don't have a thermometer, you can cut into a piece of chicken to ensure it's no longer pink in the center. Let the bread rest for 5 minutes before slicing so the cheese sets slightly and the slices hold their shape.
- Poultry: 165°F (74°C) in the thickest part
Up next · Part 3 of 3
4 variations · storage & make-ahead · 5 answers · printable card
Tips, FAQ & printable recipe (Part 3)← Back to the ingredients (Part 1)