Dinner · Part 2 of 3: Instructions
Cheesy Baked Lasagna with an Epic Cheese Pull Step-by-step instructions
- Prep
- Cook
- Total
- Serves
- 8
Before you start
Before turning on the oven, set up the whole workflow, because lasagna rewards organization. Chop the onion and mince the garlic first; they go into the pan together.
Grate the mozzarella and Parmesan and set them in separate bowls, since they are added at different moments. Take the ricotta and the egg out of the refrigerator so the filling mixes smoothly.
Ingredients at a glance (15)
- 2 tbsp olive oil
- 1 yellow onion, finely chopped (about 1 cup)
- 4 garlic cloves, minced
- 1 lb ground beef (85% lean)
- 2 tbsp tomato paste
- 4 cups marinara sauce (two 15-oz jars)
- 2 tsp dried oregano
- 1 tsp kosher salt, plus more for the pasta water
- 1/2 tsp freshly ground black pepper
- 12 lasagna noodles
- 15 oz whole-milk ricotta cheese
- 1 large egg
- 3 cups shredded mozzarella, divided
- 1 cup grated Parmesan, divided
- Fresh basil leaves, for serving (optional)
Instructions
Simmer the meat sauce
- Brown the beefHeat the olive oil in a large deep skillet over medium-high heat. Add the chopped onion and cook, stirring, until it softens and turns translucent, about 4 minutes. Stir in the garlic and cook for 30 seconds, then add the ground beef, breaking it up with a spatula. Cook until no pink remains and the beef is browned, about 7 minutes.Look for The beef should be deeply browned with no pink spots, and the onions soft and glossy.Safe temperature 160°F (71°C) internal temperature (ground meat)Tip Let the beef sit undisturbed for a minute before stirring so it develops a browned crust and deeper flavor.
- Build the meat sauceStir the tomato paste into the beef and cook for 1 minute until it darkens. Pour in the marinara sauce, then add the oregano, salt and pepper. Bring to a gentle simmer, reduce the heat to medium-low, and cook uncovered for 15 minutes, stirring now and then, until the sauce thickens enough to coat the spatula.Look for The sauce should be thick and glossy, with small slow bubbles breaking on the surface.Tip A thick sauce is the secret to clean layers; a watery one will slide right out of the slice.
The sauce is finished when it looks thick and glossy, coats the back of the spatula, and smells deeply savory with sweet tomato and browned beef.
Small, slow bubbles should break lazily on the surface rather than fizzing like a boil. Taste and adjust the salt now, since it is the last easy chance before assembly.
Layer the lasagna
- Boil the noodlesWhile the sauce simmers, bring a large pot of generously salted water to a rolling boil. Cook the lasagna noodles for 8 minutes, two minutes shy of the package time, stirring occasionally so they do not stick. Drain them and lay them flat on a cutting board or sheet pan, brushed lightly with a little oil so they do not cling together.Look for The noodles should bend easily without cracking but still feel firm in the center.Tip Undercooking by two minutes keeps the noodles from turning mushy during the long bake.
- Mix the ricotta fillingIn a medium bowl, stir together the ricotta, the egg, 1/2 cup of the Parmesan, and a good grind of black pepper until smooth and evenly combined. The filling should be thick enough to hold its shape on a spoon, which keeps the layers distinct instead of letting them bleed together while the lasagna bakes.Look for The mixture should look smooth and pale, spreading slowly when pushed with the spoon.Tip Whole-milk ricotta gives the creamiest filling; skim milk ricotta can taste chalky after baking.
- Start layeringPreheat the oven to 375°F (190°C). Spread 1 cup of meat sauce over the bottom of a 9x13-inch baking dish. Lay down 4 noodles in a single layer, then dollop one-third of the ricotta filling over them and spread it gently. Scatter 3/4 cup of mozzarella on top and finish with 1 cup of sauce.Look for Every noodle should sit flat against the sauce with no air pockets underneath.Tip Sauce on the bottom prevents sticking; cheese on the bottom burns, so keep it higher up.
- Repeat the layersAdd 4 more noodles, then repeat the ricotta, mozzarella and sauce layers two more times, pressing down gently after each round so the layers sit snug and even. Use 4 cups of sauce in total across the layers, keeping the last cup for the top. Work quickly but carefully so the noodles stay intact.Look for Three even ricotta layers should be visible from the side, each about the same thickness.Tip Dollop the ricotta in five spots and spread from there; dragging it over noodles tears them.
- Top with cheeseLay the final 4 noodles over the top, spoon the remaining sauce over them and spread it edge to edge so no noodle is exposed. Cover the surface evenly with the remaining 1 1/2 cups of mozzarella and the remaining 1/2 cup of Parmesan, going all the way to the corners for maximum crusty, cheesy edges.Look for No noodle should peek through; the whole top should be blanketed in sauce and cheese.Tip Reserve a handful of mozzarella and add it for the last 10 minutes for an extra-thick, stretchy top.
Assembly is done when the pan holds three even ricotta layers, all twelve noodles tucked in with no air pockets, and a full blanket of sauce and cheese on top with no noodle exposed. The dish should look generously full, nearly to the rim, and feel heavy.
Bake, rest and slice
- Bake coveredCover the dish tightly with aluminum foil, tenting it slightly so the foil does not touch the cheese. Bake at 375°F (190°C) for 30 minutes. Covered baking steams the noodles through and heats the center evenly, so the layers set without the cheese on top scorching or the edges drying out around the pan.Look for Bubbles should just start to murmur at the edges of the dish when the foil comes off.Tip Spray the underside of the foil with a little oil so the cheese does not stick to it.
- Bake uncovered until goldenRemove the foil and bake another 20 to 25 minutes, until the top is deep golden brown and bubbling at the edges. The center should register at least 160°F (71°C), which confirms the eggs in the ricotta filling are fully cooked through. Rotate the dish halfway through for even browning if the oven runs hot in spots.Look for The cheese should be browned in patches, and thick bubbles should rise slowly across the whole surface.Safe temperature 160°F (71°C) internal temperature (egg dishes)Tip Turn on the broiler for the final 2 minutes if the top needs more color; watch it constantly.
- Rest, slice and serveTake the lasagna out of the oven and let it rest at least 15 minutes before cutting. This pause lets the sauce thicken and the layers firm up, so each slice holds together and delivers a dramatic cheese pull instead of sliding apart. Cut into 8 squares with a sharp knife, lift out with a spatula, and serve hot, with basil if using.Look for The first cut should hold a clean edge, with steam rising and cheese stretching between the slice and the pan.Tip Wipe the knife between cuts for picture-perfect squares that show off the layers.
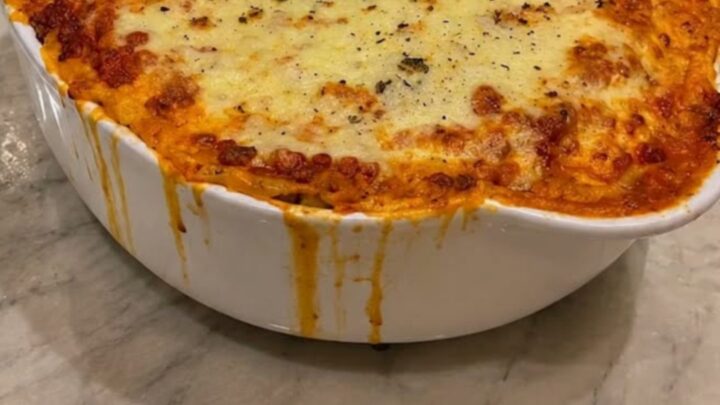
Out of the oven, the top should be golden brown with darker blistered spots, the edges bubbling thickly, and the center registering at least 160°F (71°C). The kitchen should smell of browned cheese and simmered tomato.
After 15 minutes of rest, the first cut should hold a sharp edge, showing distinct layers, with steam rising and mozzarella stretching between the slice and the dish.
Common mistakes
The most common misstep is a sauce that is too thin, which yields soupy slices; simmer it until it coats the spatula before assembling. Overcooked noodles are the second culprit, so pull them two minutes early.
Skipping the covered bake dries out the edges and leaves the center lukewarm, while skipping the rest turns every cut into a landslide.
How to tell it’s done
The lasagna is done when the top is deep golden brown with blistered patches, the sauce bubbles thickly at the edges, and the center reads at least 160°F (71°C) on an instant-read thermometer, confirming the egg in the ricotta filling is fully cooked.
- Ground meat: 160°F (71°C) in the thickest part
- Egg dishes: 160°F (71°C) in the thickest part
Up next · Part 3 of 3
4 variations · storage & make-ahead · 5 answers · printable card
Tips, FAQ & printable recipe (Part 3)← Back to the ingredients (Part 1)