Dinner · Part 2 of 3: Instructions
Cheese-Crusted Surf and Turf Burrito with Ribeye and Cajun Shrimp Step-by-step instructions
- Prep
- Cook
- Total
- Serves
- 1
Before you start
Take the ribeye out of the refrigerator up to 20 minutes before cooking so it sears evenly — any longer and it should go back in the fridge. Pat it thoroughly dry with paper towels; surface moisture is the main reason steaks steam instead of brown. If the shrimp are frozen, thaw them the night before in the refrigerator and pat them dry too.
Ingredients at a glance (11)
- 4 oz ribeye steak, cut into strips
- 6 jumbo shrimp, peeled and deveined
- 2 tsp Cajun seasoning, divided
- 1 tbsp unsalted butter
- 2 tsp minced garlic
- 1/2 cup cilantro-lime rice, cooked and warm (store-bought or made ahead)
- 1/3 cup black beans, rinsed and drained
- 1 large flour tortilla (12-inch), warmed
- 2 tbsp chipotle mayo (store-bought or made ahead)
- 1 cup shredded cheddar and Monterey Jack blend
- 1/2 lime, for squeezing
Instructions
Sear and sauté
- Sear the ribeyePat the ribeye dry and season both sides with half the Cajun seasoning, then let it sit at room temperature for no more than 20 minutes. Heat a dry cast-iron skillet over high heat until it just begins to smoke. Sear the steak 3 to 4 minutes per side for medium-rare, until it registers 145°F (63°C) on an instant-read thermometer. Transfer to a board and let it rest at least 3 minutes, then slice into strips against the grain.Look for A deep brown crust forms and the steak releases easily from the pan with a loud sizzle.Safe temperature 145°F (63°C) internal temperature (steaks, chops and roasts)Tip Dry steak and a ripping-hot pan are what build the crust; steam is the enemy of a good sear.
- Cook the Cajun shrimpWipe the skillet, return it to medium-high heat and melt the butter. Add the garlic and cook 20 seconds, just until fragrant. Toss the shrimp with the remaining Cajun seasoning, add them in a single layer and cook about 2 minutes per side, until they curl into a loose C and reach 145°F (63°C) inside. Scoop them out onto a plate so they stop cooking.Look for The shrimp turn opaque pink with reddened edges and the butter smells toasty and garlicky.Safe temperature 145°F (63°C) internal temperature (shellfish)Tip Pull the shrimp the moment they curl; carryover heat finishes them, and overdone shrimp turn rubbery fast.
By the end of phase 1, the ribeye should be deeply browned on both sides, rested and sliced into strips that glisten but do not drip, and the shrimp should be opaque, plump and coated in glossy Cajun garlic butter.
The kitchen smells like a steakhouse — browned beef, toasted garlic, smoky paprika. Check the temperatures before moving on: 145°F (63°C) in the steak's center and in a shrimp's thickest part.
Build and roll
- Warm the tortillaHeat the empty skillet or a dry griddle over medium heat and warm the tortilla 20 to 30 seconds per side, until it is supple and shows faint golden spots. A warm tortilla bends without cracking, which matters when the burrito is this packed. Keep it under a clean towel while the fillings are laid out so it stays pliable.Look for The tortilla puffs slightly in places and flexes cleanly when folded without any white, stiff creases.Tip Do not skip this step; a cold tortilla tears under the weight of the steak, shrimp, rice and beans.
- Layer the fillingsLay the warm tortilla flat and spread the chipotle mayo in a strip across the center, leaving a generous 2-inch border on all sides. Spoon the cilantro-lime rice over the mayo, then scatter the black beans on top. Fan the ribeye strips over the rice and tuck the Cajun shrimp alongside, keeping everything in a tight horizontal band.Look for The filling sits in a neat, compact line with clear borders of bare tortilla on every side.Tip Resist overfilling; a band that is too wide will burst through the cheese crust when it is rolled.
- Roll it tightFold the two short ends of the tortilla inward over the filling, then lift the near edge and roll it away from you, tucking as you go so the burrito is snug and seam-side down. Press gently to shape a uniform cylinder. A tight roll keeps the fillings locked in place while the burrito travels across the molten cheese.Look for The burrito holds its shape with no gaps at the folded ends and no filling peeking out.Tip If a seam wants to open, spread a smear of chipotle mayo on the edge to glue it shut.
Phase 2 ends with a tight, uniform burrito sitting seam-side down, holding its shape without any help.
Look closely at the ends: both should be neatly tucked with no rice or shrimp escaping, and the surface should be smooth with no strained, white stretch marks on the tortilla. Give it a gentle squeeze — it should feel compact, like a filled tube, not squishy or loose.
Crust and serve
- Melt the cheese bedSet a nonstick or well-seasoned flat griddle over medium heat, about 375°F (190°C) at the surface, and sprinkle the shredded cheddar and Monterey Jack into an even rectangle roughly the length of the burrito and twice as wide. Let it melt completely, 1 to 2 minutes, until it bubbles and the edges turn lacy and golden.Look for The cheese is fully molten, glossy and just beginning to blister at the edges, with a nutty smell.Tip Keep the heat at medium; scorched cheese turns bitter before the burrito even touches it.
- Roll through the cheeseLay the burrito seam-side down at one edge of the molten cheese, then roll it slowly and firmly across the bed so the cheese wraps around it in a golden frico crust. Use the spatula to lift and guide it if the cheese starts to set. The crust should hug the tortilla on all sides with no bare patches.Look for The whole burrito is sheathed in bubbling cheese that clings in a continuous, lacy layer.Tip Roll in one confident motion; hesitation lets the cheese set in patches instead of a smooth crust.
- Crisp the crustLeave the burrito seam-side down on the griddle for 1 to 2 more minutes so the cheese crisps and deepens to amber, then flip once with the spatula and crisp the other side about a minute. Transfer to a board and let it sit for 2 minutes so the crust sets with an audible crackle when tapped.Look for The crust turns deep golden brown, rigid to the touch, and smells toasty like a cheese crisp.Tip A short rest after the pan keeps the crust from sliding off when the knife goes in.
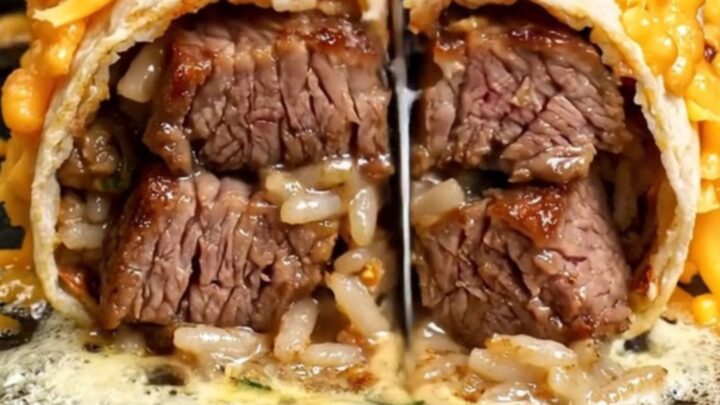
- Cut and finishSlice the burrito in half on the diagonal with a sharp knife, using a sawing motion so the crust shatters cleanly instead of tearing. Squeeze the lime half over the cut faces and serve immediately while the center steams and the crust still crackles. Serve cut-side up so the ribeye, shrimp, rice and beans all show.Look for The cross-section shows layered steak, pink shrimp, rice and beans under a crackling golden shell.Tip Wipe the knife between halves; a clean blade cuts through the frico without dragging the fillings.
The final phase is judged by ear and eye as much as by taste. The crust should be deep golden with darker lacy edges, rigid enough that tapping it with a spatula gives a dry knock, and the whole kitchen should smell like a cheese crisp with a faint charred-sugar note — never acrid.
When sliced, the cut faces should show clean layers and a gentle rise of steam.
Common mistakes
The most common failure is a torn, soggy crust, and it almost always traces back to heat that is too high — the cheese browns before it fully melts and then sticks to the pan instead of the tortilla. Keep the griddle at medium and let the cheese melt completely before the burrito touches it.
How to tell it’s done
The ribeye is done at 145°F (63°C) in the thickest part — medium-rare with a rosy center — and needs at least 3 minutes of rest before slicing so the juices redistribute instead of running onto the board.
The shrimp are done when they curl into a loose C, turn opaque pink and read 145°F (63°C) at the center; a tight O shape means they have gone too far.
- Steaks, chops and roasts: 145°F (63°C) in the thickest part, then a 3-minute rest
- Shellfish: 145°F (63°C) in the thickest part
Up next · Part 3 of 3
4 variations · storage & make-ahead · 5 answers · printable card
Tips, FAQ & printable recipe (Part 3)← Back to the ingredients (Part 1)