Desserts · Part 2 of 3: Instructions
Caramelized Pear Tart with Honey and Walnuts in Puff Pastry Step-by-step instructions
- Prep
- Cook
- Total
- Serves
- 8
Before you start
Preheat the oven to 400°F (200°C) and set a rack in the center. Line a baking sheet with parchment paper. Take the puff pastry out of the freezer or refrigerator in time to thaw, but keep it cold enough to hold its shape. Chill the butter in the freezer for about 10 minutes so it grates cleanly. Toast the walnut halves in a dry skillet for 3 to 4 minutes until fragrant, then chop them coarsely.
Rinse the pears, core them, and keep them ready for slicing. Beat the egg with 1 tablespoon of water in a small bowl. Strip the rosemary leaves if you prefer smaller pieces, or leave the sprigs whole for garnish. Set everything within reach of the cutting board so the tart comes together quickly before the pastry warms.
Ingredients at a glance (7)
- 1 sheet puff pastry, store-bought or made ahead, thawed
- 3 ripe pears, such as Bosc or Anjou, cored and thinly sliced
- 2 tbsp cold unsalted butter, grated on the large holes of a box grater
- 1/2 cup walnut halves, chopped and toasted
- 2 tbsp honey, for drizzling
- 2 sprigs fresh rosemary
- 1 egg, beaten with 1 tbsp water, for brushing the edges
Instructions
Pastry and pears ready
- Prepare the pastry and pearsUnroll the thawed puff pastry on a wooden cutting board. Thinly slice the ripe pears with a sharp knife, then fan the slices across the pastry, leaving a border of about 1 inch around the edges. Set aside the rosemary sprigs and whole walnuts nearby.Look for Pear slices are even and thin, and the pastry lies flat without tears.Tip Keep the pear slices in order as you cut them so they fan neatly.
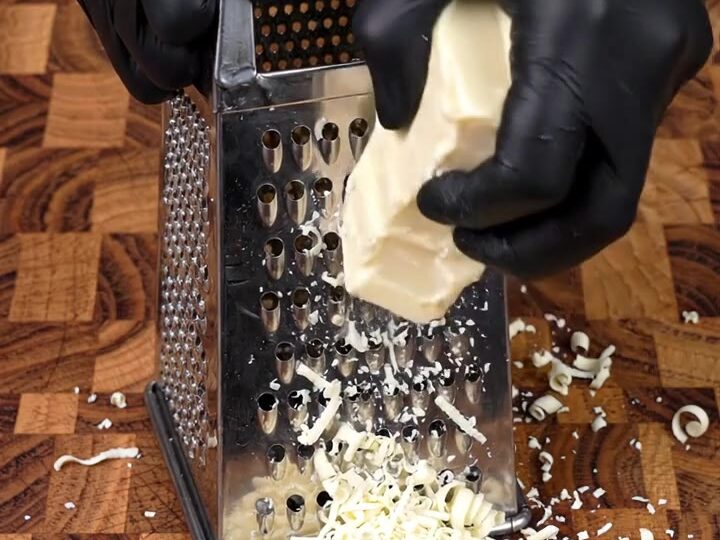
- Grate the cold butterGrate the cold butter on the large holes of a four-sided box grater, letting fine curls fall over a small plate. Keep the butter cold until it goes on the pears. Scatter the curls evenly over the pear layer.Look for Fine butter curls fall easily from the grater without softening.Tip Chill the butter for 10 minutes first if it feels soft.
The pastry lies flat on the wooden board with clean edges, and the pear slices are thin, even and fanned in neat overlapping lines across the surface. Rosemary sprigs and walnuts sit nearby in small piles. The pastry feels cool to the touch and holds its shape without sagging. Before going on, check that the border of about one inch is clear of fruit, so the pastry can puff freely. If the dough feels soft or sticky, return it to the refrigerator for 10 minutes before transferring it to the sheet, because cold dough rises better.
Tart assembled on the sheet
- Arrange the tart on the sheetCarefully transfer the pastry to a parchment-lined baking sheet. Arrange the pear slices in neat rows, then dot with chopped toasted walnuts and the butter shavings. Brush the pastry border with the beaten egg wash.Look for Pear rows are tidy, and the border is evenly glossy from the egg wash.Tip Slide the pastry onto the sheet with the parchment so it does not stretch.
- Bake until deep goldenBake in the preheated oven at 400°F (200°C) for 30 to 35 minutes, until the pastry is puffed, deep golden and crisp at the edges, and the pears have caramelized. Let the tart rest on the sheet for 10 minutes before moving it.Look for Pastry is deep golden at the edges and the pears look glossy and caramelized.Tip Rotate the sheet halfway through baking for even color.
The pastry rests on the parchment-lined baking sheet with its edges straight and even. The pear rows look orderly, with chopped walnuts scattered between them and small butter curls dotted across the fruit. The border has an even gloss from the beaten egg, which will brown into a deep golden color in the oven.
Check that no butter has fallen off the sheet and that the pears are not piled on top of one another. If the pastry has stretched during the move, gently tuck the edges back into shape with your fingertips so the tart bakes flat.
Caramelized and golden
- Drizzle with honey and serveTransfer the finished tart to a serving board. Drizzle the honey evenly over the pears and the walnuts. Cut into wedges with a sharp knife and serve with a fork.Look for Honey coats the pears in a thin glossy layer.Tip Warm the honey for 10 seconds in the microwave to make it easier to drizzle.
After 30 to 35 minutes the pastry is puffed, deep golden and crisp at the edges, and the pears have darkened slightly at the tips where the sugars caramelized. The kitchen smells of toasted butter, pastry and warm fruit. Check the underside of the tart by lifting one edge with a spatula to make sure it is golden and dry. Let the tart rest on the sheet for 10 minutes before moving it, so the butter sets and the fruit does not slide. Only move the tart to the serving board once the pastry holds its shape firmly.
Common mistakes
The most common problem is using pastry that has warmed too much before baking, which makes it spread rather than puff. Keep the sheet cold until it goes into the oven and work quickly during assembly. Another mistake is slicing the pears too thick or too unevenly, so some slices stay firm while others break down. Cut them thinly and as uniformly as you can.
Avoid overloading the tart with butter or fruit, because excess moisture keeps the base pale. Do not skip the rest on the sheet; moving the tart while it is hot can cause the pears to slide and the pastry to tear. Finally, add the honey after baking rather than before, so it stays glossy on the fruit instead of burning on the pastry.
How to tell it’s done
The tart is ready when the pastry has risen high around the edges and turned deep golden brown, and the underside is firm and dry when lifted gently with a spatula. The pears should look glossy and caramelized, with darker golden tips and no raw, pale slices in the center.
Walnuts should smell toasted and look slightly darker. Because this tart is a dessert with no meat, poultry or eggs cooked on their own, there is no protein temperature to reach. Trust the color, the rise of the pastry and the glossy fruit, and check that the tart holds its shape when it is cut into wedges.
Up next · Part 3 of 3
4 variations · storage & make-ahead · 5 answers · printable card
Tips, FAQ & printable recipe (Part 3)← Back to the ingredients (Part 1)