Dinner · Part 2 of 3: Instructions
Brown Butter Sage Goat Cheese Focaccia Step-by-step instructions
- Prep
- Cook
- Total
- Serves
- 8
Before you start
Before starting, make the brown butter: melt 1/2 cup (1 stick) unsalted butter in a small saucepan over medium heat. Cook, swirling occasionally, until the milk solids turn golden brown and the butter smells nutty, about 5 to 7 minutes.
Pour into a heatproof bowl and let cool slightly. Prepare the roasted butternut squash by tossing 2 cups of cubed squash with a little olive oil and salt, then roasting at 425°F (220°C) for 20 to 25 minutes, until tender and caramelized. Have all other ingredients measured and ready.
Ingredients at a glance (11)
- 4 cups all-purpose flour
- 2 1/4 tsp instant yeast
- 2 tsp kosher salt
- 1 1/2 cups warm water (110°F)
- 1/4 cup olive oil, plus more for the pan
- 2 cups roasted butternut squash cubes
- 6 oz creamy goat cheese, crumbled
- 1/2 cup fresh sage leaves
- 1/2 cup brown butter
- 1/4 cup toasted pepitas
- 1/4 cup pomegranate seeds
Instructions
Make the Dough
- Make the doughIn a large bowl, whisk together the flour, yeast, and salt. Add the warm water and olive oil, and stir with a wooden spoon until a shaggy dough forms. Cover the bowl with plastic wrap and let it rest for 10 minutes.Look for The dough will be sticky and rough, with no dry flour visible.Tip Use water that feels like warm bath water, not hot, to keep the yeast happy.
- Fold and restPerform a series of stretch-and-folds: reach under one side of the dough, stretch it up and over the center, then repeat on the other three sides. Cover and let rest for 30 minutes. Repeat the folding once more, then let the dough rest for another 30 minutes.Look for The dough becomes smoother and more elastic with each fold.Tip Wet your hands slightly to prevent sticking.
- Chill the doughCover the bowl tightly with plastic wrap and refrigerate the dough for at least 8 hours, or up to 24 hours. This slow fermentation develops flavor and makes the dough easier to handle.Look for The dough will have nearly doubled in size and smell yeasty.Tip A long cold ferment is the secret to a light, airy crumb.
After mixing, the dough will be shaggy and sticky. After the stretch-and-folds, it becomes smooth, elastic, and slightly puffy. After the cold ferment, it should have doubled in size and smell pleasantly yeasty. The dough should be easy to handle and have a silky, supple texture.
Shape and Top
- Prep the pan and doughGenerously coat a 9x13-inch baking pan with olive oil. Turn the dough out into the pan and gently stretch it toward the corners. If it resists, let it rest for 15 minutes and stretch again. Cover and let rise in a warm spot for 1 to 2 hours, until puffy.Look for The dough should feel pillowy and hold a gentle indentation when pressed.Tip Use your fingertips to press the dough, not your palms, to avoid deflating it.
- Dimple the doughPreheat the oven to 450°F (232°C). With lightly oiled fingers, press deep dimples all over the surface of the dough, pushing almost to the bottom of the pan. The dimples will hold the toppings and create the classic focaccia texture.Look for The dough is dimpled but still airy, not flattened.Tip Work from the center outward to keep the dough even.
- Add toppingsScatter the roasted butternut squash cubes and crumbled goat cheese evenly over the dimpled dough. Tuck the fresh sage leaves into the dimples, pressing them gently so they stay in place.Look for The toppings are evenly distributed, with sage leaves peeking out.Tip Press toppings slightly into the dough so they don't fall off when slicing.
The dough should be puffy and pillowy, filling the pan. When dimpled, it should hold deep impressions without collapsing. The toppings—squash, goat cheese, and sage—should be evenly distributed, with sage leaves nestled into the dimples. The surface should look inviting and colorful.
Bake and Finish
- Pour brown butter and bakeDrizzle the brown butter evenly over the top of the focaccia, letting it pool in the dimples. Place the pan in the oven and bake for 25 to 30 minutes, until the crust is deep golden brown and the cheese is blistered in spots.Look for The crust is golden, the cheese is bubbling, and the aroma is nutty and savory.Tip Rotate the pan halfway through for even browning.
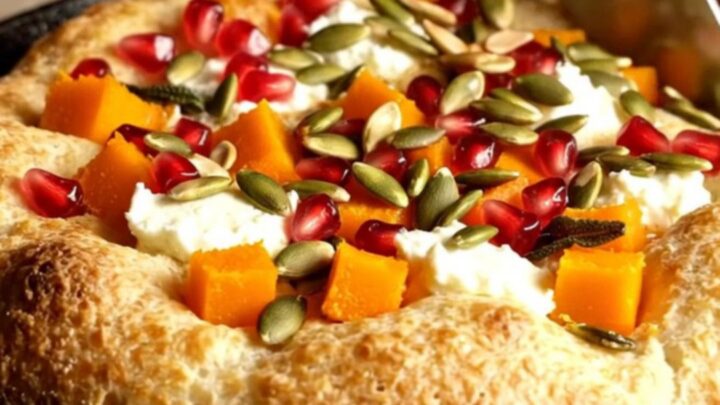
- Finish and coolRemove the focaccia from the oven and immediately sprinkle with toasted pepitas and pomegranate seeds. Let the focaccia cool in the pan for 10 minutes, then transfer to a cutting board. Cut into thick slices and serve warm.Look for The pepitas are toasted and the pomegranate seeds add bright red jewels.Tip Cooling briefly helps the focaccia set so it slices cleanly.
The focaccia should be deeply golden brown, with blistered cheese and crisp edges. The brown butter will have pooled in the dimples, creating glossy spots. The aroma should be intensely nutty and savory. After cooling, the crust should be crisp and the interior light and airy.
Common mistakes
One common mistake is over-proofing the dough, which can cause it to collapse and become dense. Keep an eye on the dough during the final rise—it should be puffy but not doubled in size.
Another issue is pressing too hard when dimpling, which deflates the dough and prevents it from rising properly.
Use gentle, even pressure. Also, be sure to use a generous amount of olive oil in the pan; this creates a crisp, golden bottom crust. Finally, don't skip the brown butter—it's the flavor backbone of the recipe.
How to tell it’s done
The focaccia is done when the top is deep golden brown, the edges are crisp and slightly darker, and the cheese is blistered and browned in spots. The internal temperature of the bread should be around 200°F (93°C) when measured with an instant-read thermometer.
The crust should sound hollow when tapped on the bottom. If the top is browning too quickly but the center is not yet done, tent loosely with foil for the last 5 minutes of baking.
Up next · Part 3 of 3
4 variations · storage & make-ahead · 5 answers · printable card
Tips, FAQ & printable recipe (Part 3)← Back to the ingredients (Part 1)