Dinner · Part 1 of 3: Ingredients
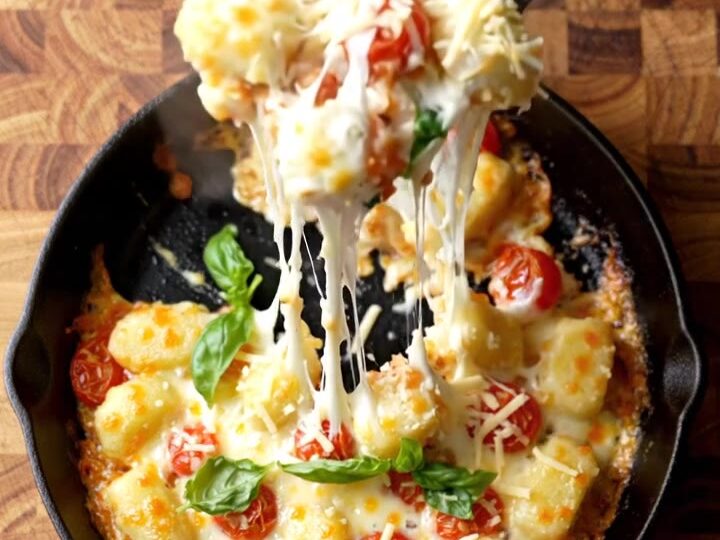
Blistered Tomato Gnocchi with Melted Brie in One Skillet
- Prep
- Cook
- Total
- Serves
- 4
Potato gnocchi crisped in garlic butter, blistered cherry tomatoes and a golden layer of melted brie make a dinner that comes together in one pan. Every bite gives you crunch, sweetness and gooey cheese, and the whole skillet goes straight to the table.
This skillet dinner brings together the comfort of Italian-American gnocchi with the richness of a melted cheese platter. Potato gnocchi go into a cast iron skillet with garlic butter until they turn golden and crisp, then halved cherry tomatoes blister alongside them in the hot fat.
A mix of finely grated hard aged cheese and soft brie melts over the top into a bubbling layer that clings to every piece. Finish with fresh basil and serve straight from the pan so the cheese stays gooey and the gnocchi keep their crust. The method needs only one skillet and about 35 minutes, which makes it an easy weeknight dinner for four.
Ingredients
- 1 lb potato gnocchi
- 3 tbsp unsalted butter
- 2 tbsp extra-virgin olive oil
- 4 cloves garlic, peeled and thinly sliced
- 1 lb cherry tomatoes on the vine, halved
- 1 cup finely grated hard aged cheese, such as Parmesan
- 4 oz brie, rind removed and cut into chunks
- 1 tsp dried Italian herbs
- kosher salt and black pepper to taste
- fresh basil leaves for garnish, to taste
Why this recipe works
Gnocchi are dense, starchy and nearly dry on the outside, so when they hit hot butter and olive oil the surface browns and turns crisp while the center stays soft. Starting them in a single layer and leaving them undisturbed for a few minutes lets a real crust form, which contrasts well with the creamy cheese that comes later.
Cherry tomatoes release their juice slowly, so cutting them in half and placing them cut side down in the hot fat makes their surfaces blister and caramelize.
The tomato juices mix with the garlic butter and turn into a light, slightly sweet sauce that keeps the gnocchi moist. Adding the cheese last lets it melt over the finished base rather than burn during the crisping stage.
Notes and substitutions
Choose plump potato gnocchi that are firm to the touch rather than soft and sticky, because firm pieces crisp better in the skillet.
Shelf-stable gnocchi work well too, but they must be cooked in boiling salted water until tender and well drained before they go into the garlic butter. Use a hard aged cheese such as Parmesan, and grate it finely so it melts quickly and evenly across the top of the skillet.
A 12-inch cast iron skillet holds heat well and gives the gnocchi and tomatoes enough room to brown in a single layer. Use a box grater for the hard cheese and a sharp chef's knife for the brie and garlic.
If you do not have cast iron, a heavy stainless steel skillet works, although the crust will be slightly less deep. Brie can be swapped for Camembert or fontina for a similar soft melt, and dried oregano or dried thyme can stand in for the Italian herbs.
- brie: Camembert or fontina, cut into chunks, for a similar soft melt
- dried Italian herbs: 1 tsp dried oregano or dried thyme
- potato gnocchi: shelf-stable gnocchi, cooked in boiling salted water until tender and well drained before the skillet step
Equipment
- 12-inch cast iron skillet
- Box grater
- Wooden cutting board
- Chef's knife
- Slotted spoon
Up next · Part 2 of 3
6 steps · 20 min of cooking · what to look for at each stage
Step-by-step instructions (Part 2)