Desserts · Part 2 of 3: Instructions
Black Forest Chocolate Cherry Almond Bark in 30 Minutes Step-by-step instructions
- Prep
- Cook
- Total
- Serves
- 12
Before you start
Set out the pan, parchment paper, grater, chef's knife, board, piping bag and skewer before you begin, so every step flows without pausing. Chop the almonds and cherries first and keep them in separate small bowls: reserve a portion for the top and a portion for the swirls. Chop the white chocolate into small, even pieces so it melts evenly, and have a heatproof bowl ready over a pan of barely simmering water.
Put on disposable nitrile gloves if you want to keep the chocolate clean and the work surface tidy. Keep the dark chocolate cold until you grate it, because cold chocolate produces neat curls instead of smears. Clear a flat spot in the refrigerator if you plan to speed up setting, and make sure the pan will sit level on the shelf.
Ingredients at a glance (6)
- 1/2 cup whole almonds, roughly chopped
- 1/2 cup dried cherries, divided
- 8 oz dark chocolate, cold, for grating
- 3 oz white chocolate, chopped, melted
- unsweetened cocoa powder, for dusting, to taste
- white chocolate, melted, for drizzling, to taste
Instructions
Base and chopped fruit ready
- Chop the almonds and cherriesPut on disposable gloves and work on a wooden cutting board. Roughly chop the whole almonds with a chef's knife, then chop the dried cherries until you have a rough mix of nut pieces and fruit. Set aside about one third of the mix for the top.Look for The mix should look rough and uneven, with nut pieces and fruit of different sizes.Tip Keep some larger almond pieces for the top so the bark has visible crunch.
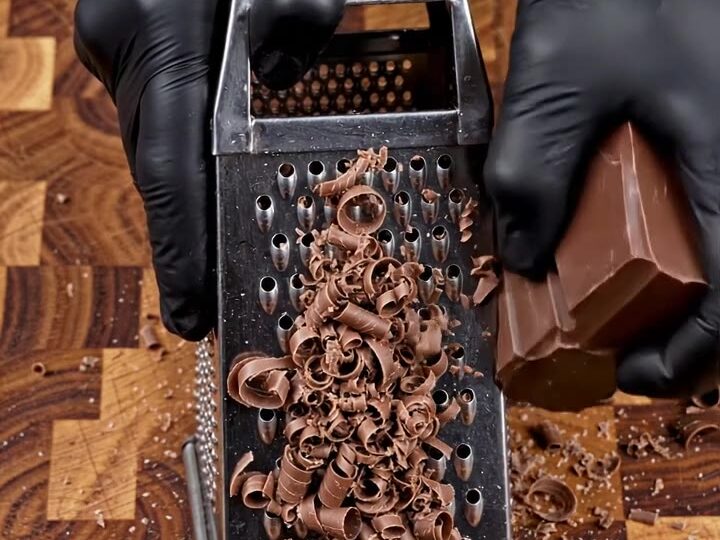
- Grate the dark chocolateHold the cold dark chocolate against the coarse side of a box grater and grate it over the board. Keep grating until you have a generous pile of fine curls and shavings.Look for You should have a heap of fine curls and shavings with no large chunks left.Tip Cold chocolate grates into curls more easily than soft chocolate.
- Line the pan and spread the baseLine a metal baking pan with parchment paper, letting it overhang the sides. Spread the grated dark chocolate evenly across the bottom to form the base layer, pressing it lightly with your fingertips.Look for The base should cover the pan in an even layer with no bare spots.Tip Pressing lightly helps the layer hold together when you cut it later.
At the end of this phase, the almonds and cherries should be chopped into a rough, varied mix, and the grated dark chocolate should cover the parchment in an even layer. The curls should look fine and feathery with no large chunks left behind. Press the base lightly with your fingertips and check that it reaches all four corners of the pan without gaps. If there are bare spots, add a few more curls and press them down. The base should look like a dark, textured floor for the swirls to sit on, ready for the white chocolate.
Swirls, marbling and toppings set
- Melt the white chocolateMelt the chopped white chocolate in a heatproof bowl set over barely simmering water, stirring until smooth. Transfer it to a disposable piping bag and snip a small opening at the tip.Look for The white chocolate should be smooth, glossy and easy to pipe.Tip Stir often and remove the bowl from the heat as soon as the last lumps melt.
- Pipe the swirls and marblePipe the melted white chocolate in swirls over the dark chocolate base. Scatter about half of the reserved dried cherries across the surface, then drag a skewer or knife through the layers to create a marbled pattern.Look for The white swirls should be visible and the cherries spread throughout the surface.Tip Make only a few passes with the skewer to keep the marbling clean.
- Top with almonds and cherriesSprinkle the remaining chopped almonds and cherries over the top of the bark, pressing them in gently so they stick to the surface.Look for The top should be dotted evenly with nut pieces and red cherries.Tip Press the toppings gently so they do not roll off when the bark is cut.
At the end of this phase, the melted white chocolate should be piped in visible swirls over the dark base, with cherries scattered across the surface and a few marbled lines running through the layers. The top should be dotted evenly with the remaining almonds and cherries, pressed gently so they hold.
Check that the white chocolate still looks smooth and glossy, not thick or clumpy, and that the marbling is clean rather than muddy. If the white chocolate has begun to stiffen, warm it briefly over the water before adding more. The pan should look colorful, with dark, white and red tones clearly visible.
Final set and clean cuts
- Let the bark set firmLeave the pan at cool room temperature, or in the refrigerator, until the bark is completely firm to the touch. Do not stack or move the pan while it sets.Look for The surface should feel firm and no longer soft when pressed lightly.Tip A short stay in the refrigerator speeds setting, then let it sit briefly before cutting.
- Cut, dust and drizzleLift the bark out of the pan using the parchment. Cut it into rectangular pieces with a sharp knife. Dust the pieces with cocoa powder, then drizzle them with melted white chocolate and let the drizzle set before serving.Look for The pieces should cut cleanly and the drizzle should look set and glossy.Tip Wipe the knife between cuts for neat edges on every piece.
At the end of this phase, the bark should be fully firm when lightly pressed, with no soft spots and no sticky film on the surface. Lift the slab out using the parchment, then cut it into even rectangles with a sharp, dry knife. Each piece should break or cut cleanly, showing the dark layers, white swirls and red cherry pieces. Dust the tops with cocoa powder and drizzle with melted white chocolate, then let the drizzle set. Check that the edges are neat and the drizzle looks glossy before you pack or serve the pieces.
Common mistakes
The most common problem is melting dark chocolate instead of grating it, which produces a dense, heavy layer that does not look like the bark in the photo. Warm chocolate also softens quickly under your fingers, so keep the grated curls cold and work in a cool kitchen.
Overheating the white chocolate causes it to seize into a grainy paste, so melt it gently and stop heating as soon as it is smooth. Piping too much white chocolate at once makes the marbling blur into one color, so pipe in modest swirls and drag the skewer only a few times. Cutting the bark too early can crack the layers, so wait until it is firm all the way through.
How to tell it’s done
The bark is ready when it is completely firm and no longer soft when lightly pressed at the center. The dark base should look dry and matte, the white chocolate should look set and glossy, and the cherries should feel tender but not sticky. A cut edge should release cleanly from the knife without smearing or tearing.
For a quick check, press the surface with a clean fingertip: if it leaves no mark, the bark is set. If the chocolate still feels soft or tacky, return the pan to the refrigerator for 10 to 15 minutes and check again. This recipe contains no protein to cook, so no meat or egg temperature applies. Focus on texture and a clean cut, and let the bark come to a cool room temperature before serving.
Up next · Part 3 of 3
4 variations · storage & make-ahead · 5 answers · printable card
Tips, FAQ & printable recipe (Part 3)← Back to the ingredients (Part 1)