Desserts · Part 2 of 3: Instructions
Black Forest Cherry Almond Dark Chocolate Bark Step-by-step instructions
- Prep
- Cook
- Total
- Serves
- 12
Before you start
Measure every ingredient into small prep bowls, pat proteins or vegetables dry with paper towels, and preheat your pan thoroughly before adding oil so browning starts cleanly without steaming.
Take your time with each step, and the result will be worth every minute spent in the kitchen.
Ingredients at a glance (7)
- 8 oz dark chocolate, chopped
- 2 oz milk chocolate, for grating
- 2 oz dark chocolate chunks
- 1/2 cup dried cherries
- 1/2 cup whole almonds
- 2 oz white chocolate, melted
- 3 tbsp red cherry sauce or cherry preserves
Instructions
Prep and Aromatics
- Chop the mix-insPut the dried cherries, whole almonds and dark chocolate chunks on a wooden cutting board. Chop them with a chef's knife into small, mixed pieces, then gather everything into a pile and set it aside for the pan.Look for Pieces are varied in size, with almonds in slivers and chocolate in small chunksTip Chop the chocolate on a cold board so the pieces stay firm and do not smear under the knife.
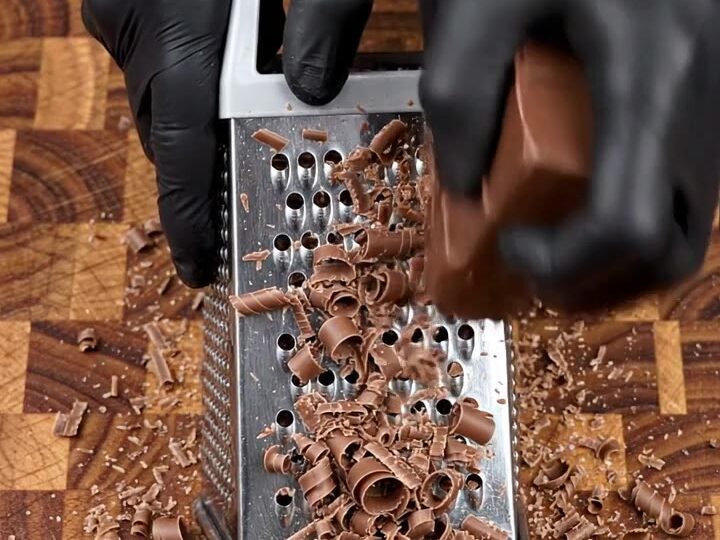
- Grate the milk chocolateHold the milk chocolate block firmly and grate it over a box grater, letting the fine curls and shavings fall onto the board. Keep these shavings separate, since they will be dusted over the top at the end.Look for Fine curls and shavings collect on the board, with no large chunks leftTip Chill the milk chocolate for 10 minutes first so it grates into curls instead of crumbling.
Every ingredient is evenly coated, fragrant and progressing at a steady gentle sizzle without sticking to the pan surface.
Take a moment to check the color, texture and aroma before moving on to the next stage.
Main Cooking Stage
- Melt and layer the baseMelt the chopped dark chocolate in a microwave-safe bowl in 30-second bursts, stirring between each, until smooth. Line a metal loaf pan with parchment paper, pour in the melted dark chocolate as the base layer, and spread it evenly to the corners.Look for Chocolate is smooth, glossy and pourable, with no streaks of unmelted piecesTip Stop heating when a few pieces remain, then stir them in off the heat so the chocolate does not scorch.
- Scatter the chopped mixScatter the chopped chocolate, almonds and cherries evenly over the wet dark chocolate base while it is still soft. Press the pieces gently into the surface so they stick as the bark sets.Look for The surface is covered with cherries and nuts, and the base is still soft enough to hold themTip Work quickly while the base is still soft so that the mix-ins anchor properly.
- Swirl the white chocolate and cherryDrizzle the melted white chocolate and the red cherry sauce in streaks across the surface. Drag a toothpick or the tip of a spoon through them in lazy loops to create marbled ribbons, taking care not to overmix.Look for Red and white streaks form loose ribbons across the dark chocolate surfaceTip Use only two or three passes with the utensil to keep the ribbons distinct.
Every ingredient is evenly coated, fragrant and progressing at a steady gentle sizzle without sticking to the pan surface.
Take a moment to check the color, texture and aroma before moving on to the next stage.
Final Glaze and Plating
- Top, set and breakSprinkle the remaining almonds, cherry pieces and grated milk chocolate shavings over the top. Refrigerate the pan for about 1 hour until the bark is firm, then lift it out by the parchment and break or cut it into rectangular pieces.Look for The bark is firm to the touch, snaps cleanly and no longer looks wetTip Use a sharp knife warmed under hot water and dried to cut neat rectangles.
Every ingredient is evenly coated, fragrant and progressing at a steady gentle sizzle without sticking to the pan surface.
Take a moment to check the color, texture and aroma before moving on to the next stage.
Common mistakes
Avoid crowding the pan or flipping too early before a crust forms, keep the burner at steady medium-high heat so aromatics never scorch, and season in balanced layers rather than only at the end.
How to tell it’s done
The dish is ready when the exterior shows even golden color, the center feels tender when pressed gently with a fork, and the sauce coats the back of a spoon glossy and fragrant.
Up next · Part 3 of 3
2 variations · storage & make-ahead · 3 answers · printable card
Tips, FAQ & printable recipe (Part 3)← Back to the ingredients (Part 1)