Desserts · Part 2 of 3: Instructions
Emerald Matcha Molten Lava Cakes Step-by-step instructions
- Prep
- Cook
- Total
- Serves
- 4
Before you start
Before you start, set out your ingredients so they come to room temperature. Chop the white chocolate into small, even pieces for quick melting. Sift the matcha powder and cake flour separately to avoid lumps. Butter four 6-ounce ramekins generously and place them on a baking sheet.
Heat the oven to 400°F (200°C) and position a rack in the middle. Have a whisk, a spatula, and a fine-mesh sieve ready. This recipe moves quickly once you begin, so having everything prepped ensures a smooth process.
Ingredients at a glance (6)
- 5 oz white chocolate, chopped
- 1/4 cup unsalted butter, plus more for ramekins
- 2 tbsp ceremonial grade matcha powder, sifted
- 2 large eggs
- 1/4 cup granulated sugar
- 3 tbsp cake flour
Instructions
Melt, Whisk, and Fold
- Melt the Chocolate BasePlace the chopped white chocolate and butter in a medium microwave-safe bowl. Heat in 20-second bursts, stirring between each, until completely melted and smooth. Let cool slightly. Sift the matcha powder over the melted chocolate and whisk until fully incorporated and no lumps remain.Look for The mixture is glossy, smooth, and uniformly emerald green.Tip Do not overheat the chocolate or it may seize. Stir often.
- Whisk the Eggs and SugarIn a separate bowl, whisk the eggs and granulated sugar together until pale and slightly thickened, about 1 minute. The mixture should be frothy and light. Pour the egg mixture into the chocolate-matcha mixture and whisk until fully combined.Look for The batter is smooth, with no streaks of egg.Tip Whisking the eggs first helps create a lighter texture.
- Fold in the FlourSift the cake flour over the batter and fold gently with a spatula until just combined. Do not overmix; a few small lumps are fine. The batter should be thick and pourable.Look for No dry flour remains, and the batter is uniform.Tip Folding rather than stirring keeps the batter airy.
The melted chocolate mixture is smooth and glossy, with the matcha fully dissolved into a vivid green. The egg-sugar mixture is pale and slightly thickened.
When you fold in the flour, the batter becomes thick but pourable, with no dry streaks. The aroma is sweet and slightly grassy. Before moving to the next phase, ensure the batter is uniform and the ramekins are prepared.
Bake to a Perfect Set
- Prepare the RamekinsGenerously butter the inside of four 6-ounce ramekins. Divide the batter evenly among them, filling each about three-quarters full. Place the ramekins on a baking sheet for easy handling.Look for The ramekins are coated, and the batter is evenly distributed.Tip Use a pastry brush to coat every corner for easy release.
- Bake the CakesBake at 400°F (200°C) for exactly 10 minutes. The edges should be set and slightly puffed, while the center remains soft and glossy. Remove from the oven and let rest for 1 minute before serving.Look for The tops are set but the centers jiggle slightly when shaken — that's the lava.Safe temperature 160°F (71°C) internal temperature (egg dishes)Tip Do not overbake or the center will set completely.
After 10 minutes, the cakes have puffed slightly and the tops look set but the centers are still soft. The kitchen smells of warm matcha and white chocolate. The edges are firm, and the centers jiggle gently when the pan is shaken. Do not open the oven early, and remove the cakes promptly after the timer goes off.
Unmold and Watch the Flow
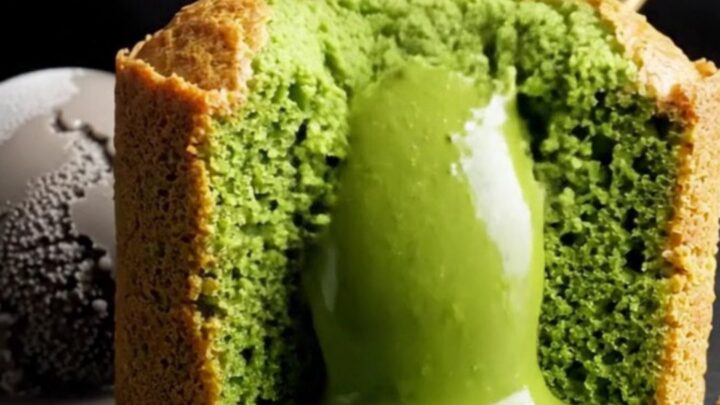
- Unmold and ServeCarefully run a thin knife around the edge of each ramekin. Invert each cake onto a plate and let it settle for a few seconds. The warm emerald lava will begin to flow as you cut into it. Serve immediately, ideally alongside a scoop of black sesame ice cream.Look for The cake holds its shape, and the center flows like a glossy river.Tip Use a sharp knife to make the first cut for the best lava effect.
The cakes release cleanly from the ramekins, holding their shape. As you cut into one, a thick, glossy emerald lava flows out slowly, pooling on the plate. The texture is creamy and the color is vibrant. Serve immediately while the center is still warm and fluid.
Common mistakes
The most common mistake is overbaking, which turns the lava into a fully set cake. To avoid this, trust the 10-minute mark and do not open the oven door during baking. Another issue is underbaking, which leaves the batter raw and runny; the edges should be fully set.
If the batter is too thick, it may not flow; make sure to fold the flour gently and not overmix. Finally, if the cakes stick to the ramekins, you likely didn't butter them enough. Run a thin knife around the edge before unmolding to help release them.
How to tell it’s done
The cakes are done when the edges are set and the tops are slightly puffed but the centers still feel soft and slightly wobbly when you gently shake the ramekin. Insert a small knife into the edge — it should come out clean, but the center should remain glossy and underdone.
The internal temperature of the batter should reach at least 160°F (71°C) to ensure the eggs are fully cooked. Let the cakes rest for 1 minute before unmolding; this allows them to firm up slightly so they release cleanly while keeping the lava liquid.
- Egg dishes: 160°F (71°C) in the thickest part
Up next · Part 3 of 3
4 variations · storage & make-ahead · 5 answers · printable card
Tips, FAQ & printable recipe (Part 3)← Back to the ingredients (Part 1)