Breakfast · Part 2 of 3: Instructions
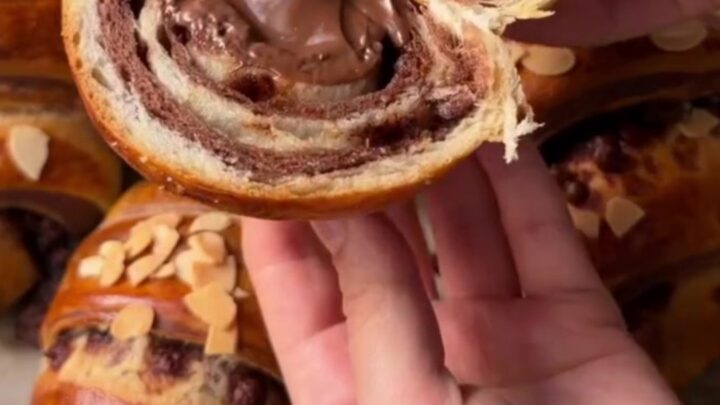
Zebra Croissant Poğaça with Molten Chocolate Step-by-step instructions
- Prep
- Cook
- Total
- Serves
- 12
Before you start
Before starting, gather all ingredients and equipment. Ensure the milk and water are warm but not hot (about 110°F/43°C) to activate the yeast. Have a clean, lightly floured surface ready for kneading and rolling.
Line a baking sheet with parchment paper. In a small bowl, whisk the egg yolk with a teaspoon of water for the egg wash. Measure all ingredients accurately for best results.
Ingredients at a glance (12)
- 1 cup warm milk
- 1 cup warm water
- 1/2 cup vegetable oil
- 1 packet instant yeast (11g)
- 1 egg white
- 3 tbsp sugar
- 1 tsp salt
- 4 1/2 cups all-purpose flour
- 2 tbsp cocoa powder
- 2 tbsp cold milk
- 1 tsp chocolate spread (per triangle)
- 1 egg yolk (for brushing)
Instructions
Dough Preparation
- Make the DoughIn a large bowl, combine the warm milk, warm water, oil, instant yeast, egg white, sugar, and salt. Stir briefly to dissolve the yeast and sugar. Add the flour and mix with a wooden spoon until a shaggy dough forms. Turn the dough out onto a lightly floured surface and knead for 8–10 minutes until smooth and elastic. The dough should be soft and supple, not sticky. Cover with a damp cloth and let rest for 10 minutes.Look for The dough becomes smooth, elastic, and slightly tacky but not sticky.Tip If the dough is too sticky, add a little more flour, a tablespoon at a time.
- Divide and FlavorDivide the dough in half. Place one half in a separate bowl. To the other half, add the cocoa powder and cold milk. Knead the cocoa mixture into the dough until it is evenly distributed and the dough turns a deep chocolate brown. If the dough becomes too dry, add a teaspoon of cold milk at a time. Cover both doughs with a damp cloth or plastic wrap and let them rest for 30 minutes.Look for The chocolate dough is uniformly brown with no streaks of white dough.Tip Knead the cocoa in gradually to avoid clouds of cocoa powder.
- Rest the DoughsAfter kneading the cocoa into one half, cover both doughs with a damp cloth or plastic wrap and let them rest for 30 minutes at room temperature. This rest allows the gluten to relax and makes the dough easier to roll and shape.Look for The doughs have relaxed and are slightly puffy.Tip If your kitchen is warm, the rest can be as short as 20 minutes.
After kneading, the dough should be smooth, elastic, and slightly tacky. The chocolate dough should be uniformly brown.
Both doughs should rest for 30 minutes until they are relaxed and slightly puffy. The kitchen should smell of fresh yeast and cocoa.
Shaping and Filling
- Roll and LayerOn a lightly floured surface, roll out each dough half into a rectangle about 1/4-inch thick. Brush the top of the plain dough lightly with water. Place the chocolate dough on top of the plain dough, aligning the edges. Press gently to seal. Using a sharp knife or pizza cutter, cut the layered dough into triangles, about 4 inches wide at the base and 6 inches long.Look for The layered rectangle is even and the doughs are stuck together.Tip If the dough sticks to the surface, flour it lightly.
- Add Chocolate FillingPlace a teaspoon of chocolate spread at the wide base of each triangle. Spread it slightly, leaving a small border. Starting at the base, roll the dough up tightly toward the point, forming a crescent shape. Tuck the point underneath to seal. Place the shaped croissants on a baking sheet lined with parchment paper, leaving space between them.Look for The rolls are tight and the chocolate is enclosed.Tip Don't overfill; a teaspoon is enough to create a molten center.
- Brush with Egg YolkIn a small bowl, whisk the egg yolk with a teaspoon of water. Using a pastry brush, gently brush the tops of the croissants with the egg wash. This will give them a golden, shiny crust as they bake.Look for The croissants are evenly coated with a thin layer of egg wash.Tip Be gentle to avoid deflating the dough.
The layered dough should be rolled to an even thickness. The triangles should be uniform, and the chocolate spread should be neatly placed at the base. The rolled croissants should be tight and evenly shaped, with the point tucked underneath.
Baking and Finishing
- Bake the CroissantsPreheat the oven to 375°F (190°C). Bake the croissants for 20–25 minutes, or until they are puffed and golden brown. The internal temperature of the croissants should reach 160°F (71°C) to ensure the eggs are fully cooked. Remove from the oven and let cool on the baking sheet for 5 minutes before transferring to a wire rack.Look for The croissants are golden brown and sound hollow when tapped.Safe temperature 160°F (71°C) internal temperature (egg dishes)Tip If the tops brown too quickly, cover loosely with foil.
- Cool and ServeLet the croissants cool on a wire rack for at least 10 minutes before serving. This allows the chocolate to set slightly and prevents burns. Serve warm or at room temperature.Look for The croissants are cool enough to handle.Tip For the best molten effect, serve within 30 minutes of baking.
The croissants should be golden brown and puffed. The internal temperature should reach 160°F (71°C). The chocolate should be molten and the aroma of baked bread and chocolate should fill the kitchen.
Common mistakes
Avoid over-kneading the dough, as it can become tough. Do not let the dough rise too long; 30 minutes is enough. When rolling the triangles, make sure they are even so they bake uniformly.
Be careful not to overfill with chocolate spread, as it can burst out. Also, ensure the egg wash is applied gently to avoid deflating the dough.
How to tell it’s done
The croissants are done when they are puffed, golden brown, and the internal temperature reaches 160°F (71°C) as measured with an instant-read thermometer.
The tops should be firm to the touch and sound hollow when tapped. If the chocolate leaks out, it's still okay; the croissants will still be delicious.
- Egg dishes: 160°F (71°C) in the thickest part
Up next · Part 3 of 3
4 variations · storage & make-ahead · 5 answers · printable card
Tips, FAQ & printable recipe (Part 3)← Back to the ingredients (Part 1)