Desserts · Part 2 of 3: Instructions
White Chocolate Raspberry Almond Bark, No-Bake and Ready to Cut Step-by-step instructions
- Prep
- Cook
- Total
- Serves
- 12
Before you start
Gather everything before you begin, because the bark works best when each stage moves quickly. Line a rimmed rectangular baking tray with parchment paper, letting it hang slightly over the edges so the slab lifts out easily later. Set out the block of white chocolate, the whole almonds, the fresh raspberries and the raspberry sauce, and place a cutting board, a large sharp knife, a box grater and a small spoon within reach.
If your raspberry sauce is thick, thin it with a few drops of water so it spreads into ribbons rather than blobs. Work in a cool room, since warm hands and warm surfaces soften the white chocolate and make grating messy. Chopping the nuts and fruit first means the grated chocolate can go straight onto the tray without waiting.
Ingredients at a glance (4)
- 8 oz white chocolate, in one block
- 1/2 cup whole almonds, roughly chopped
- 1/2 cup fresh raspberries
- 3 tbsp raspberry sauce or seedless raspberry jam, thinned
Instructions
Prepare the nuts and grated base
- Chop the nuts and fruitLine a rimmed rectangular baking tray with parchment paper. Chop the whole almonds into rough pieces with a large knife, and chop the raspberries into halves or quarters. Gather the nut pieces together on the board.Look for Almonds are in irregular pieces with some slivers, and raspberries are halved or quartered.Tip Chop the almonds on a dry board so the pieces stay crisp and do not turn oily.
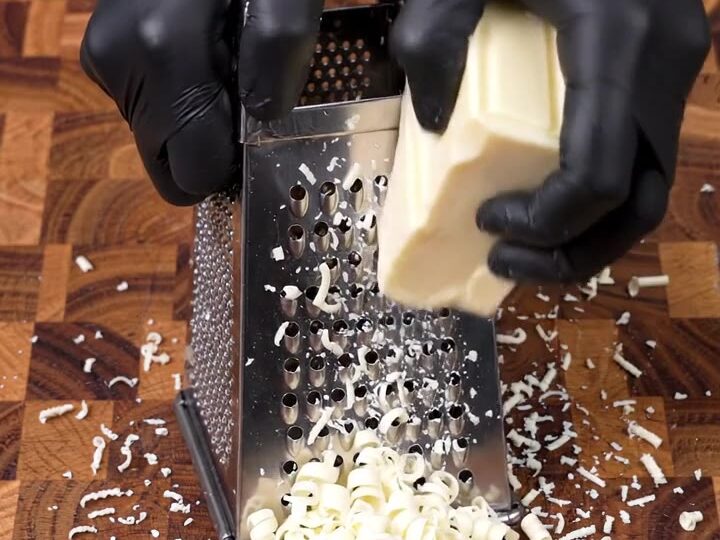
- Grate the white chocolateCut the block of white chocolate into pieces that fit your box grater. Grate the chocolate over the board or a sheet of parchment so the fine curls fall directly onto the paper.Look for Curled white chocolate shavings collect in a soft, even pile.Tip Keep the chocolate cool and grate it quickly so the curls do not soften and clump.
At the end of this phase, the almonds and raspberries should be chopped into even, irregular pieces, and the white chocolate should lie in a soft, fine pile of curls on the parchment. Look for shavings that are thin and separate, with no large chunks left over. Check that the nut pieces are not dusty or crumbly, which would mean they were chopped too finely, and that the raspberries are still whole halves or quarters so they keep their shape.
The chocolate should feel cool and firm to the touch rather than sticky. Before you move on, spread the shavings evenly into a smooth layer across the tray, pressing gently so there are no bare patches. The base should look even and pale, ready to take the sauce and fruit without any lumps or thin spots showing through.
Swirl, top and press in place
- Spread the chocolate baseScatter the grated white chocolate evenly over the parchment-lined tray. Spread it gently with your fingers or the back of a spoon until it forms a smooth, even layer edge to edge.Look for The chocolate covers the tray in a smooth, even, creamy layer with no bare patches.Tip Press lightly rather than pushing hard, so the surface stays smooth and not greasy.
- Add the raspberry swirlsSpoon the raspberry sauce across the chocolate in small drops. Swirl it through the surface with the tip of a knife to make red ribbons, taking care not to tear the base.Look for Bright red swirls run across the pale chocolate in loose, visible ribbons.Tip Use only a few drops at a time, since too much sauce can loosen the set bark.
- Top with fruit and almondsScatter the raspberry halves and the chopped almonds over the chocolate. Press them gently into the surface with your fingertips so they stay in place when the bark sets.Look for Raspberry pieces and almond bits sit evenly on the surface, partly pressed in.Tip Press with a light touch so the fruit does not break and bleed red juice into the chocolate.
At the end of this phase, the chocolate should show clear red ribbons from the raspberry sauce, with raspberry pieces and almond slivers scattered across the top and gently pressed into the surface. Check that the sauce has been drizzled in small amounts, so the white chocolate remains visible between the swirls rather than turning pink all over.
The fruit should sit in place without sliding, and the almonds should be firmly anchored. Confirm that the top is level, since uneven spots set into uneven pieces. Give the tray a gentle tap on the counter to settle everything, and then move it to a flat spot where it can rest undisturbed while the chocolate firms up completely.
Set the bark and cut it
- Set and cut the barkLeave the tray at cool room temperature, or in the refrigerator if your kitchen is warm, until the chocolate is completely firm. Then score the slab with a thin knife and cut it through into rectangular bars.Look for The surface feels firm and dry, and the chocolate snaps cleanly along the cut.Tip Wipe the knife between cuts for clean edges, and score deeper before cutting all the way through.
At the end of this phase, the chocolate should be fully firm, dry to the touch and no longer tacky or soft when pressed lightly with a fingertip. The surface should look glossy and smooth, with the red swirls and fruit held in place. Before cutting, check that the slab has released any residual warmth and that the chocolate snaps cleanly rather than bending. Score the slab with a thin knife to mark your rectangles, then cut through the layer in one or two firm passes. The cut edges should look crisp and clean, with the almonds and raspberries intact. If the chocolate chips or cracks in an uneven way, it may need a few more minutes to set.
Common mistakes
The most common mistake is melting the white chocolate with too much heat or leaving it too long in a warm kitchen, which can make it grainy or cause it to soften before it sets. Keep the chocolate cool and grate it just before spreading, and avoid handling it more than needed. Another frequent error is using too much raspberry sauce. A heavy hand makes the surface wet, slows the set, and can leave the bark tacky or streaked instead of cleanly marbled. Add the sauce in small drops and swirl lightly. Pressing the raspberries too hard can crush them and bleed color into the chocolate, so use a gentle touch. Finally, cutting too soon will crack the slab and tear the fruit.
How to tell it’s done
The bark is ready to cut when the white chocolate is completely set, dry to the touch and firm enough that a fingertip leaves no mark. The surface should look smooth and glossy, with the raspberry swirls and almonds held firmly in place. When you tap the edge of the slab, it should feel solid rather than soft or flexible.
A quick test is to score a line with a thin knife: a clean, crisp score means the layer is ready, while any smearing or bending means it needs more time. Because this bark is a no-bake candy with no protein, there is no internal cooking temperature to reach. Let it set at cool room temperature, or refrigerate it briefly if your kitchen runs warm, until it is fully firm before you cut the rectangular pieces.
Up next · Part 3 of 3
4 variations · storage & make-ahead · 5 answers · printable card
Tips, FAQ & printable recipe (Part 3)← Back to the ingredients (Part 1)