Desserts · Part 2 of 3: Instructions
Watermelon Sourdough Bread with Dark Chocolate Chip Seeds Step-by-step instructions
- Prep
- Cook
- Total
- Serves
- 12
Before you start
Before starting, measure all ingredients and have them at room temperature. Prepare the sourdough starter and ensure it is active and bubbly. If using a banneton, dust it generously with flour. Have a large mixing bowl, a rolling pin, and a sharp knife or lame ready.
Preheat the oven with the Dutch oven inside at least 30 minutes before baking. Clear enough counter space for kneading and rolling. Also, prepare a baking sheet lined with parchment for transferring the loaf.
Ingredients at a glance (10)
- 500 g all-purpose flour
- 280 ml water
- 80 g active sourdough starter
- 10 g salt
- red food coloring (gel or liquid), to taste
- 1/2 cup dark chocolate chips
- 100 g all-purpose flour
- 60 ml water
- 20 g active sourdough starter
- green food coloring (gel or liquid), to taste
Instructions
Phase 1: Build the Core
- Make the Red DoughIn a large bowl, combine 400 g of the flour, water, 80 g starter, and salt. Mix until a shaggy dough forms. Add red food coloring a few drops at a time, kneading until the dough is an intense crimson color. Knead for about 8-10 minutes until smooth and elastic. Fold in the dark chocolate chips evenly.Look for The dough is a deep red and springs back when poked.Tip Use gel food coloring for a more vivid hue without adding excess liquid.
- Shape the Red CoreShape the red dough into a taut cylinder, about 8 inches long. Cover and let rest while preparing the white layer.Look for The cylinder holds its shape and feels firm.Tip A tight shaping helps keep the watermelon shape after baking.
- Make the White RindRoll out a thin plain white dough sheet using the remaining 100 g of flour and a little water (about 50 ml) to make a pliable dough. Roll it into a rectangle large enough to wrap around the red cylinder completely.Look for The white sheet is thin and even, about 1/4 inch thick.Tip Keep the white layer thin so the red shows through when sliced.
- Wrap with White DoughWrap the white dough sheet around the red cylinder, pinching the seam to seal. Trim any excess. The white layer should be snug but not too tight.Look for The red core is fully covered with a smooth white layer.Tip Moisten the edge with water to help seal the seam.
At the end of this phase, you have a vibrant red dough studded with chocolate chips, shaped into a tight cylinder. The white dough is rolled into a thin sheet and wrapped around the red core. The assembly should be smooth and free of air pockets.
The red dough should be firm enough to hold its shape, but not stiff. The white layer should be even and fully encase the red, with the seam sealed. This is the foundation for the watermelon look.
Phase 2: Wrap and Proof
- Make the Green SkinIn a separate bowl, combine 100 g flour, 20 g starter, and enough water (about 60 ml) to form a smooth dough. Knead in green food coloring until the dough is a vibrant green. Roll it into a large thin sheet.Look for The green dough is pliable and evenly colored.Tip Add the green coloring gradually to achieve the desired shade.
- Wrap with Green DoughWrap the green sheet completely around the white layer, sealing the seam well. Place the loaf seam-side down in a banneton basket lined with a floured towel.Look for The loaf is fully encased in green dough, resembling a watermelon rind.Tip Make sure the green layer is even to avoid white patches after baking.
- Proof and ScoreCover the banneton and let proof at room temperature for about 4 hours, or until the dough has risen noticeably and feels airy. Carefully turn the loaf out onto a piece of parchment paper. Score curved watermelon stripes on the green surface using a sharp lame or knife.Look for The dough has puffed up and holds the scored marks.Tip Score deeply enough to cut through the green layer but not too deep into the white.
- BakePreheat the oven to 450°F (230°C) with a Dutch oven inside. Carefully transfer the loaf (on the parchment) into the hot Dutch oven. Cover and bake for 30 minutes. Remove the lid and bake for an additional 5 minutes to deepen the crust color.Look for The crust is deep green and sounds hollow when tapped.Tip Use oven mitts and be careful of steam when removing the lid.
The green dough is now wrapped around the white layer, creating a seamless outer skin. The loaf is placed in the banneton and proofed until it has risen noticeably, about 4 hours. The dough should feel airy and spring back when pressed. Scoring the stripes on the green surface reveals the white layer beneath, creating the characteristic watermelon pattern. The loaf is ready to bake, with the oven preheated and the Dutch oven hot.
Phase 3: Bake and Enjoy
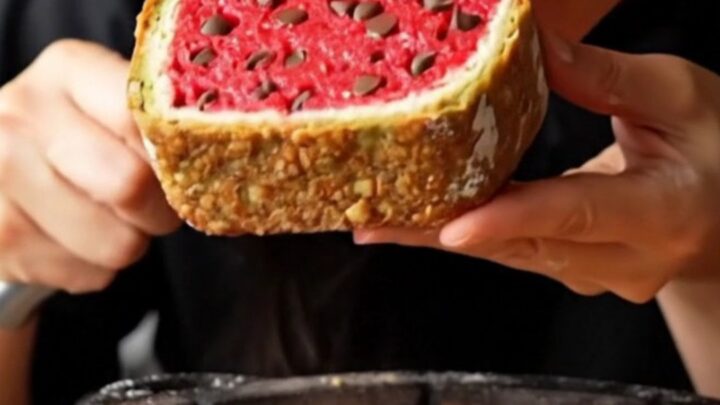
- Cool and SliceRemove the bread from the Dutch oven and let cool on a wire rack for at least 1 hour before slicing. Use a serrated bread knife to cut thick slices, revealing the crimson crumb with chocolate chips.Look for The loaf is cool to the touch and slices cleanly.Tip For the best texture, wait until completely cool—this sets the crumb.
After baking, the loaf emerges with a deep green crust and a hollow sound when tapped. It cools on a wire rack, filling the kitchen with a warm, sourdough aroma. Slicing reveals a brilliant crimson crumb with dark chocolate chips, framed by white and green rinds. The texture is crusty on the outside and tender inside. Each slice is a visual and culinary delight, perfect for sharing.
Common mistakes
One common mistake is adding too much food coloring, which can make the dough bitter or stain hands. Use a small amount and adjust. Another is over-proofing the dough, which can cause it to collapse during baking. Keep an eye on the proofing time and the dough's rise.
Also, ensure the layers are sealed well; otherwise, they may separate during baking. If the green layer is too thick, it may not bake through properly, so roll it thin. Finally, do not skip the cooling step—slicing warm bread can crush the crumb.
How to tell it’s done
The bread is done when the crust is deep green and firm to the touch, and the internal temperature reaches about 200°F (93°C) for a fully baked crumb. When tapped on the bottom, the loaf sounds hollow.
If using a thermometer, insert it through the bottom crust to check. The bread should feel light for its size. Let it cool completely on a wire rack before slicing to allow the crumb to set; slicing too early can result in a gummy texture.
Up next · Part 3 of 3
4 variations · storage & make-ahead · 5 answers · printable card
Tips, FAQ & printable recipe (Part 3)← Back to the ingredients (Part 1)