Desserts · Part 2 of 3: Instructions
Walnut Toffee Dark Chocolate Bark in One Easy Batch Step-by-step instructions
- Prep
- Cook
- Total
- Serves
- 12
Before you start
Gather all the ingredients and equipment before you start, since the chocolate needs to be spread while it is still soft. Line a metal baking sheet with parchment paper, leaving a little overhang on the edges so you can lift the finished bark out later. Set a heatproof bowl over a pan of barely simmering water, and make sure the bowl does not touch the water.
Place a clean wooden cutting board where you can chop the walnuts and toffee comfortably. Have a box grater, a large chef's knife, a spatula and a sharp knife ready. Measure the walnuts and toffee bits and set them aside in separate piles, and keep the flaky sea salt within reach so you can add it while the chocolate is still soft.
Ingredients at a glance (4)
- 1 cup whole walnuts, roughly chopped
- 8 oz dark chocolate block, for grating and melting
- 1/2 cup golden toffee bits (maple walnut toffee or butter crunch toffee), chopped
- Flaky sea salt, to taste
Instructions
Chop and grate components
- Chop the walnutsPlace the walnuts on a wooden cutting board and chop them roughly with a large chef's knife into a rough pile of coarse pieces. Keep some larger chunks and some smaller bits for texture.Look for Walnuts form a rough pile of coarse pieces with some small bits mixed in.Tip Work in small batches so the nuts stay in pieces rather than turning to dust.
- Add toffee and saltScatter the golden toffee bits and a few flakes of flaky sea salt over the chopped walnuts on the board. Mix them in gently with the knife so the pieces are spread evenly.Look for Golden toffee bits and salt flakes are spread through the walnut pile.Tip Chop the toffee first if the pieces are large, so they distribute evenly.
At the end of this phase, the walnuts should form a rough pile of coarse pieces with a mix of larger chunks and small bits. The toffee should be scattered through them in small golden pieces, with a few flakes of flaky sea salt visible. The dark chocolate should be grated into fine curls and shavings, falling onto the board or bowl.
Nothing should look like dust or large unbroken chunks. Check that the chocolate is soft and easy to melt, and that the walnut and toffee mixture is spread evenly across the board before you move on to melting and spreading the chocolate.
Melt and spread chocolate
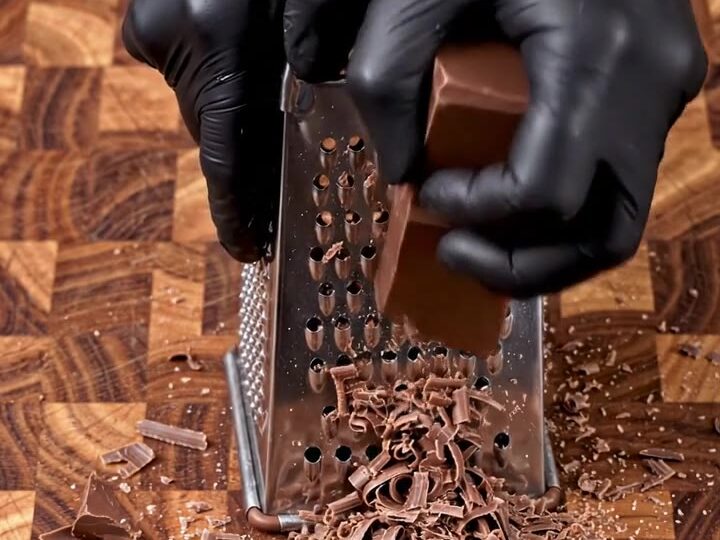
- Grate the dark chocolateHold the dark chocolate block against a box grater and grate it over the board or a bowl. Let the fine curls and shavings collect, then melt them gently in a heatproof bowl over barely simmering water until smooth.Look for Chocolate is fully melted, smooth and glossy with no lumps.Tip Keep the water below a simmer and make sure no steam or drops reach the chocolate.
- Spread the chocolateLine a metal baking sheet with parchment paper. Pour the melted dark chocolate onto the sheet and spread it into an even layer, about one-quarter inch thick, with an offset spatula.Look for The chocolate covers the sheet in an even, smooth layer.Tip Tap the sheet on the counter to release air bubbles and level the surface.
- Scatter the walnut mixWhile the chocolate is still soft, scatter the walnut, toffee and salt mixture evenly over the surface. Press the pieces lightly into the chocolate so they stay in place.Look for The chocolate is still soft enough to hold the pressed pieces.Tip Add the mix quickly before the chocolate starts to firm up.
At the end of this phase, the grated dark chocolate should be fully melted into a smooth, glossy liquid with no lumps or streaks. It should spread easily across the parchment-lined sheet into an even layer about one-quarter inch thick, with no thin bare spots. Tap the sheet gently on the counter to release any trapped air bubbles. The chocolate should still feel soft at the surface when you press a finger gently against the edge. Check that it has not started to thicken or set before you add the walnut and toffee topping.
Top and set the bark
- Let the bark setLeave the tray at cool room temperature until the chocolate is firm and glossy. You can refrigerate it briefly to speed the setting, then keep it cool until serving.Look for The surface looks glossy and feels firm when lightly touched.Tip Avoid the freezer, which can cause condensation and dull the surface.
- Break the barkLift the set bark from the sheet using the parchment. Cut it into long rectangular pieces with a sharp knife, or break it into irregular shards, then serve.Look for Pieces break cleanly and show the walnuts and toffee bits in the slab.Tip Warm the knife slightly under hot water and dry it before each cut for clean edges.
At the end of this phase, the walnut, toffee and salt mixture should be evenly distributed over the chocolate and lightly pressed into the surface, so the pieces stay in place. The bark should look glossy and feel firm when touched lightly on the top. The tray should be left at cool room temperature until the chocolate is completely set and no longer tacky. Check that no pieces have slipped off the edges and that the surface looks smooth and shiny before lifting the slab from the sheet and cutting it into long pieces.
Common mistakes
The most common mistake is adding the walnuts and toffee after the chocolate has already firmed up, which leaves the toppings sitting loosely on the surface and falling off when the bark is cut. Work quickly once the chocolate is spread, and keep the chocolate warm enough to stay soft while you scatter the mix. Another frequent problem is overheating the chocolate.
Melting it over water that is too hot or letting steam touch the bowl can cause it to seize and turn dull. Keep the water at a gentle simmer and stir the chocolate until smooth. Grating the chocolate into large chunks also slows melting and can lead to uneven texture, so grate the block into fine curls. Finally, avoid chopping the walnuts too finely, since dust-sized pieces disappear into the chocolate instead of giving the bark its crunch.
How to tell it’s done
The bark is done when the chocolate has set completely firm, glossy and no longer tacky to a light touch. The surface should not show any soft spots, and the walnuts and toffee should stay attached when the slab is lifted. When the slab is cut with a sharp knife, it should break or slice cleanly, showing a solid chocolate layer under the toppings.
Because the bark is made with chocolate, walnuts, toffee and salt and contains no eggs, poultry or meat, there is no internal cooking temperature to reach. The chocolate is ready when it looks shiny, feels firm, and snaps cleanly when broken into pieces.
Up next · Part 3 of 3
4 variations · storage & make-ahead · 5 answers · printable card
Tips, FAQ & printable recipe (Part 3)← Back to the ingredients (Part 1)