Dinner · Part 2 of 3: Instructions
Waffle Iron Quesadilla with Crispy Golden Pockets Step-by-step instructions
- Prep
- Cook
- Total
- Serves
- 2
Before you start
Take the shredded chipotle chicken out of the refrigerator and warm it gently in a small pan or a few seconds in the microwave so it spreads in soft strands rather than clumps; pat it dry so no liquid reaches the tortilla. Crumble the cooked bacon into small, even bits and dice the scallions thinly.
Shred the cheddar if it is not already shredded, and soften the butter so it brushes onto the hot grids without tearing. Set the waffle iron on the counter with room above the lid, plug it in, and have a spatula, a cutting board and the serving plates ready. Two quesadillas press one after the other, so the second stack should be built while the first cooks.
Ingredients at a glance (9)
- 4 8-inch flour tortillas (2 per quesadilla)
- 1 cup shredded sharp cheddar, divided
- 3 oz shredded chipotle chicken, store-bought or made ahead, divided
- 2 tbsp crumbled cooked bacon, divided
- 1 tbsp diced scallions, divided
- 1 tbsp unsalted butter, softened, for the waffle iron
- 1/2 cup chunky guacamole, for serving
- 1/4 cup sour cream, for serving
- 1/4 cup hot salsa, for serving
Instructions
Build the stacks
- Prep the fillingsWarm the shredded chipotle chicken briefly so it spreads easily, and make sure the bacon is crumbled into small, even bits. Dice the scallions thinly, white and green parts together. Small pieces matter here: anything too large will stop the tortillas from sealing and the pockets from filling with cheese.Look for The chicken should be pliable and the bacon in bits no bigger than a pea.Tip Pat the chicken dry with a paper towel; wet filling steams the tortilla instead of crisping it.
- Build the cheese baseLay one flour tortilla on the cutting board and scatter half the shredded cheddar evenly across it, edge to edge. The cheese layer acts as glue: when it melts in the waffle iron, it welds both tortillas together and fills every grid indentation with crisp, lacy, golden cheese.Look for An even, edge-to-edge blanket of cheese with no bare tortilla showing.Tip Shred the cheddar yourself if possible; pre-shredded bags carry anti-caking starch that melts less smoothly.
- Stack and cap the quesadillaSpoon the chicken over the cheese, then scatter the bacon and scallions on top, keeping everything within an inch of the edge so nothing squeezes out under pressure. Lay a second tortilla over the filling and press down gently with your palm to settle it into place before it meets the iron.Look for The top tortilla sits flat with no filling peeking out at the rim.Tip Build the second quesadilla while the first presses, so both come off the iron hot.
At the end of this phase, two sealed quesadilla stacks sit on the board, each looking like a plain, flat double tortilla with nothing visible at the edges. Press a palm on the top of each one; it should feel compact and even, with a faint give of filling underneath but no loose pieces sliding.
Check the rims carefully: any cheese or bacon within half an inch of the edge will escape under the press and burn on the grids. If something peeks out, push it back toward the center before the stacks meet the iron.
Press until golden
- Heat and butter the ironClose a Belgian waffle iron set to 400°F (200°C) and let it come fully to temperature, about 5 minutes. Brush both grids lightly with softened butter. The butter bubbles and fries the tortilla surface on contact, which is what gives the waffle pattern its deep, crackling golden crust.Look for A drop of water flicked on the grid should skitter and evaporate instantly.Tip A pastry brush reaches the deep grid corners a folded paper towel misses.
- Press for 3 1/2 minutesSet the stacked quesadilla in the center of the iron, close the lid gently, and press for 3 minutes 30 seconds, until the chicken is heated through to 165°F (74°C) at the center. The lid will resist at first as the cheese melts and the stack compresses; do not force it. Steam escapes at the hinge in the first minute, then the sizzle deepens and steadies.Look for A steady, low sizzle with no loud spitting from the hinge.Safe temperature 165°F (74°C) internal temperature (poultry)Tip Resist lifting the lid early; every peek releases the steam that keeps the centers tender.
- Check and releaseOpen the iron and look underneath: the tortilla should show deep, dark golden indentations with crisp cheese lace in every pocket. If it is pale, close and give it another 30 seconds. Slide a spatula under the whole disc and lift it onto the cutting board, then repeat with the second quesadilla.Look for Deep brown-gold grid marks, crisp at the edges, cheese melted through the middle.Tip Let the iron reheat 1 minute between quesadillas so the second crusts as hard as the first.
Each quesadilla should now be a firm, ridged disc with deep brown-gold waffle marks on both faces and crisp cheese lace visible in every pocket. The edges sound dry and crackly when tapped with a spatula, and the kitchen smells of browned butter, toasted tortilla and melted cheddar. Lift one with the spatula: it should feel rigid, not floppy. If the color is only pale gold, return it to the iron for another thirty seconds before moving on, and give the second one the full press from a fully reheated grid.
Cut and dress
- Cut into trianglesLet the quesadilla sit for one minute so the melted cheese sets slightly and stops flowing, then cut it into wedges with a sharp knife or a pizza cutter. The grid pattern gives natural cutting lines; slicing along the waffle ridges keeps every pocket intact and every edge shatteringly crisp.Look for Clean cuts through crisp pockets, cheese glossy but no longer streaming.Tip A pizza cutter rolls over the crunchy crust without crushing the pockets flat.
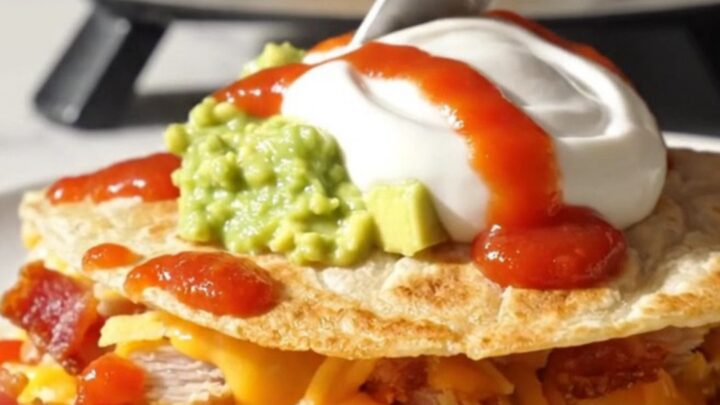
- Top and serve hotArrange the triangles on warm plates and spoon chunky guacamole over the top, followed by dollops of sour cream and a generous spoonful of hot salsa. Serve immediately, while the crust still crackles, with extra salsa at the table for anyone who wants more heat.Look for Crust audibly crisp, toppings spooned on just before the plates reach the table.Tip Serve toppings on the side if the meal will wait; they soften the crust as they sit.
The finished triangles should hold their shape with crisp, upright pockets, cheese set to a glossy pull rather than a flowing stream, and the chicken steaming hot in every bite. The toppings go on at the very last moment: guacamole piled bright green, sour cream in cool dollops, salsa spooned over with its juices. Check one triangle before plating: the crust should still crackle under the knife. If the plates will wait more than a couple of minutes, hold the toppings back and dress at the table instead.
Common mistakes
The most common failure is overfilling. Once the filling reaches past an inch of the rim, the lid cannot seal and cheese runs out onto the grids, where it burns. The second mistake is underheating the iron: a grid that is not fully hot steams the tortilla instead of frying it, and the crust turns leathery.
Lifting the lid early releases steam and softens the crust, so trust the timer. Finally, do not skip the butter; a dry grid gives color but none of the crackling, glassy crispness that makes this version worth the hack.
How to tell it’s done
The quesadilla is done when the underside shows deep, dark golden indentations and the cheese in the pockets has fried into crisp, browned lace. The crust should feel firm and crackle when tapped with a spatula, never bend. Cut one triangle and look at the center: the cheese should be fully melted and glossy, and the chicken heated through to 165°F (74°C) with no cool spots.
If the color is pale gold and the middle still bends, close the iron for another thirty seconds. Because the chicken is already cooked and the bacon crisp, the main tests are color and melt, and both are visible the moment the lid opens.
- Poultry: 165°F (74°C) in the thickest part
Up next · Part 3 of 3
4 variations · storage & make-ahead · 5 answers · printable card
Tips, FAQ & printable recipe (Part 3)← Back to the ingredients (Part 1)