Desserts · Part 2 of 3: Instructions
Wacky Chocolate Cake in One Dish, No Eggs or Butter Needed Step-by-step instructions
- Prep
- Cook
- Total
- Serves
- 9
Before you start
Take the butter for the frosting out of the refrigerator first — it needs the full hour the cake bakes and cools to reach a properly soft, spreadable state. Measure every ingredient before starting, since the batter comes together in under two minutes once the water goes in.
Check that the baking soda is fresh: it is the only leavener in the cake, and a dead box means a flat, dense crumb. Set the oven rack in the center position, grease the 8-inch square dish, and have a wire rack ready for the hot pan. A fork for stirring, a whisk for the dry mix, a spatula for spreading and an electric hand mixer for the frosting round out the toolkit.
Ingredients at a glance (13)
- 1 1/2 cups all-purpose flour
- 1 cup granulated sugar
- 3 tbsp unsweetened cocoa powder
- 1 tsp baking soda
- 1/2 tsp kosher salt
- 1 cup water
- 1/3 cup vegetable oil
- 1 tbsp white vinegar
- 1 tsp vanilla extract
- 1/2 cup unsalted butter, softened
- 3 cups confectioners' sugar
- 2-3 tbsp whole milk
- 1 tsp vanilla extract
Instructions
Mix the batter in the dish
- Heat the oven and prep the dishSet a rack in the center of the oven and heat it to 350°F (175°C). Lightly grease the bottom and sides of an 8-inch square glass baking dish, or line it with a parchment strip that overhangs two sides for easy lifting. Gather the dry ingredients within reach.Look for The oven reads 350°F (175°C) and the dish gleams with a thin, even film of grease.Tip Glass browns the edges a touch faster than metal, so check doneness a few minutes early.
- Whisk the dry ingredients in the dishAdd the flour, sugar, cocoa powder, baking soda and salt directly to the baking dish. Whisk in place until the cocoa lumps disappear and the mixture looks uniformly dark brown, about 30 seconds. Run the whisk through the corners — baking soda hiding there means a bitter pocket later.Look for No pale flour streaks or dark cocoa clumps remain; the powder is one even color.Tip Sift clumpy cocoa through a fine-mesh strainer — dry cocoa loves to ball up in the box.
- Make wells and add the wet trioWith the back of a spoon, press three shallow wells into the dry mixture: one larger well in the center and two smaller ones on either side. Pour the oil into the center well, the vinegar into one small well, and the vanilla into the other, keeping them separate.Look for Each liquid sits in its own pocket without spilling into the neighbors.Tip The wells need only be deep enough that the liquids stay put until the water arrives.
- Pour in the water and stirPour the cup of water straight over the wells and the dry mix. Stir with a fork, scraping the bottom and corners, until the batter turns smooth, glossy and pourable with no dry streaks, about 1 to 2 minutes. A few tiny lumps are fine; overmixing is not needed.Look for The batter flows off the fork in a dark ribbon with no hidden flour at the bottom.Tip A fork is genuinely enough — that is the whole point of mixing in the pan.
At the end of this phase the batter should look smooth, glossy and uniformly dark chocolate, flowing slowly off the fork like warm fudge, with no flour streaks at the bottom corners when scraped.
The aroma at this stage is faintly vinegary — that is correct, and it vanishes completely in the oven. Check that the three liquids were fully incorporated and that the top of the batter is reasonably level before the dish goes into the oven; a lopsided surface bakes into a lopsided cake.
Bake and cool
- Smooth and bake the cakeTilt the dish gently so the batter settles level, then smooth the top with the spatula. Bake on the center rack at 350°F (175°C) for 30 to 35 minutes, rotating once halfway if the oven runs uneven. A toothpick in the center should come out with only moist crumbs.Look for A deep chocolate aroma fills the kitchen and the edges pull slightly from the glass.Tip Resist opening the oven before the 25-minute mark; an early draft can deflate the center.
- Cool the cake completelyMove the dish to a wire rack and let the cake cool for at least 1 hour, until fully cool at the center. Frosting a warm cake melts buttercream into a slick film, so patience here protects the billowy white top. Once cool, it can be frosted or chilled for later.Look for The bottom of the dish feels cool against a palm and the surface gives off no warmth.Tip Speed things up: 30 minutes on the rack, then 30 minutes in the refrigerator.
The baked cake should smell deeply of chocolate, sit evenly domed, and pull just barely from the sides of the dish. A toothpick in the center should come out with moist crumbs only. Press the top gently — it should spring back rather than sink. Then comes the hard part: the full hour of cooling. The cake must be cool to the touch at the center, not just at the edges, before any frosting touches it, or the topping will melt on contact.
Frost and serve
- Beat the butterPlace the softened butter in a medium bowl and beat with an electric hand mixer on medium speed for 1 to 2 minutes, until pale, smooth and slightly fluffy. Butter straight from the fridge shreds the sugar instead of blending with it, so it should dent easily when pressed first.Look for The butter turns lighter in color, with a spreadable, almost whipped texture.Tip No mixer? Cream the softened butter vigorously with a sturdy fork instead.
- Build the vanilla frostingAdd the confectioners' sugar 1 cup at a time, mixing on low so it does not cloud the kitchen, then pour in 2 tablespoons of the milk and the vanilla. Beat on medium for 2 to 3 minutes, adding the last tablespoon of milk only if the frosting seems stiff.Look for The frosting looks glossy and billowy, holding a ridge when a spatula lifts it.Tip If it goes loose, beat in another 1/4 cup of confectioners' sugar to thicken it.
- Frost, swirl and serveScoop the frosting onto the cooled cake and spread it edge to edge with the spatula, leaving gentle swirls and ridges on top. Cut into 9 squares with a sharp knife, wiping the blade between cuts, and serve at room temperature so the crumb is at its most tender.Look for An even white layer with visible peaks covers every corner, and the fork glides through.Tip Dip the spatula in hot water and wipe dry between passes for the smoothest swoops.
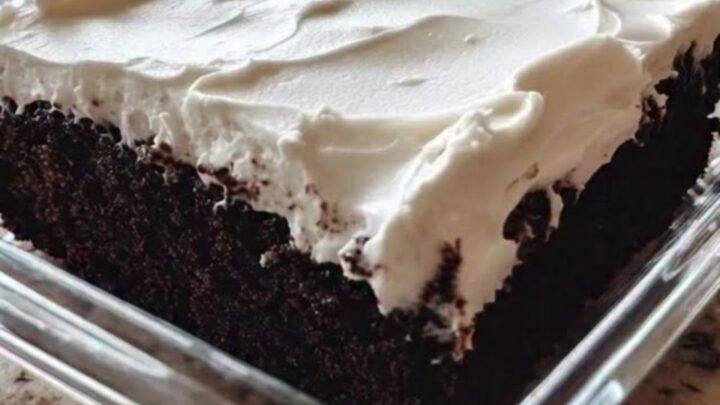
The frosting should look white, glossy and billowy, holding soft peaks and ridges where the spatula passes, and spreading without lifting crumbs from the cake surface. If it drags and tears the top, beat in another tablespoon of milk; if it slides, beat in more confectioners' sugar. The final test is the fork: it should glide through the white layer into a deep, moist chocolate crumb that holds its shape on the plate. Serve at room temperature for the tenderest bite.
Common mistakes
The most common slip is frosting a warm cake: even a faint warmth under the surface turns buttercream into a translucent, sliding film, so give the full cooling hour. Overmeasuring flour is the second — spoon and level rather than scooping, or the crumb turns dry and heavy. Skipping the thorough whisk of the dry ingredients leaves bitter pockets of baking soda and cocoa in the corners.
Adding all the milk to the frosting at once is another trap; add it gradually and stop as soon as the frosting turns billowy, because a spoonful too much makes it slide off the knife. Finally, do not overbake in search of a firm top — moist crumbs on the toothpick mean done.
How to tell it’s done
The finished cake is done when the top springs back slowly from a gentle press and a toothpick inserted in the center emerges with a few moist crumbs but no wet batter — if streaks of raw batter cling, give it 5 more minutes and test again.
The edges will have pulled just slightly from the sides of the glass, and the surface should look evenly domed and deeply brown. There is no raw protein in this recipe, so no internal temperature check is required; the toothpick test is the reliable judge. The frosting is done when it holds soft ridges off the beater and spreads without tearing the cake surface.
Up next · Part 3 of 3
4 variations · storage & make-ahead · 5 answers · printable card
Tips, FAQ & printable recipe (Part 3)← Back to the ingredients (Part 1)