Breakfast · Part 2 of 3: Instructions
Two-Tone Chocolate Croissant Buns with Mirror Shine Step-by-step instructions
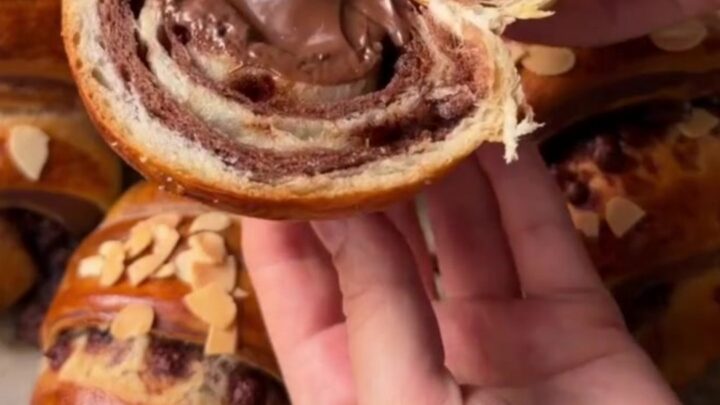
- Prep
- Cook
- Total
- Serves
- 12
Before you start
Before starting, measure all ingredients and bring them to room temperature if possible. Warm the milk and water to about 110°F (43°C) — warm to the touch but not hot. Dissolve the yeast in the warm liquid with the sugar and let it sit for 5 minutes until frothy.
This ensures the yeast is active. Prepare a clean work surface and have a rolling pin, pizza cutter, and parchment-lined baking sheet ready. Clear enough space in the refrigerator in case the dough needs to chill during shaping.
Ingredients at a glance (10)
- 1 cup warm milk
- 1 cup warm water
- 1/2 cup vegetable oil
- 2 1/4 tsp active dry yeast (one packet)
- 3 tbsp granulated sugar
- 4 cups all-purpose flour, plus more for dusting
- 3 tbsp Dutch cocoa powder
- 2 tbsp milk
- 1/4 cup unsalted butter, melted
- 1/4 cup simple sugar syrup
Instructions
Dough and Cocoa
- Make the DoughIn a large bowl, whisk together the warm milk, warm water, oil, yeast, and sugar. Let sit for 5 minutes until foamy. Gradually add the flour, stirring with a wooden spoon until a soft dough forms. Turn the dough onto a lightly floured surface and knead for 6–8 minutes until smooth and elastic. Place the dough in a lightly oiled bowl, cover with a towel, and let rise in a warm spot for 1 hour, or until doubled in size.Look for The dough should be soft, slightly sticky, and spring back when pressed.Tip If the dough is too sticky, add flour one tablespoon at a time until it comes together.
- Add the CocoaAfter the dough has risen, punch it down and divide it into two portions: one third for the cocoa dough and two thirds for the plain dough. In a small bowl, mix the cocoa powder with the 2 tablespoons of milk to form a paste. Knead the cocoa paste into the smaller portion of dough until the color is uniform and the dough is smooth. Keep both doughs covered while working.Look for The cocoa dough should be a deep, even brown with no white streaks.Tip If the cocoa paste is too thick, add a few drops of milk to loosen it.
After the first rise, the dough should be doubled in size and spring back when gently poked. The cocoa dough should be a uniform deep brown, smooth, and pliable. If the cocoa paste is too stiff, add a few drops of milk to loosen it. The two doughs should be soft and easy to handle, not sticky or dry. Cover them with a towel to prevent a skin from forming while you work.
Layering and Shaping
- Layer and RollOn a lightly floured surface, roll out the plain dough into a large rectangle about 1/4 inch thick. Roll the cocoa dough into a similar rectangle, slightly smaller. Place the cocoa rectangle on top of the plain dough and gently press together. Using a rolling pin, roll the stacked dough into a single large rectangle, about 1/4 inch thick. The two layers should adhere without air pockets.Look for The rectangle should be even, with the cocoa layer fully covering the plain layer.Tip Dust the surface lightly with flour to prevent sticking, but brush off excess before rolling.
- Cut TrianglesUsing a pizza cutter or a sharp knife, slice the stacked dough into long, slender triangles. Each triangle should be about 4 inches wide at the base and taper to a point. Work quickly to keep the dough from warming too much. If the dough becomes too soft, chill it in the refrigerator for 10 minutes before cutting.Look for You should have 12 even triangles with clean edges.Tip A pizza cutter makes the cleanest cuts without dragging the dough.
- Shape the CroissantsStarting from the wide base of each triangle, roll the dough up toward the pointy tip, keeping the roll tight and even. Slightly curve the ends to form a crescent shape. Place the shaped buns on a baking sheet lined with parchment paper, leaving about 2 inches between each. Cover with a clean towel and let proof for 30 minutes, or until puffy and nearly doubled.Look for The buns should look plump and slightly springy when gently pressed.Tip Don't overproof; the buns should hold their shape when touched.
The stacked dough should be a single rectangle with no air pockets. When cutting triangles, they should be even and clean. Rolling each triangle from the base to the tip should create a tight, neat spiral.
The shaped buns should be uniform in size and placed with enough space to expand. After proofing, they should look puffy and almost doubled, and hold a slight indentation when pressed.
Baking and Glazing
- Brush with ButterBrush the proofed buns generously with the melted butter. Make sure to coat the tops and the sides evenly, as this will help them brown and develop a rich, buttery flavor. If the butter has solidified, reheat it gently until liquid again.Look for The buns should look glossy and well-coated with butter.Tip Use a pastry brush for even coverage; don't let the butter pool in the pan.
- BakePreheat the oven to 360°F (182°C). Bake the buns for 22 minutes, or until they are puffed and golden brown. The internal temperature of the dough should reach at least 190°F (88°C) to ensure the center is fully baked. If the tops brown too quickly, tent loosely with foil for the last 5 minutes.Look for The buns should be deep golden, sound hollow when tapped, and feel firm to the touch.Safe temperature 160°F (71°C) internal temperature (egg dishes)Tip Bake on the middle rack for even heat distribution.
- Glaze and CoolRemove the buns from the oven and immediately brush them with the simple sugar syrup. The syrup will give them a mirror-like shine. Let the buns cool on the baking sheet for 5 minutes, then transfer to a wire rack to cool completely. The buns are best served warm, but they can also be enjoyed at room temperature.Look for The buns should be glossy and shiny, with the syrup soaking into the crust.Tip Brush the syrup generously while the buns are still hot for maximum shine.
The buns should be puffed, golden brown, and glossy from the butter. When tapped, they should sound hollow. The sugar syrup should be brushed on immediately after baking to create a shiny, mirror-like finish. The buns should be firm but spring back when touched. Let them cool for a few minutes before serving, but the shine is best when they are still slightly warm.
Common mistakes
One common mistake is overworking the dough, which can make it tough. Knead just until smooth and elastic. Another issue is rolling the dough too thick or too thin; aim for an even 1/4-inch thickness.
If the dough sticks to the surface, dust with flour but don't overdo it, as too much flour can dry out the dough. When cutting triangles, use a sharp cutter to avoid dragging the layers. Finally, don't skip the proofing step after shaping; this ensures a light, airy texture.
How to tell it’s done
The buns are done when they are puffed, golden brown, and sound hollow when tapped on the bottom. The internal temperature should read at least 190°F (88°C) in the center to ensure the dough is fully baked.
If you have a thermometer, insert it into the thickest part of a bun; it should not look doughy or wet. The tops should be firm to the touch and the syrup should have created a glossy sheen. Let them cool slightly before serving, but they are best enjoyed warm.
- Egg dishes: 160°F (71°C) in the thickest part
Up next · Part 3 of 3
4 variations · storage & make-ahead · 5 answers · printable card
Tips, FAQ & printable recipe (Part 3)← Back to the ingredients (Part 1)